Chai Cupcakes with Cinnamon-Honey Frosting
For recipe,
Chai Cupcakes with Cinnamon-Honey Swiss Meringue Buttercream:
Yields: an 8-inch triple-layer cake (serves 12 - 16) OR use cupcake pans instead
Original recipe from Sky High: Irresistible Triple-Layer Cakes via Une-Deux-Senses
For the cupcakes:
1 1/3 cup milk
6 chai tea bags (I used Good Earth Tea, Sweet & Spicy - Erin)
4 whole eggs
2 egg yolk
2 tsp. vanilla extract
2 3/4 cup cake flour
2 cup sugar
4 1/2 tsp. baking powder
3/4 tsp. cinnamon
1/2 tsp. cardamom
1/2 tsp. salt
8 oz. (2 sticks) unsalted butter, room temperature
For the frosting:
2 egg whites
1/4 cup sugar
1 1/2 sticks of butter (12 tbsn.), room temperature
6 tbsn. honey
1/4 tsp. cinnamon
1. Preheat to 350 F. Line with cupcake liners, set aside.
2. In saucepan, bring the milk to a simmer over medium heat. Add the tea bags. Remove from the heat and allow to steep for 5 minutes. Remove the bags and squeeze out the remaining milk. Let the milk cool completely.
3. In a medium bowl, combine the eggs, yolks, vanilla and 1/3 cup of the chai milk.
4. In the bowl of a mixer sift together the flour, sugar, baking powder, cinnamon, cardamom, and salt. Beat on low for about 30 seconds, then add the butter and remaining chai milk.
5. Mix on medium low speed until light and fluffy.
6. Next, add the egg mixture in three additions, making sure to scrape the bowl well after each.
7. Divide the batter among the cupcake tins, about 2/3 full, and bake for 15 - 20 minutes or until an inserted toothpick comes out clean. Allow the cupcakes to cool completely.
8. For the frosting, add the egg whites and sugar into the bowl of a stand mixer. Place over a pot of simmering water and whisk until egg whites are warm and sugar is melted.
9. Place the bowl back into the machine and beat until soft peaks form.
10. Add the butter, one tablespoon at a time until well incorporated. Let mix on medium-high for another 6 - 8 minutes until smooth and creamy.
11. Add the honey and cinnamon until well combined. Frost and enjoy!
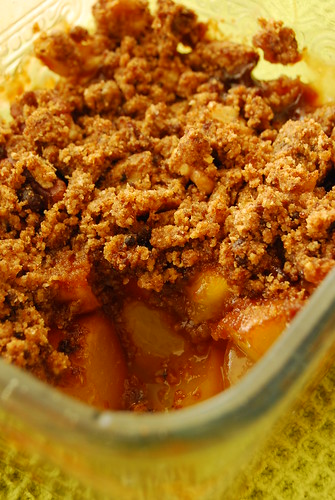
Breakfast #28: Nectarine Crumble
Truth be told, the only thing that makes this crumble breakfast is the fact that I had it for breakfast. When it comes to breakfast, I see no reason why we need to limit ourselves to what is traditionally considered to be breakfast food. What is one country’s dessert, or another country’s lunch (Filipino breakfasts have rice and meat and egg and condiments!), may be your country’s breakfast. So why even bother with the boundaries of cold cereal when breakfast can one glorious place that needs no plane or visa to get to?
Not that I have anything against cold cereal. I actually do love it (I’m serious), especially with nuts and fruits, drowning in straight-from-the-fridge milk. But if we just open our breakfast plates to other than just the usual suspects, perhaps more of us would be eating this very important meal.
This is something I threw together because I had two nectarines sitting around, on the verge of neglect, though still hopeful and tarty. I have written the recipe below with four nectarines because I ended up using only half the crumble topping for my two. You can make the full recipe below for breakfast (or dessert) for four, or do what I did: Use two nectarines and half the crumble topping...keeping the other half in the fridge for breakfast or dessert the next day, using either nectarines again or any other fruit (or mixture of fruits) you deem crumble-worthy. We had apple crumble for the next day’s dessert (I used only one apple) with the other half of the topping, wherein I substituted the vanilla below for a nice dusting of cinnamon.
Nectarine Crumble
- 4 nectarines
- A few drops of lemon juice
- A few drops of vanilla extract
- 1-2 tablespoons white sugar (depending how sweet/tart your nectarines are)
- Scant teaspoon all purpose flour
- 50 grams butter, chilled
- 100 grams dark muscovado sugar
- 75 grams whole wheat pastry flour
- 2-3 heaping tablespoons chopped walnuts or pecans (I used a combination)
- Seed and chop nectarines into chunks. Place them in a bowl with a sprinkling of lemon juice (I used less than half a lemon), a few drops of vanilla extract, the white sugar, and the teaspoon of all purpose flour, and toss to combine. Set aside and get on with the crumble topping.
- Combine butter, muscovado sugar, whole wheat pastry flour, and nuts in another bowl and rub dry ingredients into the flour with your fingers until the whole thing resembles coarse crumbs. You can use a pastry cutter but really, why bother with something more to wash in the morning?
- Place prepared nectarines in an oven-proof dish that will accommodate all of it leaving some room on top for the crumble. Alternately, you can also divide the fruit into individual dishes.
- Crumble topping over the fruit.
- Place your crumble dish (or dishes) on a baking sheet (to catch messy drips and make things easier if you are dealing with multiple dishes) and bake in a 180C/350F oven for 45 minutes to 1 hour, until filling is bubbling.
- Serve with yogurt or cream.
- Serves 3-4.
I brought out my whole wheat pastry flour to use in the topping, for which I bought a sack for this cake, and I must say here that although C was not too happy with the cake (though I liked it), he loved the crumble! I think the delicate touch of earthiness in the flour, echoed in the dark muscovado, and complemented by the nuts, provides a perfect rustic, comfy blanket for the sticky-sweet warm fruit! I imagine it also makes it a touch healthier than using white flour and sugar. A splodge of cream or yogurt will not go unappreciated. A scoop of vanilla ice cream if your feeling indulgent. Dairy comes in all forms my friends ;)
I made this one morning when I woke up earlier than usual and the sun was shining and everything looked fresh and promising (it rained later that day, but what better weather in which to eat warm crumble leftovers right?). It doesn’t take much time to whip this up, though you can also prepare the crumble mixture the night before and just top your fruit with it the next morning. Preparing the fruit is not something I recommend doing ahead of time though as they will brown and look generally down-trodden if you leave them for long.
I have just come back from another weekend escape, this time just a drive away, and I hope to share some photos here soon. Until then, happy breakfast everyone! :)
The Umbrellas of Santa barbara
Animal Cutters
Also, on the cute cookie cutter front, Ikea has introduced these adorable pastry cutters. For $4, you get six cutters, including one of a hedgehog! Order online here or find a store near you by clicking here.
Cakes I Want to Date: Ktinka's Chocolate Cake
I have a thing for nearly anything animal related (yes, it's a sickness), so it's not surprising that I instantly fell head or heels in love with this cake!!! I love the look of stencils on baked goods and this is one of the best yet! So easy and yet so cute! Oh, yeah, and the cake's creator, Katinka, says that the cake is so yummy that it's almost as good as sex, so bonus! Yummy and darling and a sex substitute all at the same time. No wonder I'm in love. If only men could be more like cake. The world would be a much sunnier place!
Click here for the complete recipe and here to view Ktinka's Web site.
Weekend Escape: Sirangan Resort, Sorsogon
Another week has gone by, despite my all best, chocolate-covered, intentions of coming here and sharing the wonderful escape we had last weekend.
How we did absolutely nothing but lie in incredibly squashy lounge chairs, take dips in the pool and sea, have naps in our white canopy bed, and sigh contentedly at doing absolutely nothing away from absolutely everything.
How the place we found to hide away was filled with a charming, eclectic mix of faded rugs, native lamps, grandfather chairs, chandeliers, and an old-school snooker table.
How there was only one other couple there, so we pretty much had the place to ourselves. Aside from a saucy little kitty with a gold collar and a friendly bunch of dogs who watched over us. And two adorable puppies.
How they had their own organic herb and vegetable garden with the hand painted signs in Spanish.
How the manager is also the cook and she made us freshly baked bread every morning.
How we hardly looked at the menu...just chatted with the cook every day about what was the fresh catch, whether we should have prawns or crabs or fish (we had all three), how we should prepare our spanking fresh seafood, and what vegetables to pair with it – all we had to do is sit back and enjoy awesome meals on a terrace fronting the sea, with nothing but distant islands and a few fishermen’s boats dotted about.
How we made a mess of the tablecloth while eating the crabs.
How I finally saw Mayon Volcano!
How there was fresh flowers all around, even if we were practically the only ones there.
How many avocado shakes I had.
How, despite it being rainy season, the only time it rained was when we napped.
How I really wish we could’ve stayed longer.
Hope these photos give you an idea...happy weekend kind folk!
The Dessert Truck
Yes, it's true. I'm obsessed with the Dessert Truck. I know several other versions of these sugar carrying vehicles have popped up in NYC and other large cities lately, but I think the appropriately named Dessert Truck is my favorite. Maybe it's because one of the people behind the Dessert Truck is a former pastry sous chef at Le Cirque, and that sounds fancy or maybe it's because the desserts they offer aren't typical truck fare (i.e. slow-baked apples and cinnamon [see pic above] and goat cheese cake). But, really, when you get right down to it, I think it has a lot to do with my childhood love of ice cream trucks. How could I resist?
If you too would like to relive your latent childhood fantasies involving magic trucks jam packed with yumminess, click here to find out where and when the Dessert Truck will make it's next stop. Or, if simpler snacks are more your thing, check out the Treats Truck, right here. (Food pics by Eugenio Garcia-Palacios)
Sweet Dreams are Made of Cupcakes
Sweet Dreams by Kirsten Lepore. This stop-motion story about a cupcake construction worker made me smile. How can you not smile at a film where the trees are made out of ice cream cones! I'm not sure how I feel about the ending, though, or the love scene, but, as the Eurythmics say, who am I to disagree?
I'm in Yummy this June!
Before I go though, I thought I'd share with you a bit of news...I have another recipe feature in this month's issue of Yummy magazine! :) Now, although I adore slow cooking and craftily making things from scratch, I do know that the reality for many of us has little time for spending hours (or days!) in the kitchen. So for this issue, I've put together some quick-as-can-be recipes for all us busy girls and boys!
I'm off! Happy weekend and to all the Filipinos out there....Happy Independence Day tomorrow!!!
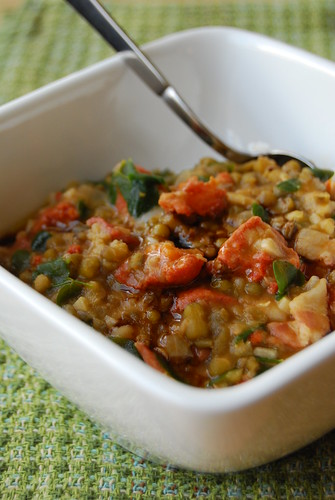
Spanish-style Munggo Guisado
Was I just talking about the heat not too long ago? As June rolls in, so does our rainy (or “wet”) season, the second season of our two-season year (the other being, you guessed it, “dry” – or summer if you want to give it a prettier name). The season’s misty monsoon spray showers us all, bringing with it its usual accoutrements – grey skies and power outages, leaks and traffic, and on the more serious side, the dreaded typhoons.
Although a gloomy, overcast aura that hangs over the city (and nothing does gloomy like a city in the rain) and slowly dampens warms summer spirits, there is a silver lining for those who care to see it. After the blazing heat of the summer, the rains bring me fresh relief (and I love summer so don’t think I’m a sun-shunner). The steady thrum of raindrops, even the severe lashing of torrential downpours, can make my oft-too-hot apartment seem like a cozy and cool cave. I sometimes open the windows just a sliver to let some of that chilly wind in (supervised of course). Weekends ensconced in a warm duvet, good books tucked into its folds, musings both important and random to keep me entertained – that’s rainy season.
And that is not even saying anything about the absolute best part of all this – the comfort food! Soups, stews, hot chocolate! I love this type of food, both the making and the eating of it. Slow-simmered pots of goodness, hearty with sustenance and comfort and memories. Unfortunately, with most of the year being under a glorious tropical blanket of humidity, this is really not the place to indulge in such home-and-hearth dishes. Which doesn’t stop me of course. It’s just much better to enjoy them when you aren’t breaking a sweat.
I’ve spoken about munggo guisado before and how much I love this humble bean stew. It is a dish that crosses many social, political, and economic barriers over here. Eaten by all. Perhaps not enjoyed by all though, but definitely enjoyed by my brother and I who, even as children, would scrape our bowls of munggo clean and fight over the last remnants in the pot. This definitely ranks as one of my top comfort foods of all time. I can eat this for days on end and still come back, like little Oliver, empty bowl in hand, asking for more.
Munggo Guisado is basically a kind of bean stew using munggo or mung beans. The beans are boiled until soft, and then sautéed with a mixture or onions, garlic, tomatoes, flavourings, vegetables, meat or fish...or any combination thereof. It’s very typical here, the type of dish you would find in somebody’s home rather than on a Filipino restaurant menu.
Since I started cooking munggo on my own, I’ve experimented quite a bit. Beans being what they are, this dish is open to limitless versions. Here is one of my favourites (with tinapang bangus – smoked milkfish). This is another.
Spanish-style Munggo Guisado
- 250 grams munggo beans
- 4 cups of water
- 4 – 5 cloves of garlic, peeled and sliced
- 1 onion, chopped
- 1 bay leaf
- 150 grams Spanish chorizo for cooking (either what is known here as chorizo bilbao, or any other Spanish-style chorizo that is meant for cooking)
- 100 grams slab bacon, chopped
- 1 cup malunggay (moringa) leaves, optional
- Canola oil
- Sea salt
- Freshly cracked black pepper
- Clean the munggo by dunking the beans in a bowl of tap water and skimming off the “floaters”.
- Place munggo in a pot with the 4 cups of water and cook on low heat until soft (around an hour, more or less). Add water if you see it drying out.
- Once beans are done, start with your guisa (sauté).
- Heat some oil in a large pan (large enough to fit all your cooked and softened munggo).
- Sauté garlic, onions, and bay leaf until the onions are soft.
- Add the bacon and chorizo and sauté until the bacon is cooked but still soft and the chorizo has rendered its orange oil.
- Add cooked munggo and stir. If you have a lot of liquid with your munggo don’t add it in all at once, add all the beans and some of the liquid first. As you cook the stew, keep adding liquid until you reach your desired consistency. Some like this very soupy, some like it thick.
- Let it simmer until all the flavours have melded together, about 20 minutes, stirring every so often. Taste and adjust seasoning with salt and pepper.
- If using, add malunggay leaves, give it a few stirs (they’ll cook fast), and you’re done.
If you really want to give this amazing depth of flavour, boil the beans in ham stock instead of water, just make sure to taste before adding any salt...you may not even need any. If you don’t have 4 cups of ham stock lying around you can use part ham stock or part water. Or you can also toss a small piece of ham bone in the water when boiling the beans.
If you don’t have any slab bacon you can use whatever bacon you do have. I’ve labelled the malunggay (moringa) leaves optional because it doesn’t really fit with the Spanish theme but I really do love greens in my munggo so I always add them – and it still does taste wonderful with this addition. I like to eat this atop a bowl of steaming rice with a drizzle of olive oil and balsamic vinegar.
Some argue that I’ve fancied our munggo up unnecessarily with this but I have to disagree. I think munggo is a perfect canvas for all sorts of adaptations and we should experiment far and wide with our little green bean. Why would we give the same treatment to lentils but not munggo? And it’s delicious! Which is really all the reason I need to make something :)
As I type this the sun has peeked out again, hissing at the moist leavings of last night’s rain. But this is only the beginning of rainy season, so I foresee more munggo on the horizon.
BabyCakes: Vegan, Gluten Free, and Yummy!
So, I know what you're thinking, with all those weird ingredients, how do these desserts taste?? Well, my sister recently made the chocolate chip cookie sandwiches (see pic above), and, let me tell you, they were really good! They definitely had a unique flavor. Not bad, just unique, and the coconut flour did give them a very slight coconut taste, so if you hate coconut, be forewarned. All in all, I'm anxious to try something else from the cookbook. It's like every recipe is a little baking adventure!
A video on how to make the sandwiches, along with the recipe, can be found at Martha Stewart's Web site, right here.
If you live in New York and want to try some vegan yumminess (you know who you are!) head on over to BabyCakes in NYC. A Los Angeles location will be opening soon. If you'd like to order online, click here.
Sweet Testing: Chocolate Bourbon Pecan Pie
As far as the baking process is concerned, this is one of the easier recipes from the Baked cookbook. The pie crust came out perfectly, but if you want to opt for a store-bought crust, you could make this really quickly. Oh, and you can't taste the bourbon, which I liked, but if like your desserts a little more boozy, you can always add more.
More From Baked: Whoopie Pies, Sugar Cookies, Sweet and Salty Cake, Lemon Drop Cake, Coconut Snowball Cupcakes
You can find the complete recipe after the jump.
Chocolate Bourbon Pecan Pie
from Baked: New Frontiers in Baking
1 ball of Classic Pie Dough (below), chilled
2 cups pecan halves, toasted
3 large eggs
¾ cup light corn syrup
3 tbsp. sugar
4 tbsp. firmly packed dark brown sugar
2 tbsp. unsalted butter, melted
Pinch of salt
1 tsp. pure vanilla extract
3 tbsp. bourbon
1 cup (6 oz.) semisweet chocolate chips (I used a bit more)
Dust work surface with a sprinkling of flour. Unwrap the ball of chilled dough and put it directly on the work surface. Roll out into a 12-inch round. Transfer the dough to a pie dish and carefully work it into the pie dish, folding any overhang under and crimping the edge as you go. Wrap and freeze the crust until firm, about 2 hours, or up to 3 months.
Preheat the oven to 325 degrees F. Coarsely chop ¾ cup of the pecans. Set aside.
In a large bowl, whisk the eggs until combined. Add the corn syrup, sugars, butter, salt, vanilla, and bourbon. Whisk again until combined. Stir in the chopped pecans and set the filling aside.
Spread the chocolate chips evenly along the bottom of the frozen pie shell. Slowly pour the filling on top of the chocolate chips. Arrange the remaining 1 ¼ cups pecan halves on top of the filling.
Bake in the center of the oven for 30 minutes, then cover the edges of the crust loosely with the aluminum foil and bake for another 30 minutes. Test the pie by sticking a knife in the center of the filling. If the knife comes out clean, the pie is done. If the knife comes out with clumps of filing sticking to it, bake for another 5 minutes and test again.
Cool the pie on a wire rack and serve warm or at room temperature. The pie can be stored in the refrigerator, tightly covered, for up to 2 days.
Classic Pie Dough
Yield: 2 balls of dough, enough for 2 (9-inch) single-crust pies or 1 (9-inch) double-crust pie
3 cups all-purpose flour
1 tbsp. sugar
1 tsp. fine salt
1 cup (2 sticks) cold unsalted butter
¾ cups ice cold water
In a medium bowl, whisk together the flour, sugar, and salt together.
Cut the cold butter into cubes and toss the cubes in the flour mixture to coat. Put the mixture in the bowl of a food processor and pulse in short bursts until the pieces of butter are the size of hazelnuts.
While pulsing in quick, 4-second bursts, drizzle the ice water into the food processor through the feed tube.
As soon as the dough comes together in a ball, remove it from the food processor and divide it into two equal balls, Flatten to a disk and wrap each disk first in parchment paper and then in plastic wrap. Refrigerate the disks until firm, about 1 hour. (The dough can be refrigerated for up to 3 days or frozen for up to 3 months. Thaw in the refrigerator before proceeding with the recipe.)
Suck on This, Daniel Craig
Flavored Salt
You can also get some bacon-flavored salt courtesy J&D's. This particular bacon salt is not only kosher, but also vegetarian, so it would the perfect way for vegetarians to incorporate the bacon trend into their desserts! (I still haven't tried the whole bacon dessert thing, but it intrigues me, even though I'm a vegetarian.)
Btw, they also have bacon-flavored lip gloss for those of you out there who are really really into bacon. Click here to find store locations or to order online.