Saving the last of the veggies...

title
Once again I find myself at the end of the week, rushing to use up all the remnants of my organic veggie basket before my charming organic farmer shows up at my doorstep with my new basket. With every new batch, I promise myself that I will be diligent about using all my vegetables, and find delicious new (or not new, but still delicious) ways to prepare them, after which I will post them here and pat myself on the back.

Some days that is exactly what I do.

Sigh...not this week.

Not last week either, judging from the glum lack of posts here.

I won’t bore you with tales of feeling under-the-weather and mountains-of-work and what such. I’m sure nobody is a stranger to that (and if you are well, lucky you!). As such, I am also sure that there are those of you who likewise fall into that inevitable position of having to make use (or “liquidate” as I like to nerdily refer to it) of the vegetable remainders.

So, instead of letting another silent week pass us by, I decided to share what I sometimes find myself scrambling to do come end of the week (if I haven’t been diligent about using up all my vegetables in new and inventive ways that is).

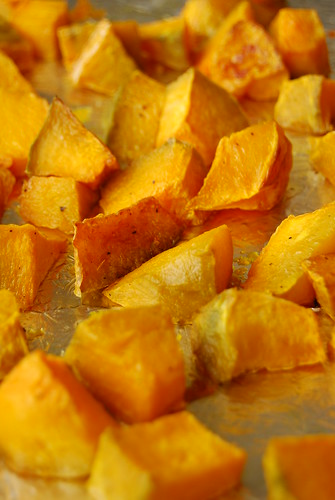
I usually get half a squash with my basket, and no matter how much I love squash, there is sometimes a straggling portion that remains in the bottom of the crisper by the time the next squash is due. When it’s evident that I am not going to make good use of it, I chop it up, put it on a lined baking sheet, drizzle with olive oil, salt, and pepper, and roast it until it’s toasty and soft. While it’s roasting I can get on with whatever is keeping me too busy to make a proper squash dish. When it’s done I let it cool then chuck it into a freezer bag, and using my hands, mash the squash through the bag until it is a rough puree. Then I put it to bed in the freezer for some future squash soup!

title
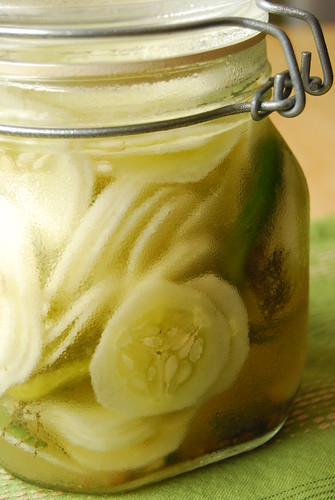
Another regular specimen I get in my basket is these lovely white cucumbers. They are crunchy and refreshing...especially in the heat we are experiencing now! Although they are fantastic fresh in salads or on fish, I find myself more often than not pickling them. It’s a great way to extend their shelf life (especially if you are getting another batch soon and need to make room) and it becomes a wonderful condiment that complements anything from grills to sandwiches to fried fish! I have no recipe to share on this count, as I usually just throw in whatever appeals to me at that moment (remember, this is usually done on the fly, when very busy, and there is no choice but to use the cucumbers now!). You can use your favourite pickling solution but in a pinch I just mix some vinegar with salt and sugar (by taste) and add whatever herbs or spices I might have on hand (fresh dill, fennel fronds, shallots, chilis, whole peppercorns, dill seed, coriander seed...whatever strikes my fancy!).


title
The cucumbers aren’t the only things that get pickled. Pickling is a terrific way to take something, put it in suspended animation for a while, then resurrect it at some later date when you have caught your breath. For this batch, I’ve also done it to a small piece of ampalaya (bitter melon) and radish. Pickled radish is something I’ve made before, and for this mix I’ve used much the same pickling solution as I did then. Vinegar and sugar, and lots of black pepper (freshly ground and whole). I also added sliced long green chilis, and some Himalayan pink salt. Before adding the ampalaya to the mix I prep it first as I did here to tone down the bitterness.

Now, bear in mind that I’m not referring to pickling produce by bulk for the winter! That does demand time and work (and certain strict measures of sterilization). What I do is make a small pickling solution (as I’ve described above), place some veggies in it, and store in the fridge for short term usage.

Whew! Now I’ve got some veggies effectively tucked away for future use. The crisper is breathing easy and so am I :)

Getting Drunk on Ice Cream

I don't drink wine, but I do come from a wine family (meaning that they drink a lot of wine, not that they stomp grapes in barrels or anything), so I was super excited to come across this wine-flavored ice cream! It would be the perfect gift for my father, who has a makeshift wine cellar in his basement. Unfortunately, it's not so easy to get your hands on this stuff, except if you live in New York, where you can buy Mercer's Wine Ice Cream at your local Whole Foods. Make sure that you have proper ID before making the trip, though! The ice cream does contain five percent alcohol, so you have to be of legal age to buy it! Finally, a chance to get drunk and have a sugar high at the same time! Click here for store locations and additional info.

Victorian House Cake

I finally figured out why I'm fascinated with edible houses! It may have something to do with the fact that I love architecture (duh!), the architecture of houses to be more specific. Some people are fascinated with building architecture and visiting various famous skyscrapers around the country, but I much prefer looking at houses. Don't get me wrong, I love old buildings, like San Vitale or new ones like the Helix Hotel (which hasn't even been built yet), but there's something much more familiar and accessible about houses. Besides, you don't need to travel far to see examples of beautiful home architecture. All you have to do is check out your local neighborhood streets. Last year, I discovered that there is a Frank Lloyd Wright house practically in my backyard! (Okay, so it's not quite that close.) It had been sitting in near ruin, abandoned for years until the current owners bought and restored it to its former glory.

Anyway, this tangent has taken me far far away from anything resembling desserts, so I'll attempt to get back on track. The cake above was created by Elisa Strauss of Confetti Cakes fame, and although I'd much rather live in that house, than consume it, at the end of the day a cake is made to be eaten, so I wouldn't put up much of a fight.

To read about the creation of the Victorian House cake, click here. To see what happens to beautiful houses when they are left to fend for themselves, click here.

Sweet Testing: Coconut Snowball Cupcakes


Back in April, after much debate, I decided to make these beautiful coconut cupcakes for Easter dessert. Unfortunately, I was not thrilled with how they turned out. Oh, no! My first Baked disappointment! But don't fear Baked lovers, the story has a happy ending. So, where was I? Oh, yes, initially, things did not look good. I thought, oh, well, it had to happen eventually. I can't possibly LOVE every recipe in this cookbook. They weren't horrible cupcakes. I didn't spit them out or anything, but they just weren't that exciting. Usually anything from Baked excites me! Despite my displeasure, I packed up a few leftovers for home, anyway, and gave some away. The next day, after a long day at the office, I cut off a small bite from one of the cupcakes and, low and behold, ended up eating the whole thing! These cupcakes definitely improved with age or maybe I was just too full from Easter dinner to properly enjoy them the first time around. Also, someone told me that it was the best cupcake they ever had, which is the traditional Baked compliment, so they didn't let me down on that front!

To order the Baked cookbook, click here.

More From Baked: Whoopie Pies, Sugar Cookies, Sweet and Salty Cake, Lemon Drop Cake

I'm still working on my photography skills, so I saved my pic for after the jump! You can find the complete recipe there as well.


Coconut Snowball Cupcakes
from Baked: New Frontiers in Baking

Ingredients

For the cupcakes

2 cups cake flour
1/2 cup all-purpose flour
2 1/4 teaspoons baking powder
1/4 teaspoon baking soda
1/4 teaspoon salt
6 tablespoons unsalted butter, softened
1/2 cup shortening, at room temperature
1 1/2 cups sugar
1 teaspoon pure vanilla extract
1 large egg
1 cup ice water
2 large egg whites
1/4 teaspoon cream of tartar
1/2 cup shredded, sweetened coconut

For the coconut pastry cream
2 cups half-and-half
1 cup unsweetened coconut flakes
6 large egg yolks
1/2 cup sugar
3 tablespoons all-purpose flour
1/4 teaspoon salt
1 teaspoon pure vanilla extract

For the coconut frosting
1 1/2 cups sugar
1/3 cup all-purpose flour
1 1/2 cups milk
1/3 cup heavy cream
1 1/2 cups unsalted butter, soft but cool, cut into small pieces
1 teaspoon pure vanilla extract
1/2 cup coconut pastry cream
1/2 cup shredded sweetened coconut

1. Preheat the oven to 325°F (160°C) . Line two 12-cup cupcake pans with paper liners.

2. Sift the flours, baking powder, baking soda, and salt together into a large bowl and set aside.

3. In the bowl of an electric mixer fitted with the paddle attachment, beat the butter and shortening together until creamy, 3 to 4 minutes. Add the sugar and vanilla and beat on medium speed until fluffy, about 3 minutes. Scrape down the sides and bottom of the bowl, add the egg, and beat until just combined. Turn the mixer to low. Add the flour mixture, alternating with the ice water, in three additions, beginning and ending with the flour mixture. Scrape down the bowl, then mix on low speed for a few more seconds.

4. In a clean bowl, whisk the egg whites and cream of tartar until soft peaks form. Do not over-beat. Gently fold the egg whites into the batter. Fold the shredded coconut into the batter.

5. Fill the cupcake liners about three-quarters full. Bake for 20 to 25 minutes, rotating the pans halfway through the baking time, until a toothpick inserted in the center of a cupcake comes out clean. Transfer the pans to a wire rack and let cool for 20 minutes. Remove the cupcakes from the pans and place them on the rack to cool completely.

Make the coconut pastry cream
1. Set a fine-mesh sieve over a medium bowl.

2. In a medium saucepan over low heat, bring the half-and-half to a simmer. Add the unsweetened coconut, cover, and simmer for 20 minutes to let the coconut steep. Strain and discard the coconut.

3. In another medium bowl, whisk the egg yolks with the sugar, flour, and salt until the mixture is pale, about 1 minute. Whisk half of the warm half-and-half into the egg yolk mixture, then pour that mixture into the remaining half-and-half in the saucepan and cook over medium heat, whisking constantly, until thickened, about 6 minutes. Remove the saucepan from the heat and whisk in the vanilla. Strain the pastry cream through the sieve and press a piece of plastic wrap directly onto the surface of the cream to prevent a skin from forming. Refrigerate the coconut pastry cream for about 1 hour, or until chilled.

Make the coconut frosting
1. In a medium heavy-bottomed saucepan, whisk the sugar and flour together. Add the milk and cream and cook over medium heat, whisking occasionally, until the mixture comes to a boil and has thickened, about 20 minutes.

2. Transfer the mixture to the bowl of an electric mixer fitted with the paddle attachment. Beat on high speed until cool. Reduce the speed to low and add the butter; mix until thoroughly incorporated. Increase the speed to medium-high and beat until the frosting is light and fluffy.

3. Add the vanilla extract and 1/2 cup of the freshly made coconut pastry cream and continue mixing until combined. If the frosting is too soft, put it in the refrigerator to chill slightly, then mix again until it is the proper consistency.

Assembly the cupcakes
1. Fill a pastry bag fitted with a medium tip with the remaining coconut pastry cream. Puncture the center of a cupcake with the tip and squeeze approximately 1 teaspoon of coconut pastry cream into the cupcake. Repeat for all cupcakes.

2. Frost the top of each cupcake with the coconut frosting and sprinkle with shredded coconut.

Tree Pedestal Cake Stand (DIY)

For those of you looking for a more environmentally friendly choice in your cake stand options, the Tree Pedestal Cake Stand from Laurie at Once Wed is the stand for you! It's a really creative way to take found material and turn it into something useful and lovely. I was wondering, though, can you just use any old piece of tree that you find in the woods? How do you know when the wood it too rotted to use? Okay, maybe those are naive questions, but, really, I don't know the answers! Anyway, I was really impressed with how well these turned out, given that not much has changed from the original pieces. I even love the cake topper! Click here for full instructions on how to make the stand at Once Wed and here to visit Laurie's personal site for more crafty ideas!

The Prettiest Cakes in Town

I'm a sucker for pink, frilly, girly things. For example, I was a HUGE fan of Sara Jessica Parker's princess-like Oscar dress, even though some said she looked like Glenda, The Good Witch of the North. I would have totally worn it, if, you know, I had been invited to the Oscars. That said, you can imagine that it took me all of two seconds to fall in love with these ultrafeminine cakes. They are all so pretty and would definitely get lots of "oohs" and "aahs" from your party guests!

Happy Spring and Happy Mother's Day!

Martha Stewart's Ruffle Tower Cake


Dorie Greenspan’s Perfect Party Cake by Ezra Pound Cake


Lemon cake with Pink Hearts by Moa Maria


Topiary Mini Cake ($85) by Cupcake Envy

Quadruple Chocolate Loaf Cake

title
One of the wonderful attributes of chocolate, and I mean good chocolate, is that it has the ability to be absolutely perfect for just about any of life’s occasions. Whether it acts as a salve after crazy-hectic weeks at work, or the exclamation point to mark life’s wonderful celebrations, or just the last essential piece to a gloomy-day-in puzzle...or even as a earnest offering for having been away from this blog for a while!

And if it acts as all four? Why then, use four times the chocolate!

I had bookmarked this famous (infamous) recipe by the Domestic Goddess herself a while back when spied it over here. There is nothing really more to say than I saw all the chocolate, and I was smitten. I’ve read the good (glorious!) reviews and I’ve also read the bad (doesn’t cling-film melt?) reviews. But so far, Nigella has not let me down. And this cake was no different.


title
Quadruple Chocolate Loaf Cake
(From Nigella Lawson. See here for original recipe.)


For the cake:
  • 200 grams all purpose flour
  • 1/2 teaspoon baking soda
  • 50 grams cocoa powder
  • 275 grams caster sugar
  • 175 grams unsalted butter, softened
  • 2 eggs
  • 1 tablespoon vanilla extract
  • 80 ml sour cream
  • 125 ml boiling water
  • 175 grams dark chocolate chips
    • For the syrup:

    • 1 teaspoon cocoa powder
    • 125 ml water
    • 100 grams caster sugar
    • 25 grams milk or dark chocolate (I used a 30 gram Lindt milk chocolate bar)
      • - Bring all ingredients to room temperature.
        - Pre-heat your oven to 170C and stick a baking sheet in. Grease a loaf tin (21 x 11cm and 7.5cm deep) and line it with parchment paper. Leave a little bit of parchment to extend beyond the tin so that you will have something with which you can easily lift the cake out of the tin later on.
        - Put the flour, baking soda, cocoa, sugar, butter, eggs, vanilla, and sour cream in a processor and blitz until it is smooth and satiny. Scrape down with a rubber spatula and process again while pouring the hot water down the funnel. Switch it off, remove the lid and the blades, and then fold in the chocolate chips.
        - Pour the batter into the prepared tin and bake in your pre-heated oven for 1 hour or until a cake tester comes out pretty clean...there may be stickiness as this is a damp cake and that is totally fine.
        - When you still have about 10-15 minutes left of baking time on your cake, get started with the syrup. Put the cocoa, water, and sugar in a saucepan and boil for 5 minutes or so. You want a reduced, syrupy liquid that is still pourable.
        - When the cake is done, place the tin on a rack and pierce the cake here and there with a skewer. Pour the syrup as evenly as you can over the cake.
        - Once the cake is completely cooled, take it out of its tin (just pull it out with the parchment overhang you so carefully crafted), peel off the parchment, and place it on a serving platter. Now take your bar of chocolate and cut it into flakes and splinters and scatter all over the top of the cake. I used milk chocolate for the topping because the cake was already dark chocolate all throughout and I was taking this to a friend who is more a fan of milk than dark. You can also try topping with chocolate before the cake cools down so the chocolate shards melt a bit...MMM!

        Let me take a moment here to just say: I really prefer weighing ingredients over fiddling with measuring cups! Weighing your ingredients is not only more precise, it is a whole lot easier! Especially if you have to do the washing up. Imagine a world where you never have to wash those darn measuring cups. That is the world of the scales my friend.

        I am sold on adding boiling water to the batter as I did in another of Nigella’s cakes here. It really produces an enchanting crumb! Soft, tight, rich, but light. And despite the quadruple-ness of the chocolate, the cake just holds itself back from being over the top...stopping at being a lovely, luscious, comforting chocolate cake.

        We took this cake to a friend’s house for dinner and it was enjoyed by all! Even my non-cake eating husband :) I hope you find it a suitable gift as well for my being a delinquent blogger :)

        Yeast Extract Dessert: Dreams Do Come True

        Sunday afternoon, I was sitting around, enjoying my favorite snack, Marmite on crackers, and listening to Chick Habit, when I started wondering, has anyone ever made a dessert with Marmite or Vegemite?? Mmmm . . . yeast extract and sugar. A quick internet search for Marmite/Vegemite desserts didn't turn up much, except for a few cute ads for Marmite rice cakes (see below).


        On the recipe front, I was only able to uncover a couple of urban legend type mentions of Marmite/Vegemite desserts, but nothing substantial. Hmmm . . . there must be someone, somewhere (probably with a British or Australian accent) that has used Marmite in a dessert!

        By Monday afternoon, I had pretty much given up my search, and with my Marmite fantasies long gone, what did I happen upon, quite accidentally?? Not one, but two different recipes for Vegemite cheesecake! It was fate! It was kismet! It looked seriously delicious!! If I hadn't been at work desk, I would have been jumping around with excitement.


        (Oh, for those of you who don't know Marmite is similar, in taste and texture, to vegetable bouillon.)

        Click here to get the recipes for Billy's two Vegemite cheesecakes at A Table for Two and here to view a Marmite commercial. It says it all.

        Julie & Julia Trailer


        Julie Powell, author of the blog/book Julie & Julia and hero to food bloggers everywhere, hits the big screen in August, in the film adaptation of her book. Well, more accurately, the adorable Amy Adams hits the big screen, playing Powell, while the planet's greatest living actress, Meryl Streep, tackles the part of Julia Child. Oh, and then there's Stanley Tucci and that strangely attractive guy who played Claire's boyfriend/husband on Six Feet Under as their spouses. I never read Powell's book and, yes, this is a Nora Ephron movie, so there is a definite possibility that it will break records in cheesiness, no pun intended, but I'm still excited to see it. I mean, it's an entire movie about food!! How bad could it be?? Okay, so it could be terrible, but what can I say, I'm trying to stay positive, at least for the time being. In the meantime, check out the trailer and the great poster below.


        In an unrelated note, I've noticed lately that I've been getting a lot of hits from StumbleUpon, so I thought I'd make it easier for everyone by posting the SU button. Thanks to everyone who has already Stumbled something from my little site!! I'm always thrilled to see that someone liked a post enough to Stumble it. What can I say?? I'm a dork!!