Arni Youvetsi

title
Another package arrives from mum-in-law. What could it be? There is no regularity to when these gifts arrive or what they are…it depends on the ebb and flow of her impulses and what she comes across while shopping, so it is always a surprise. At any given day, the doorbell will buzz, her driver will pop in with a parcel, and C and I will crowd around it and inspect our loot. As I peel off the wrappings, my Iron Chef face comes on (at least in my head): “Hmmm, it’s cold, hmmm, meat, hmmm, and the surprise ingredient is…lamb shank!

Wait. Did I say lamb shank? Only one of my most favorite kinds of meat around! I rubbed my hands together in glee. I already knew what it was fated to become. What better use for a favorite meat, than a favorite dish? A favorite Greek dish to be exact. Arni Youvetsi to be even more exact.

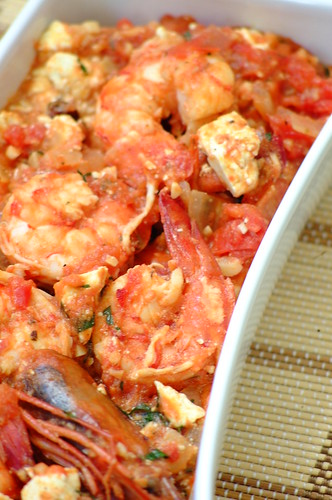
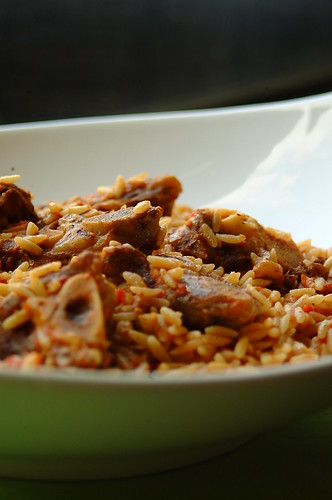
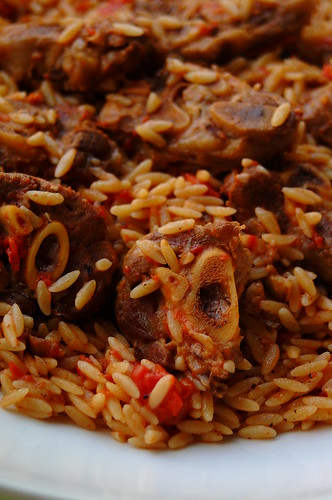
Arni Youvetsi, or lamb youvetsi, or giovetsi, is lamb baked with orzo (rice shaped pasta, like risoni) and tomato sauce. I fell madly in love with it in a Greek restaurant here, and when I finally made it to Greece, I wasted no time in eating my way through all the youvetsi’s they had to offer.

The recipe I used is adapted from Tessa Kiros’ Falling Cloudberries (I book that I adore). I changed the quantities a bit to suit our tastes (more garlic!) and the ingredients I had. Her recipe calls for lamb meat with no bone, but as the shanks looked like cute mini-osso buco’s, I wanted to include the whole thing.

title
Arni Youvetsi
(adapted from Falling Cloudberries by Tessa Kiros)

  • 3 tablespoons olive oil
  • 750 grams lamb shank (not whole, cut crosswise as beef and veal shanks are)
  • 2 red onions, chopped
  • 4-5 garlic cloves, chopped
  • 1 400-gram tin of chopped tomatoes with juice
  • 1 400-gram tin of whole tomatoes, drained, juice reserved
  • 1 cinnamon stick
  • 40 grams butter
  • 500 grams orzo
  • 150-200 grams feta cheese
  • Freshly grated parmesan, to serve

- Heat olive oil in a heavy, oven-proof casserole and brown lamb on all sides. Remove meat and set aside.
- Add onions to the same casserole and sauté until soft, adding a little more oil if necessary.
- Add the garlic and sauté for a couple of minutes more, then return lamb to the pan.
- Add the tomatoes (crushed and whole). Stir and mash the whole tomatoes roughly with the back of your spoon. Salt and pepper to taste.
- Add the cinnamon stick and the butter, give it a stir, and then let it simmer for about 5 minutes.
- While your pot is simmering, take the reserved juice from the tomatoes, stick it in a measuring jug, and top up with water until you have 4 cups (1 liter). Heat the liquid first (I did this in a microwave) and then add to your pot.
- Cover and bake in an 180C/350F oven until lamb is tender.
- Rinse pasta in a sieve or colander and drain. Add to the pot once lamb is tender and stir through until well incorporated. Cover pot and return to oven for about 15-17 minutes, or until the pasta is cooked and has absorbed most of the sauce. You can add more hot water if it seems too dry. (pasta cooks longer in the oven, so a pasta that usually takes 7 minutes will take about 15 in the oven)
- Once done, remove from the oven and stir in crumbled feta while it’s still hot, so the cheese melts a bit. (this part is optional but I like it)
- Serve with freshly grated parmesan.

Just as it sounds and appears, this is no glamorous, sophisticated dish. It is hearty and comforting. A very Sunday-family-meal type of dish that you can imagine some robust Greek yaya (or yiayia – grandmother in Greek) making. This is not a summer sort of dish either. The fact that I made it in this blazing heat is a testament to how much I love it.

It seems like in the summertime, this not-so-young girl's mind turns to thoughts of...Greece...I promise to buy my brain a plane ticket to somewhere else soon...

Garides Saganaki

title
I have reminisced about my time in Greece, and the country’s amazing cuisine, before. As my own summer now gets more and more ruthless, my thoughts turn to that long ago summer in Athens. Running around to and from meetings in the heat and traffic of the city (in a suit no less!), catching a gyro-lunch on the fly or sitting down to a fresh salad in the shade, dreaming of the islands that we would visit during the weekend.

There is less running around to meetings now, but I am still working in the summer’s remorseless heat (as only summer heat in a city can be), clacking away at my computer while sweat drips down my back. I still have to deal with a city’s staggering traffic. And I still dream of the islands I’m going to visit during the weekend (not every weekend, but on a certain weekend next month I’m off!).

The only thing missing is the food. With only three restaurants in the city and surrounds devoted to Greek cuisine (and of course, for some, we can’t even say solely to Greek cuisine as the occasional Filipino-fusioned dish will make an appearance on the menu), I don’t exactly have a plethora of choices. Well, that stops now.

Garides saganaki is a dish made of shrimp (garides), tomato sauce, and cheese (saganaki). You can find it in all over Greece in countless restaurants and ouzerie’s. You can even find it in the aforementioned three Greek restaurants here. And now you can find it on my table. Bliss.

Garides Saganaki
(my own patchwork of a recipe adapted from various recipes)
  • 500-600 grams prawns, peeled and deveined, head and tail intact
  • Juice of 1 lemon
  • 7-8 cloves garlic, chopped
  • 1 medium onion, chopped
  • 1-2 teaspoons dried oregano
  • 1-2 small dried chilis
  • 2 fresh tomatoes, chopped
  • 1 400-gram can chopped tomatoes
  • 170 grams feta cheese
  • 2-3 tablespoons parsley, chopped
  • Olive oil
  • Sea salt and freshly ground black pepper

- Drizzle lemon juice over prepped prawns and set aside.
- Heat some olive oil in a pan. Toss in the garlic and onions, and sauté until the onions are soft and translucent.
- Add dried oregano (crushing between your fingers as you do) and chilis, and sauté until the fragrance wafts up.
- Add fresh tomatoes and sauté until soft, and then toss in the canned tomatoes
- Let this simmer, covered, to allow flavors to develop, about 15 minutes. Add salt and pepper to taste.
- Add prawns and cover. Simmer until prawns are cooked, turning pinky-orange. Check after 5 minutes because this shouldn’t take too long and you don't want to overcooked them.
- Crumble feta in (reserving a few bits for topping) and add parsley. Stir through then remove from heat.
- Transfer everything to a baking dish, top with remaining feta, and place under a preheated grill until feta is toasty.
- Serves 2-3.

I decided to use prawns instead of shrimps to take this from meze to main course. The combination of the prawns, tomato, and feta, embraced by the oregano, chili, and garlic is a stellar mix. It’s also one of C’s favorite Greek dishes, so all the more reason to have it on our menu!

Greek food at home! Sweet liberation…hooray!

There are more Greek dishes I want to try…including my favorite. But that is a recipe for another post…

To all the Manilenyos out there…keep cool!

Hay Hay It's Donna Day #11: Nutella Mousse

title

It’s Donna Hay time again! I am a big fan and I look forward to this event every month. Even when it’s not Donna Day, this blog is peppered with her dishes or dishes inspired by her dishes. Each time another round is over, I check the new host’s blog every other minute until she posts the next theme. Yes, weird and obsessive me.

This month’s round is hosted by Helene of the very inspiring blog Tartlette (visit on an empty stomach at your own risk…dessert fiends be warned!), and the theme she chose was…mousse! I sat at my laptop a little palm-sweaty. I know this is supposed to be a simple, easy-to-make dessert. I mean, I know it in theory. But I had never made it before (!) so knowing it in practice was a completely different creature.

But this is what I like about this event. It always manages to stretch my culinary creativity and sharpen my fledgling kitchen skills. So on goes the thinking cap with mousse in my mind. Kind Helene posted two recipes to spur us on. I mulled and I pondered until I could mull and ponder no more. So with the deadline fast approaching (I think I barely made it) with nary an idea in sight, I realized something which must have been unconsciously guiding me in the kitchen for a while now: When in doubt, Nutella.

(trust me…it works almost every time)


title


Nutella Mousse
(adapted from Donna Hay recipe posted by Helene)

  • 1 ½ tablespoons water
  • 1 teaspoon gelatin powder
  • ½ cup Nutella
  • 1 cup heavy cream
  • Hazelnut brittle for garnish**

- Place gelatin in a bowl and sprinkle water over it. Set aside and let the gelatin absorb the water.
- Whip cream to medium peaks.
- Add Nutella to cream and whip until fully incorporated and fluffy.
- Add gelatin mixture and stir well.
- Pour into small molds and chill until set (about an hour or two…overnight is even better).

**For the hazelnut brittle, I used this recipe from Peabody, substituting hazelnuts for the pumpkin seed.

The mousse was light and smooth, like silk on my tongue. Soft, Nutella-flavored silk. I was beside myself! Until I got somewhere midway through the bowl. I don’t know if it’s just me, but I don’t think I can finish much mousse on its own. I think this would benefit perhaps from a thin layer of dark chocolate sponge cake underneath to cut through the mousse-ness of it all. Or maybe some bananas. Mmmm…next time.

I used these small clay bowls I bought during our honeymoon in Spain. We got them from La Bisbal, where all this pottery comes from. I’m sure I don’t need to mention that I was dorkily excited to trot these out and use them for the first time!

Thanks Helene for hosting! :)

Check out Barbara’s Winos and Foodies to find out more about Hay Hay it’s Donna Day!

I love Nutella, yes I do! Here’s proof:
Nutella Self Frosting Cupcakes
Happy Nutella Day!

Cream-Braised Brussels Sprouts

title
If you love brussel sprouts raise your hand! Am I in good company as a lover of these adorable little green globes? Or, like the cheese, do I stand alone? I have professed my devotion to this oft-misunderstood vegetable before. How can anyone not be absolutely keen on something that is yummy, nutritious, and cute all at the same time? I mean, how often does that happen? And as much as I love oatmeal, I have to say that it just doesn’t cut it in the cute department.

I can eat these sprouts everyday…and if someone starts growing them locally and brings down the cost, I just might! Steamed and tossed with butter and salt, they are sublime. Sautéed lightly with bacon, they are a dream for a pork-lover like me. As a gratin, a mini-slaw, shredded into scrambled eggs, slivers tossed in a salad…there is not a way, shape, or form that I will not have them.

If we are in agreement, run; don’t walk, to Molly’s wonderful blog Orangette and try her Cream-Braised Brussels Sprouts. It is every bit as good as she says. No. Better. No. Better than better. My husband loves veggies. I wanted to share these with him. Didn’t happen. After the picture you see above was taken, that bowl was licked clean in under 60 seconds. Yes. Lose-your-mind kinda good.

(um, please note that I didn’t make Molly’s full batch…)

The braise in cream brings out the sprouts’ sweetness, making them rich, mellow, and smooth…almost seductive. If such a thing could be said about a wee innocent brussel sprout. Molly mentions the nutty aroma while it’s cooking…oh so true. It drove me a bit batty actually, knowing that I had to wait for them to finish cooking, and then have to take some pictures…

If you love brussel sprouts, make this now.

And if you don’t love brussel sprouts, well, this may just be the recipe that melts your heart and wins you over…

I’ve rounded up some great brussel sprout posts here for your enjoyment:
Molly’s Cream-Braised Brussels Sprouts
Molly’s Hashed Brussels Sprouts with Poppy Seeds and Lemon
Kevin’s Brussels Sprouts Dijon
Elise’s Brussels Sprouts Recipe
Debbie’s Roasted Brussels Sprouts
Stephen’s Brussels Sprouts with Pancetta, Garlic and Basil
Stephen’s Roasted Brussels Sprouts with Bacon, Apples and Onions
Stephen’s Brussels Sprouts Pancakes with Onion Marmalade
Stephen’s Oysters, Brussels Sprouts and Pancetta Gratin
Stephen’s Brussels Sprout and Celeriac Cream Soup, with Parsley Pesto
Stephen’s Brussels Sprouts Antipasto Salad
Erielle’s Inconsolable Brussel Sprout
Anne’s Brussel Sprouts Gratin
Rosa's Maple Glazed Brussel Sprouts and Potatoes

title
This is my entry to this week's Weekend Herb Blogging hosted by Sher of What Did You Eat? Weekend Herb Blogging is an event created by the brilliant Kalyn of Kalyn's Kitchen :)

Leftover Osso Buco Pasta


As much as we would like to believe that we live in a universe where we create a new dish for every meal, at some point we have to deal with leftovers. Whether it’s a busy work-week-night when there is simply no time to get yourself elbow deep in prep work, or a lazy Sunday when you want a respite from any sort of activity that entails getting out of bed, time will find you poking at a motley assortment of containers in the fridge thinking, “What am I ever going to do with you?”

The resurrection, and transformation, of leftovers has been a subject of many a blog post. In fact, there is even an event made to celebrate leftovers' many incarnations. I’m all for it. I love the victorious feeling I get when I have triumphed over a sad batch of leftovers and given them a new lease on life, given us a great meal, and avoided waste, all in one fell swoop.

Although I think experience has made me pretty adept in cooking small portions (first for one, then now for two), there are some dishes that just don’t lend themselves to being reduced too much. Substantial, slow cooking stews are a prime example, producing tons of leftovers from my little table-for-two. But how do you re-do a stew?

This is one of my favorite ways with leftovers. The type of dish for which I would purposely generate leftovers. A little background: Osso Buco is one of my mother’s specialties, that I now make too. When we make it though (Italian purists please do not flog us!), it comes out more like a stew than a braise. Reason being that my brother (who is one of the best people in the world to feed**…hence the inexplicable manner in which we all cook to suit his taste) loves to have extra sauce for his rice. If we get a little overzealous with the sauce/liquid, then we are inevitably left with a surplus.

So here is what I like to do: I take all the leftover Osso Buco, stick it in a ziplock bag, and toss it in the freezer. Then one day, when I am just too tired or busy to cook, I unearth it from its frozen depths, thaw it out and heat it. I then prepare some pasta noodles (preferably a really hefty type, like pappardelle…one of my favorites! If you can find the curly type even better. This is a hearty sauce and does well with an equally hearty noodle). I toss the two together and top with some freshly shaved parmesan.

Depending on what your leftovers were like, you may still have chunks of meat in it. Shred this roughly and include in your sauce. This pasta is redolent with the aromatics of the Osso Buco. It has the backbone of the beef drippings, and the essence of the marrow. Lots of oomph here!

(**My brother has the appetite of a warrior, the gastronomic adventurousness of an explorer, and the words and thoughts of a poet. I am blessed to have him as a brother and a taste tester.)

Thai Green Curry with Tilapia


I want to go to Thailand. Sometimes it seems that practically all my friends have already visited this very famous tourist-destination-neighbor of ours (one very good friend just got back). In fact, a lot of them are already off to less visited places around our little Asian block, while I have not even seen the major go-to points…places that are in my own backyard! Criminy.

They say people take for granted that which is familiar…and I suppose I am guilty. All my life I dreamed of far-off destinations, when some of the most exotic where right beside me (instead of a debilitating 18+ hour flight away), not to mention all the incredibly amazing places to visit right here (but that’s a whole other story)!

Ah Thailand! What secrets have you shared with everyone but me? When I go, will you be weary of visitors and have no gusto left for a latecomer? Will the cuisine I have heard so much about, whose flavor is incomparable to any of its replications in other countries, still lash out with the same power and heat to slay me? Will all your goodies still be as reasonably-priced? Wait for me Thailand!

Sigh...one day. Meanwhile, I pacify myself with homemade Thai curry.

I love Thai food (another reason I am itching to go!) but I have never really thought of making it at home. Until I saw these recipes on Rice and Noodles…Mae’s fabulous site of which I am a big fan. I combined some of her recipes, along with some others from my own cookbooks and this is what I came up with.

Thai Green Curry with Tilapia
(adapted from
Mae’s recipes)

  • 300 grams tilapia fillets
  • 1 cup coco evap (Nestle coconut evaporated milk)
  • 1 cup water
  • One 50-gram package green curry paste (about 2-3 tablespoons)
  • 2 stalks of lemongrass (sliced 1 inch diagonally, crushed)
  • 1/3 cup dried kaffir lime leaves (not packed)
  • One onion, sliced
  • 2 slices dried galangal
  • 3 pieces calamansi (one for the curry and two for the fish)
  • ¼ cup of dried holy basil
  • 1 teaspoon fish sauce
  • 1 tablespoon canola oil

- Squeeze calamansi on the tilapia and set aside.
- Heat the oil in a pot on medium heat.
- Fry the onions, lemongrass, and galangal until onions are soft.
- Add the curry paste and kaffir lime leaves and sauté a bit.
- Add the coco evap and water. Let simmer until flavors develop, about 20 minutes. Add fish sauce and calamansi/lime to taste.
- While the sauce is simmering, add the tilapia fillets. Stir (carefully! take care not to crush the fillets), cover, and let simmer for about 10 minutes.
- Add the holy basil and stir (carefully!). Simmer a bit more then take off the heat.

The curry came out much better than I expected. I thought my first attempt at Thai cooking at home might not capture the full flavors that I expect of Thai food…plus I was using a lot of dried/not fresh ingredients. Well, I was pleasantly surprised that all those Thai flavors did come forward, without overpowering one another! It should still be tweaked to your taste though, depending on how spicy you like it. The tilapia fillets worked really well with this. They were just the right amount of tender and held the flavors perfectly.

I used dried kaffir lime leaves and dried galangal which I found in Spices 'n Flavours. This was before I found out that you can get fresh kaffir lime leaves, galangal, and holy/Thai basil from Gil Carandang's Herbana Farms stall at the Salcedo Saturday Market. I have, since then, also found fresh galangal at Rustans Supermarket. My good friend who just came back from Thailand brought me back some kaffir lime leaves as well…in a very spiffy-looking blue tin! Thank you Gypsysoul! I will be using these next :)

I have yet to try Thai dishes in Thailand, which I am told is one of life’s amazing food experiences. Until then I have this...thanks Mae for always inspiring!

To try next time:
- Using fresh kaffir lime leaves/galangal/holy basil
- Adding fresh cilantro at the last minute
- Using real lime instead of calamansi (first I have to find some)
- Substitute the tilapia with prawns or chicken
- Adding a vegetable like kangkong or spinach or eggplant

Prawns with Aligue


Ever since we got married, my mother-in-law has been randomly gifting us with little food surprises. We never know what we are going to get…it can be anything from canned corned beef (if you are Filipino, you will understand this fixation) to fresh market produce, to marinated sardines bottled by our godmother. Every time a new package arrives we excitedly inspect it to see what we have, and start making plans for how we will use it. I like to pretend I’m an Iron Chef and mum-in-law’s gift is the surprise ingredient. And the surprise ingredient for this post is…prawns!

The day the prawns arrived on our laps both C and I debated about what would be their fate. C-food lover had lots of ideas, but in the end we both turned to a bottle that he had bought from our last market outing. Now, I know my last post was nice and healthy, so I must warn those unfamiliar with my, um, bad habits, to turn away now if they are looking for something light/lite. What was in the bottle? Why, a secret ingredient of our own…aligue or taba ng talangka. In English: crab fat.


The marriage of prawns and aligue is incredible…so rich and dangerous…like seafood in the fast lane, seafood that you don’t take home to mama. I sauté the aligue in lots of garlic, and cut the fatty-ness with a lot of calamansi (a local citrus fruit). I like to keep the prawn's head on to heighten the flavor of the whole dish, and also because I like the way they look with their heads.

Prawns with Aligue
  • 500-600 grams prawns
  • 1 8-oz. bottle of aligue or taba ng talangka
  • 4-5 cloves garlic, chopped
  • Juice of 4-6 pieces calamansi (or juice of 1 lemon)
  • Olive oil

- Heat olive oil in a pan. Sauté garlic until lightly toasted.
- Add aligue and sauté for about 5 minutes. Add calamansi or lemon and stir.
- Add prawns and cook until bright red-orange in color.

Very simple, and boy does this hit the spot…perhaps too hard for some. I served this with hot, steamed rice and kangkong (water spinach) sautéed with garlic and Sichuan peppercorns. I think it would do great with pasta too. Serve with some calamansi or lemon on the side. Don’t count calories. Enjoy!

We will be leaving for mum-in-law’s egg farm (yes, eggs, yey!) and I won’t be back until after Easter. I have planned lots of napping, reading, and grilled seafood. Can’t wait! Happy Easter!