Vegetable Meme


I have been tagged for a veggie-meme by Honeybee of Beurre et Pain. Although it may not seem immediately apparent, I actually love vegetables, it’s just that my love for bacon and chocolate sometimes tends to obscure this fact. My problem really is that there isn't much I won’t eat…

Anyhoo, on with the meme, six questions on vegetables:

1. Is there a vegetable you hated as a child but came to love as you got older?
There are a lot of veggies that I developed a taste for only as I grew up. Although I can’t say I absolutely hated any of them when I was a child. I ate pretty much anything that was in my path. There is one that I vehemently disliked as a child, and still do now – ampalaya (bitter gourd). I mean, it’s really bitter. Why?

2. Most underrated vegetable?
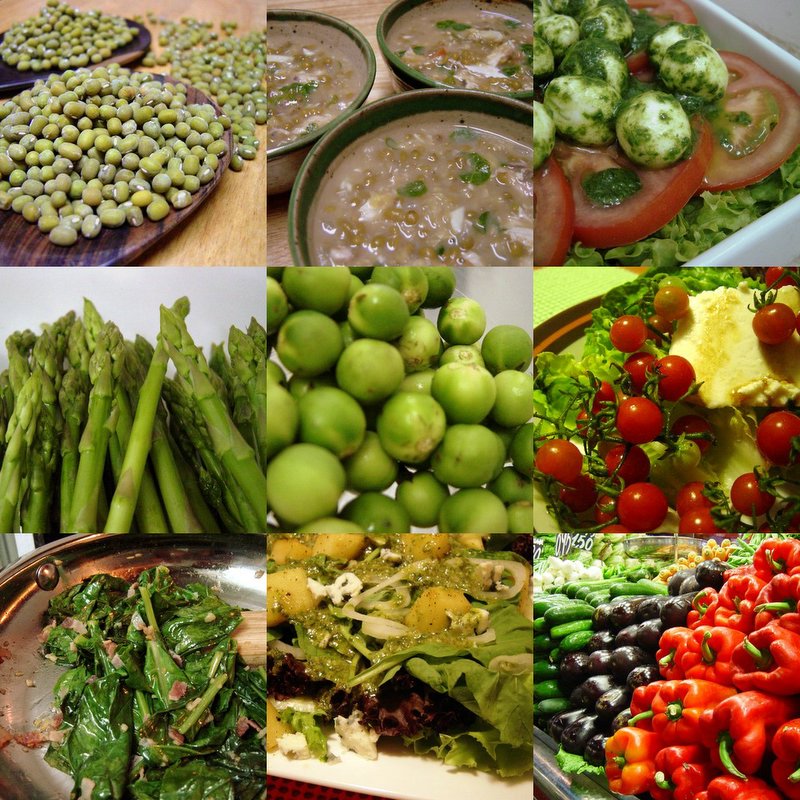
I would have to say malunggay (Moringa oleifera Lamk). It’s a local plant that can grow pretty much anywhere here. It doesn’t cost much and it has a ton of nutritional and medicinal benefits. It’s also my favorite vegetable to put in monggo (mung bean stew). Although they make pills out of it for breast-feeding mothers (it’s supposed to increase breast milk…imagine that!), I’d like to see it used more at the table and at restaurants.

3. Name one favourite summer vegetable dish.
Summer is a pretty broad term here as we have no real winter. In the summer I like to eat salads that have fruit and sinkamas (jicama?), or just cold sinkamas with some salt. Another great and refreshing salad is pako salad. Pako is a type of fern and I like is tossed with thinly sliced red onion, tomatoes, and some red (salted) egg. I also love (and I do mean love) lato...a type of seaweed. Ok, is that still considered a vegetable? Well, it's a veggie of the sea! The best way to have it (in my humble opinion) is fished directly out of the sea (lato will only grow in clean water so don't worry), give it a few swishes in the salty sea water, and pop into you mouth. It has these small globes that burst in your mouth with sea-and-summer-tasting goodness. Amazing.

4. And one for winter?
No winter here! :) It does get a bit chilly (this is very relative…”chilly” here is not really chilly in the general sense of the term…it’s more like “not hot”) around December, and around June our “wet” season starts. During these times a hot bowl of monggo (mung bean stew) can’t be beat!

5. What vegetables are in your fridge and freezer right now?
Tomatoes, lettuce, sprouts, red cabbage, mustasa (mustard leaves), eggplant, labanos (radish), and gabi (taro?).

6. Is there a vegetable you really like but don't make much yourself?
Brussel sprouts! I LOVE brussel sprouts, but as supply here is not as regular as I’d like, and it’s also a bit pricey (being imported), so I don’t have them all the time.

No tags for now but if you’d like to join in feel free and let me know!

Hay Hay It's Donna Day #9: Spinach & Cheddar Soufflé


I did it! My little heart flutters even as I write this. Bear with me and my naïve excitement for a moment. Foodie fears are not stared down into submission everyday. But yesterday was just such a day for me. After much tension and worry, laying awake at night with Donna Hay’s Modern Classics Book 1 on my chest, and praying to all manners of food gods, I finally marched into my kitchen to do it. I hid my phone away, gunned my KitchenAid, and took destiny by the reins. For the first time in my life, I made a soufflé.

Such a big deal over one dish you say? For this girl, a very big deal. Making a soufflé has always been one of my food fears. Anything that deals with handling egg whites is a challenge for me, especially when they play the pivotal role. The dishes (and desserts) I make are rich and substantial. I rarely venture into the “light and airy” part of food land. As much as I’d like to be able to associate myself with “delicate” (and I really, really do!), I, more often than not, gravitate towards “hearty”.

So what was the catalyst that propelled me towards the un-chartered waters of soufflé-making? It’s all thanks to Tami of Running with Tweezers, the host of this month’s Hay Hay It’s Donna Day! She chose soufflés as the theme, challenging us (well, me at least) to push cooking boundaries and get out of the kitchen comfort zone. (She didn’t leave us to wander about clueless though…she left us some tips)

From the moment Tami announced the theme, until I had safely taken a picture of the soufflés, I was a bundle of nerves. I stuck to the original recipe Tami posted like glue…I was not taking any chances. I had my own copy of Modern Classics Book 1 too, so I read and reread the recipe ad nauseum.

I set aside the whole morning to make it, alone, with no interruptions. I quietly went about doing the prep work (I actually really love this part -- so conducive to reflection): grating the aged cheddar, blanching the spinach, measuring out everything. Then I got on with the custard base. No problems there…egg yolk and I get on famously. In fact, this part went on like a dream…and the resulting creamy base was so yummy! There was many spoon-licking moments while musing, “Is this room temperature yet? Hmmm…better have another taste..."

Finally it was time to whip those egg whites into shape. I rolled up my sleeves and stood by the humming mixer. Was it stiff peaks or soft? I can’t tell! Ack! I was faltering. Get yourself together Jo! I turned off the mixer. Stiff or soft you whites are getting folded in…right now! I gained control of the situation once more and gently folded the whites into the cream base, then spooned them into the ramekins I had previously buttered and coated with bread crumbs. Then off they went into the oven…and all I could do was wait with crossed fingers.

I was so nervous at this point that I turned off every single fan in the apartment and closed all the windows. And I live in Manila. And my kitchen is already “naturally” hot to begin with. Sweat trickled down my face as I stared into the gloom of the oven through its glass door. Was it going to happen?

Well, you be the judge. I think they still have a bit of awkward pre-pubescence about them. Not quite all the grace and elegance of the more Audrey-Hepburn-esque soufflés I have seen. But as they came out of the oven, their little tops puffy and proud, my heart melted and I loved them anyway. Even the little guy who, uh, had a minor “accident” as I must have over-stuffed him. So for now, I will settle for…cute :)


Of course, no pudding can be proved without the tasting, and by strange coincidence my best friend K drops in earlier then planned, just it time to sample my achievement! I am happy to report (whew!) that it got a good review from K. I couldn’t have asked for more from my first soufflé…living up to its name, it was light and fluffy (yes!), and delicious to boot! I need to have cheese in soufflé form more often I think. (here’s a great idea for a cheese soufflé from Peabody)

Thank you Tami for being such a great HHDD host and for choosing a fantastic theme! Truth be told, if it weren’t for you, who knows if I would have ever made this. So thank you!!!

(a little side story: I burnt my finger pulling these babies from the oven. I showed the blister later to C hoping for some sympathy, and he quotes Anthony Bourdain’s Kitchen Confidential about having cook’s hands and that I should be proud. When did he turn into a Bourdain-quoter? And yes, I was a bit proud.)

Amatller Chocolate a la Taza


I had been meaning to post this for this month’s round of Sugar High Friday, a blogging event in celebration of sweets started by the Domestic Goddess. This month’s host is the esteemed David Lebovitz and the theme he has chosen is Chocolate…by brand. Food bloggers were invited to make something with chocolate (but of course!) and talk about the brand used, and why it was chosen. There are many reasons to choose a certain brand of chocolate, but one of the reasons David mentions stood out for me: “…Or you bought your chocolate on a trip and were saving it for some special occasion…” Ah, yes. I did indeed own one such chocolate.

Unfortunately, I am late. Sigh…my brain must have been all fizzy when I read the instructions…especially the part about the deadline. Of course, I was not going to let a little tardiness keep me from enjoying a delicious hot drink made with a very special block of chocolate, bought during a very special trip. So here I am…with a luscious hot chocolate made with Amatller chocolate a la taza.

I came upon this little treasure on my honeymoon. We visited one of my absolute favorite cities in the world…Barcelona. Barcelona vibrates with a special beat and rhythm all its own…and it has a fair share of excellent chocolate. Although I already have my favorites, this new discovery was much welcomed. Here’s a little bit about this chocolate's provenance as taken from my previous post:

Casa Amatller is one of the three buildings that make up the famous “manzana de la discordia” (block of discord or apple of discord). The “manzana de la discordia” is made up of what is said to be the three finest modernist buildings in the entire city: Casa Batllo by Antoni Gaudi, Casa Amatller by Josep Puig i Cadafalch, and Casa Lleo-Morera by Lluis Domenech i Montaner. The three buildings can be found side by side on the Passeig de Gracia, each stunning façade competing for your attention (hence the discord). The building was bought in 1898 by chocolate industrialist Antoni Amatller, and you can buy their chocolates inside. Entranced by their gorgeous packaging, delicious looking offerings, and the girl at the register telling me my Spanish was very good, we happily purchased the following: Amatllons (which are what they call their catanies), more dark chocolate, and a block of chocolate for drinking (which is their own special blend with a touch of cinnamon). You can find them at Passeig de Gracia 41.

Casa Amatller (along with Casa Batllo and Casa Lleo-Morera) is magical. Its whimsical, almost fairy-tale like façade hosts many little creatures in nooks and crannies, all operating instruments used in the early days of chocolate making. So if you do see it, take time to really explore the detailing. Although the house itself is closed to the public, they still sell the Amatller chocolates on the ground floor. (I have heard rumors though that Casa Amatller will be opened and that a lot of the original furniture is still intact! That will definitely be something to see!)

As instructed, I melted 2 small blocks of the chocolate in 1 cup of milk that I had been heating on the hob. Then, in a fit of chocolate madness, I tossed another block in. At first glance it looked like regular breakfast chocolate, milky and not too dark. But as I took my first sip, and let its delicious-ness shimmy down my throat, I was totally won over. Not as thick as the hot chocolate made here or the classic ones you get in the old granjas, but it is rich nonetheless, perfectly suited to sipping, and kissed with just a wee bit of cinnamon (as the very amiable girl at the shop promised).


In line with it being a special occasion, what with me bringing out the little cache of honeymoon goodies, I decided to enjoy my chocolate in my new pot and cup set, a belated wedding present from one of my favorite cousins. Isn’t it adorable? The best part is it stacks up nicely and you can place it on display instead of storing it in your (already overflowing) cupboard. It’s made by a very talented local artist named Impy Pilapil who works with all kinds of media and has exhibited all over the world.

This may not have made it to this month’s SHF, but it definitely made for a cozy afternoon, where both the reminiscing and the chocolate exuded a special warmth. What more could one ask for? :)

Spiced Apple Chutney


The remainder of the apples were looking more and more ornery with each passing day and their dissatisfaction was beginning to show around the edges. I had to use them fast, before they turned into toothless apple-mush right on my dining room table. They weren’t looking quite as perky as they did when they first arrived. A dilemma. How to use up the vestiges of the apple-bounty in a way that wouldn’t call attention to their, um, less than stellar state? My mom had the answer (she has all the answers): “Make a chutney!

And because mother knows best, that’s what I did.

I already had bookmarked a small pile of chutney and relish recipes in the past, so I eagerly went through them to find the perfect one for our apples. I decided on Spiced Apple Chutney from Nigella Lawson’s How to be a Domestic Goddess because: Nigella can be very convincing when she lays on the “intense, hot flavors” spiel, it was one of the recipes that used only apples, and it really did sound delicious.

I had to make a few adjustments to accommodate what I had in my pantry. I increased the recipe so I could use up all the remaining apples. Also, Nigella uses cider vinegar but I had none, so I used a small bottle of pure honey vinegar (it sounded like it would go wonderfully with this chutney), added all the red wine vinegar I had left, and when that was done topped it up with white cane vinegar to reach the required amount. The original recipe also called for turmeric, but I didn’t have that either, so I left that out and hoped for the best. I didn’t have bird’s-eye red chilies, so I used some dried red chilies I got on my trip to Egypt.


Spiced Apple Chutney
(adapted from Nigella Lawson's How to be a Domestic Goddess)

  • 800 grams peeled and chopped apples
  • 1 big onion
  • 3 dried red chilies
  • 400 grams brown sugar
  • 1 ½ tablespoon finely chopped ginger
  • 1 ½ teaspoon freshly ground cloves
  • 1 ½ teaspoon freshly ground allspice
  • 560 ml vinegar (The original recipe called for cider vinegar, but I didn’t have any. I used 250 ml pure honey vinegar, 250 ml red wine vinegar, 60 ml white cane vinegar.)
  • Salt and pepper to taste

- Peel the apples and roughly chop. Nigella’s indicated weight was before chopping, but my indicated weight (of the apples, above) was after.
- Finely chop the onion and the ginger. Grind spices (I ground them together).
- Toss all your ingredients in a heavy bottomed pot or pan and bring to a boil.
- Cook until mixture thickens (mine took 1 ½ hours). Keep watch and stir occasionally (later in the cooking I smashed some of the apple chunks and left some whole).
- Spoon the hot chutney into cleaned jars, leaving a little space on top, and close the lid. Turn jar upside down and let cool. Once completely cool turn jar right side up again.

A note on cleaning jars: I clean my jars and lids in very hot (the hottest my heater can crank it up to…which is pretty piping) soapy water. I let them dry upside down on a clean tea towel. This being said, I don’t make large batches (that goes for jam too) to store for the winter (as we have none), and anything I make is usually opened right away, stored thereafter in the ref, and finished quite quickly. So, as far as real sterilization goes, it’s best to follow the professionals.


The chutney came out a beautiful burgundy, instead of the light golden color of Nigella’s, and it was delicious! Surprisingly delicious for something made to use up a pile of old apples, and considering I had to substitute (and leave out) certain things from the original recipe. The flavor of the vinegar is a big part of a chutney’s taste and Nigella and I used completely different types. Despite that, this chutney stayed true to Nigella’s promise of “intense, hot flavors”.

This will be excellent with your favorite curries, as well as all kinds of roast meats. I love it spooned on a slice of brie, or spread on grilled gruyere on toast. It is also great in cold ham sandwiches with some mustard and greens. For a quick (and economical) appetizer pile it on a brick of cream cheese and serve with crackers. If you have a little more time, make bruschetta and top with some watercress, a small wedge of brie, and a generous smidgen of the chutney. A jar of this would make a lovely gift. And (as these suggestions wouldn’t be complete without her input), Nigella "cannot eat a Cornish Pasty without it".

I will definitely try this with the original ingredients and see how it differs. I foresee this becoming some sort of staple here. I am still discovering all sorts of wonderful pairings…and I love its sour-sweetness, punctuated by the robust flavor of the spices. Our half empty bottle is now in the ref, where it sits snugly waiting for its next use. And because mothers know best, we gave a bottle each to ours!

(My two previous apple posts)

Canadian Apple Cake


Part of the fantastic amounts of food moving about our tables at the holidays was a big box of apples, a gift from our godmother. C & I hauled it home, the apples’ sweet smell escaping from the carton and making me sigh…they smelled so good! We unloaded our loot as soon as we arrived and I brought out our biggest white platter, piled the apples high, and placed it in the middle of our dining room table. It looked, and smelled, fabulous.

Just seeing the apples started a chain of apple-cooking-and-baking plans in my head, but this was the middle of the Christmas season and we were off to one place or another, buying gifts and having wonderful meals with family. So the apples remained piled high in the middle of our table, no less fabulous, but slowly and surely moving towards their use-by date.

Finally, I took them in my arms, murmured fervent apologies for the neglect, and promised that this was finally the day when they would become more than a centerpiece! The first dish I made was a delicious salad with apples and blue cheese. But I had to move fast, as there were still more apples that needed parts to play before they were past their prime. What to do? Well, there is one girl to turn to when you find yourself with an abundance of apples. You can throw her an orchard’s worth and she will juggle them into luscious home made treats with ease and aplomb. Her name is Pille and it was to her blog, Nami-Nami I went for a solution.


I chose to go with what she dubs her “most faithful apple cake recipe”: Kanada õunakook (Canadian Apple Cake). You will find the recipe here, along with the story of a Canadian cake in an Estonian (Pille’s from Estonia) cookbook. I stuck to the recipe pretty much exactly; except I didn’t have an eight inch springform pan so I used a regular pan but it still came out fine…obediently slipping out of the pan, almost as if it wanted me to love it. And my new pink cake stand makes its debut performance!


I cannot say enough both how delicious, and how easy to make, this cake is. It’s a cinnamon-laced cake, filled with apple chunks that go soft and sweet in the baking, adding moistness to the cake. To top it off, quite literally, is a cinnamon crumb mixture that melds beautifully into the cake, still chewy in some places, and crunchy in others. C & I both enjoyed it, with C exclaiming, “We should have this with vanilla ice cream!” And so the next day we bought a tub, carted the cake to my parents’ house, and shared our bounty with my mom, dad, and brother. But we are not the only ones who have enjoyed this cake…check out the other bloggers who have tried it.

Thank you Pille for being so generous with your apple expertise!

(and don’t think that this is the end of the apple posts…)

Apple and Blue Cheese Salad


As much as I would like to live a life filled with decadent disregard for things like calories and extra pounds, a life packed with things like porchetta and chicharon and chocolate truffles, the reality of it all is that, sigh, I do have to think of these things (sometimes!). Truth be told though, I am not always the fat-gobbling, calorie-consuming Braveheart that I sometimes paint myself to be. Oh, that is definitely a big part of who I am, but I also love vegetables and fish and food that won’t kill you. I guess at the end of the day, I can say that I am an equal opportunity eater: everything gets an equal opportunity to be eaten by me.

After all of the holiday’s feasting, it was time for a little restraint. Not the restraint you would equate with suffering and deficiency, as this salad does not in any way evoke either. It was just time to eat a little lighter…something both my tightening jeans and taste buds where telling me. Yes, it happens…even to a voracious pork lover like me…I was in the mood for a salad.

I threw this salad together based on ideas and inspiration from the salad recipes in Donna Hay’s The New Cook. She has so many wonderful-sounding salads! In fact, the dressing I use here is hers as well (from her magazine, Spring issue 23). So this salad basically sprung from the crossroads of: her recipes, what I had available, and a surfeit of apples from the Christmas season.

Apple and Blue Cheese Salad
  • a bunch of red and green curly lettuce
  • a bunch of arugula
  • 2 apples, chopped into cubes
  • 1 medium onion, sliced as thin as you can manage
  • a small hunk of blue cheese (depending an taste)
  • a knob of butter
  • a pinch of brown sugar and freshly cracked black pepper

- Wash your greens and dry with a paper towel (I have a salad spinner but I find myself rolling the greens in a paper towel more and more often instead).
- Melt butter in a pan, once it’s clear and bubbly toss in apples and sprinkle with a pinch of sugar and pepper (to taste). Let apples cooked a little until the sides are a tad caramelized.
- Arrange lettuce on a plate, top with arugula, then the onions, then apples.
- Crumble blue cheese on top and drizzle dressing over everything (or, if you are like my mother, serve the dressing on the side).

Herb Dressing
(from Donna Hay Magazine, Spring issue 23)

  • ¾ cup basil leaves
  • 2 ½ tablespoons rinsed capers
  • 2 teaspoons Dijon mustard
  • 2/3 cup extra virgin olive oil
  • 1 crushed garlic clove
  • 2 tablespoons lemon juice

Process in a food processor until just combined (I used an immersion blender).

That’s not all we had! We also enjoyed a strawberry yogurt smoothie with our salad.


Strawberry Yogurt Smoothie
  • 2 cups milk
  • 1 cup natural yogurt
  • 2 cups strawberries
  • ice
  • honey to taste

- Blend everything but the honey in a blender.
- Taste.
- Add honey to sweeten, if needed.
- Makes 3 glasses.

I so enjoyed this meal! The different components of the salad seemed to interplay perfectly with one another: the apple, the onion, the blue cheese…even the dressing. I really liked that I had pan-seared the apples first (fyi, Donna did it with pears). I was quite pleased with myself, and am now happily thinking up of all kinds of salads I can make for me and C (who is an absolute vegetable lover by the way). The smoothie was good…but could have been better as our strawberries weren’t that sweet…hence the honey.

Is this the end of fatty foods for me? Hardly. Only the beginning of more variety!

Chanterelles


Before I hurl myself completely into 2007, let me share one last bit of 2006 magic. I know, I know...I should have shared this little miracle when it happened, but other posts pushed their way past, and this was left in my “archives”. Coming upon it now, I still feel the mixture of joy and disbelief I first felt when I saw them...all cozy and earthy in their basket, propped up in the produce section of Santis Rockwell (a specialty food store that gladly takes my hard earned money). I grabbed the nearest salesperson, “Are th-th-those chanterelles?” She smiled and nodded.

You must understand, I love mushrooms. I buy them every chance I get. I can eat them everyday, in spite of dire warnings from yogis that “things grown in dark places” are not good for the chakras (or whatever it is yogis look after). I remember with longing the markets in Helsinki and Amsterdam…crates of wild mushrooms that looked like they had been only minutes from the forest….a burly purveyor in an old cap, a little dirt still on his hands, helping me pick out that night’s dinner.

Here in my sunny islands, you can get fresh mushrooms. Button is available, along with Asian mushrooms like shiitake, oyster, and enoki. More and more interesting finds are available in our markets. You may also find portabellos, but they will cost you. But wild mushrooms like chanterelles, morels, porcini, and trompettes des morts are only available dried…and not cheap either! Now, the mushrooms readily available in our local markets are absolutely delicious, and I do explore these guys extensively, but I miss those wild mushrooms.

So, you can imagine my delight when I saw these chanterelles. Never mind that they probably went on a long journey to get here and the forest was already just a sweet memory for them. Never mind that they came with a hefty price tag (just under P1500/kilo). They were fresh (not dried) and they were here! I eagerly picked out a small portion and rushed back home to peruse recipes.

I settled on a recipe by David Tanis from Saveur Magazine (November 2005 issue) in a feature called An American Cooks in Paris. I liked it for its simplicity, and as I had no idea when I would ever come across fresh chanterelles again, I wanted a recipe that would showcase the flavor of the mushroom, with no other distractions.

The recipe (actually it is more like a lesson as there are no exact measurements or volumes) is for Wild Mushroom Sauté and includes more than one type of mushroom. It’s an excellent basic recipe for any mushroom and is still one of my favorite ways to prepare them.

Wild Mushroom Sauté
(from Saveur Magazine November 2005 issue, page 72)

- Spread mushrooms out to dry and clean them. Trim of brown spots. Cut off bottoms and split them to remove dirt. If they are really dirty just swish them around in some warm tap water.
- Roughly slice the mushrooms.
- Heat some extra virgin olive oil in a sauté pan, add one clove of minced garlic, cook for a minute, raise the heat, and throw in the mushrooms (thickest first if using different types).
- Sauté for about 4-5 minutes.
- Season with salt and pepper then toss in some chopped parsley.
- Get the mushrooms off the fire and turn out onto a plate.

Simple and perfect…especially for my chanterelle “harvest” as this really highlights the mushroom’s flavor without much accoutrement. I was in mushroom heaven! This was one of those meals eaten with eyes closed, in hope that it wouldn’t end. Isn't it amazing how a single ingredient can transport you?

If the chanterelles and I ever cross paths again, I will be looking for recipes on The Flying Apple and Nami-Nami, two blogs that I know to have great ways with chanterelles (as I am usually at the comment box, green with envy at the mushrooms they find and cook).

***I asked the staff of Santis when they will have chanterelles again. They said that supply isn’t regular so they can’t predict. Sigh…I supposed some things are all the more magical because you never know when they will choose to grace your life again…

Porchetta


Happy New Year! A new year always has a feeling of hope and anticipation for me. No matter what has come before, or what will actually transpire after, when standing on the cusp of a New Year, anything is possible. Perhaps this sense of exhilaration also comes from a wonderful Christmas season. This Christmas was filled with such a feeling of peaceful contentment that, upon reflection, I realized I had missed for a while now. Aside from some last minute gift and food-prep, there was a distinct absence of the “hustle and bustle”…at least in my own mind. Long weekends were spent lazily wrapping gifts while watching C busy himself around the apartment with a hammer, hanging up our paintings. The time in-between Christmas dinners and get-togethers were filled with long naps and catching up on our reading. And the sense of family seemed stronger for me this year…stronger and more precious.


This was something I prepared for a small Christmas lunch in our apartment. Just my mother, my brother, C, and myself. I came across the recipe long ago here, in Keiko’s amazingly beautiful blog Nordljus. The original recipe can be found here. The piece of pork belly I used was smaller than the original 5 kg (we were only four after all), and I didn’t have any fresh thyme (so I used dried), but it turned out delicious nonetheless. I also nixed the sautéed potatoes mentioned in the original recipe; instead we had a green salad.


Porchetta
(adapted from this recipe)

  • 1 piece of pork belly - ask the butcher to remove the ribs (size depends on how many people you are serving)
  • coarse sea salt
  • leaves from a large branch of fresh thyme (or about 2-3 tsp dried)
  • needles from a large branch of fresh rosemary, roughly chopped
  • a large bunch of fresh sage leaves, roughly chopped
  • 1 tbsp fennel seeds (if you can find wild fennel, use it instead, finely chopped – I didn’t find any so I had to use dried…but I’m still on the lookout!)
  • 8 garlic cloves, finely chopped
  • 2 tbsp olive oil
  • 4-5 tbsp runny honey
  • freshly ground black pepper

- Preheat the oven to 155C. Lay the pork belly skin-side up on your chopping board and score the skin across its width.
- Flip meat over so it is now skin-side down. Sprinkle the salt and coarsely ground black pepper over it, rubbing them well into the meat. Leave to rest for ten minutes so the salt and pepper settle well into the meat.
- Sprinkle the herbs, fennel seeds and garlic evenly over it.
- Next, tie up the meat. Carefully roll the meat up width-ways and tie it very tightly with string in the middle of the joint. Then tie at either end about 1cm/½ inch from the edge and keep tying along the joint. The filling should be well wrapped, if any excess filling escapes from the sides, push it in.
- With your hands, massage one tablespoon of the olive oil all over the joint. Then rub the remaining salt and some more black pepper over it.
- Grease the rack of a large roasting tin with the remaining olive oil and place the pork on the rack, while pouring some water in the tin itself. Roast for 2.5 - 3 hours.
- Increase heat to your oven’s highest setting and roast for 15-30 minutes more to sear skin and (hopefully) produce crackling.
- Remove the joint from the oven and coat with honey, drizzling some of the juices from the roasting tin all over it too. Insert a fork in either side of the joint and lift it on to a wooden board.
- If you want, you can make some pan gravy. Remove all juices and oil from the roasting tin. Return about 2 tablespoons oil with 2 tablespoons flour into the tin and place on the hob and stir with a wooden spoon until the mixture turns a nutty brown color. Return juices to pan and add some white wine and about a cup of water, scraping the pan to deglaze. Taste and season if needed.
- Slice the joint thinly and serve with the sauce. Alternatively, leave the meat to cool and slice when needed. It will keep for up to a week in the fridge.

This turned out much better that my first attempt at roast pork…primarily, I suspect, because I would rather be eating a pork belly then a pork loin any day. The stuffing was also incredibly aromatic and produced an amazing flavor…especially the fennel, which I think goes brilliantly with pork. And the honey is just the perfect crown for this dish. Most importantly, to me at least, there seemed to be the beginnings of crackling along the edges. Just a small cluster, fighting to surface, but enough to convince me not to give up hope!

I think the emergence of the crackling can be attributed to the change I made in the cooking temperature. A tip I got from Santos. Instead of a high-heat sear in the beginning of the cooking time, I did it at the end. I also put some water at the bottom of the tin, another recommendation from my first attempt. If anyone has more suggestions, please pass them on. Crackling…you will be mine yet!


Here are some pictures of our gift-opening that day. I got a pink cake stand (hooray!!!) which came with matching aprons for C and I…mine in a retro pink pattern and C’s was the front of a gladiator! I think this was one of the Christmas celebrations I enjoyed the most…so simple and intimate, where the quality of the company was the main player (along with a yummy porchetta) :)