Typhoon Ondoy

As some of you may have heard, we were struck by a horrible typhoon (typhoon Ondoy, international name: Ketsanaon) on September 26, Saturday. Most of Luzon (the region where Metro Manila is) was placed under a state of calamity on Saturday as cities and provinces in the region lay victim to massive flooding.

My family and I are safe but that is not the case for a lot of my fellow countrymen. Many lost their homes, and in numerous tragic cases, dear ones as well. Some are still missing. They need our help.

Here are some ways to help:

  • You can donate to the Philippine Red Cross HERE – you just have to choose Typhoon Ondoy under Project/Activity. More ways to donate to the Philippine Red Cross HERE. You can also donate via Txtpower.org to the Philippines Red Cross. You will need a Paypal account though.
  • Midge of Sybaritic Diversions has put together some numbers to call HERE.
  • Marketman is increasing his feeding program's efforts in the public schools in Taguig HERE.
  • Starting today, 29 September, the Philippine National Red Cross will be accepting relief goods and donations for the victims of Typhoon Ondoy from 8am to 8pm at The Blue Leaf Events Pavilion, 100 Park Ave. McKinley Hill Vill. Fort Bonifacio, Taguig City.
  • Enderun College (1100 Campus St, McKinley Hill, Fort Bonifacio) is preparing food packages for distribution and accepting food donations.
  • Whitespace, a venue in Makati, is also accepting donations. Most needed are: potable water, rice, blankets, clothing detergent, body soap, clothes, canned goods (or any food that can survive transport). Also needed: crackers/cookies, noodles, toiletries, formula...and VOLUNTEERS to help repack everything and load them into vans. Also badly needed are Vans for transport. Whitespace is in 2314 Pasong Tamo Extension (in between Cantinetta and Makati Hope Christian School). You can call 8447328 for more info.
  • All LBC branches, both here and abroad are available as drop-off centers for relief goods and cash donations which will be transported/remitted for free. They have partners such as ABS-CBN to make sure the goods are sent to those most in need.
  • If you are in the Alabang area you can call Deds. They are offering their showroom as drop off point for donations for the flood victims. They will deliver the goods to De La Salle Zobel so you don't have to go inside the village. Please drop off from 9 AM to 5 PM at Shop Familia, #406 Richville Corporate Centre 1314 Commerce Avenue Extension, Madrigal Business Park, Alabang Muntinlupa City. Phone: 8428412.
  • You can check Mc Donald's or Jollibee outlets. Most of their outlets are drop-off points for everyone to donate relief goods.
  • All La Salle Schools are accepting donations in cash and kind for the typhoon victims. Details on their Ondoy Relief Operation can be found HERE.
  • ABS-CBN drop off point for donations is at Examiner St., right by Alex III. Manggy has heard clamor for new underwear but of course food and potable water is the priority.
  • Also from Manggy: Doctors who wish to volunteer their services can contact the Philippine Medical Association at 929-6366 or 929-6951.
  • Ateneo de Manila University is also organizing relief operations. See details HERE.
  • For those in the U.S., you can view links posted by Knitty Mommy for US donations HERE.
  • If you are abroad, you can also use your Amazon account to donate to THIS Kickstart project.
  • THIS LINK lists the consolidated efforts for Typhoon Ondoy relief.
  • Gawad Kalinga Foundation is also organizing relief efforts. You can make donations HERE.

Amidst this tragedy, the amount of people coming together to help is truly inspirational. If anyone knows of more avenues to help, send donations, places in need of volunteers, please leave a comment. I will repost them here as well. Thank you!

Inspiration Board: Where the Wild Things Are

To celebrate the release of the film version of Maurice Sendak's Where the Wild Things Are, I thought I'd post a few pics of some fabulous Wild Things-inspired cakes. The cake above, from Coco Cake, has been floating around the web for a while, but with the movie coming out on October 16th, I just had to post it, along with the one below by tallulah blue.

If you're not as artistically gifted as these bakers, you can also buy edible cake decorations that will quickly transform a plain old cake into a page from Sendak's much-loved book! Check out Ebay for more designs or just click here for the one below.

Mixing Bowl: Zucchini Cake with Coconut Cream Cheese Frosting by Oh So Good

Today’s Mixing Bowl recipe comes from graphic designer and Etsy seller Sarah Roberto of Oh So Good. Her delicious recipe for whole wheat zucchini cake with coconut cream cheese frosting would be make a tasty weekend treat and would also be a great way start the fall baking season! Personally, I love zucchini bread, even though zucchini is one of my least favorite veggies. I'll eat the green squash, but it's not my first choice, but zucchini bread . . . yum! The fact that it doesn't have an overwhelming zucchini flavor makes it a great, healthier, dessert option for the kiddies, too. Just don't tell them that there's zucchini in it!


Sarah is a Toronto-based graphic designer who creates environmentally-friendly notebooks, greeting cards, and gift tags using salvaged paper. For example, when you buy one of Sarah's notebooks, the inside will be filled with found pages (grid, lined, colored) and the cover print may have been rescued from a discarded book or a scrap of vintage wallpaper. Such a great idea! I don't often buy stationary products because I inevitably feel guilty about the environmental impact. As a result, I have TONS of unbound paper scraps floating around my house with various notes scribbled on them. Sarah's notebooks are a great way to stay organized, without hurting the environment! The faux wood notebooks have my name written all over them, but there are a lot of other great designs to choose from. You can view Sarah's collection online right here.


Thanks so much to Sarah for sharing her recipe with us! Happy Baking!

You can find the full recipe and more photos after the jump.


Whole Wheat Zucchini Cake with Coconut Cream Cheese Frosting

CAKE

Ingredients:
• 3 cups whole wheat flour
• 1 tsp. salt
• 1 tsp.baking soda
• 1 tsp. baking powder
• 3 tsp. cinnamon
• 3 eggs
• 1 cup vegetable oil
• 2 cups white sugar
• 3 tsp. vanilla extract
• 2 cups grated zucchini
• 1 cup chopped walnuts (optional)


Directions:
1. Grease an 8 x 8" pan. Preheat oven to 325 degrees F.
2. Combine flour, salt, baking soda and cinnamon in a bowl.
3. Beat eggs, oil, vanilla and sugar in another larger bowl. Add dry ingredients to the creamed mixture and beat well. Stir in zucchini and nuts. Pour batter into prepared pan.
4. Bake for 40 to 60 minutes. Remove from pan and cool completely.


Frosting

Ingredients:
• 1/4 cup unsalted butter, room temperature
• 4 ounces (1/2 cup) cream cheese, room temperature
• 3 tbsp. icing sugar
• 1/2 tsp. vanilla extract
• Flaked coconut
• Raspberries and mint leaves for garnish (optional)

Directions:
1. Beat butter and cream cheese until smooth. Gradually add icing sugar and beat until smooth. Beat in vanilla extract.

2. Spread frosting on cooled zucchini cake.

3. Preheat oven to 350 degrees F. Spread coconut flakes on baking sheet. Toast coconut until lightly browned – this takes only a few minutes, so watch carefully.

4. Dust toasted coconut on cake and garnish with raspberries and mint leaves.

Alison Nelson's Chocolate Bar

The Web site for Alison Nelson’s Chocolate Bar is jam packed with designs I love. I really like the look of the Atomic Chocolates and the stylishly-packaged chocolate bars, whose labels are designed by artists like Rolito and Nathan Jurevicius. I'm especially interested in trying the Retro Bars, which come in flavors like malted milk, salty pretzel, and peanut butter caramel. So many choices! You can find stores in New York or Dubai or you can order online by clicking here.

(Pictured above: Stencil Bars. Below: Retro Bars, Graffiti Bars (designed by graffiti artists), Artist Bars, Atomic Chocolates)


Lemon Butter Cookies / Sablés Au Citron

title
We had such wet weather last week, with rains pouring down and gloomy skies. Going to the market required juggling an umbrella with my usual market bag, and using my free hand to inspect veggies and fruits (and trying to avoid the big drips of water from overhead make-shift awnings that seem to target my head specifically!). It also meant having to market in actual “closed” shoes as opposed to my usual flip-flops...criminy.

C was woebegone as he couldn’t go biking (he’s a passionate mountain biker). I would spy him early on weekend mornings, shuffling out of bed and peering hopefully through the window blinds, then shuffling back to bed with a sigh and a resigned look. The trails would be too muddy to ride through.

This week however flounced in full of sunshine! Sun blazing through the windows and hammering the streets with its heat. And though I’m tempted to turn on the a/c during the day, I resist. Opting instead to enjoy this bit of light and warmth in one of my beach batiks and my latest pair of flip-flops. I admit the heat may often drive me bananas, but sometimes it’s good to take a step back and be thankful for the blessings the sun brings me: all-year tank tops, never having to suffer through bitter cold weather, vitamin D synthesis, and protection from vampires just to name a few.

No matter how yummy it may be to nuzzle back into a fluffy duvet on a rainy Sunday morning, I can’t deny the air of hope that sunshine brings with it.

That’s what I’d like to celebrate with this entry to A Taste Of Yellowhope. The hope that when many gather together in support of something, the darkness does not seem so daunting nor as insurmountable. The hope you feel when you know you have someone who will stick with you through tough times. The hope that they may find a cure. The hope that tomorrow will be sunnier, cooler, better.

LiveSTONG with A Taste of Yellow is a food blogging event created by the fabulous Barbara of Winos and Foodies in support of the Lance Armstrong Foundation, to raise awareness of cancer issues. It is a platform for bloggers to share their stories, or simply their support. I have always been a great admirer of Barbara and the way she approaches life...with polish and flair and always a kindness for others. And hope too I believe.

I chose these Lemon Butter Cookies (or Sablés Au Citron if you want to be cute and French...which I must admit I sometimes do) from Clotilde’s cookbook Chocolate & Zucchini, page 224. The cheery yellow of the lemon and the butter, along with the heavenly smell of lemon rind being grated, assured me that I was on the right track with this recipe. And the delicious results were all the proof I needed to know I had made the correct choice.

Here’s what you do: Mix together 1 cup plus 2 tablespoons all-purpose flour, 1/3 cup granulated sugar, 1 teaspoon fleur de sel (I used one scant teaspoon), and 1 tablespoon freshly grated and finely chopped lemon zest (from organic lemons if possible!). Add 3.5 ounces (7 tablespoons) unsalted butter that is well chilled and diced. Rub the butter into the flour mixture (this feels really nice), or cut in with a pastry cutter until combined into what looks like coarse crumbs. Add one egg yolk and stir with a fork until blended. Take the dough into your hands and knead (lightly now...you’re not making a baguette) until it comes together and forms a ball. If they dough looks too dry add some ice water (a little at a time!). If it feels too sticky add some flour (a little at a time!). Now, halve the dough and roll each half into a log about 1-inch in diameter. Wrap each log in cling wrap and tuck in the freezer for a 30-minute nap (you can also freeze the dough for up to a month -- freshly baked butter cookies any time you want...yay!). When you are ready to bake them, remove a log from the freezer, unwrap, and slice into 1/4-inch rounds using a serrated knife (roll the dough a quarter-turn after each slice so the log stays round). Repeat with the second log. Place on a baking sheet lined with parchment and stick into a 350F (pre-heated) oven for 12 minutes. Transfer to a rack and let the cookies cool completely before adding the glaze.

To make the glaze: I only made half the glaze so to get the full quantity just multiply by two. Place 1/2 cup powdered sugar in a bowl with 1 1/2 tablespoons lemon juice – whisk until syrupy. Glaze the cookies using a pastry brush or the back of a teaspoon...or as I did here, place glaze in a ziplock bag or parchment paper cone and pipe onto cookie in any design you wish! Let cookies stand until the glaze is set.

These cookies bake up to a buttery crispness on the outside and a melting flakiness on the inside, infused with a bright lemony aroma and shot through with bursts of fleur de sel. They would be perfect shared with a good friend over tea and a nice chat.

Barbara has extended the deadline for entry submission to September 18 so you can still catch up!

Wishing you all a sunny day with a taste of yellow! :)

p.s. the sun was out for the past few days, but as I post this it has started to rain again...good thing I have stored a little sunshine in the form of these cookies!

p.p.s. it's the following day and the sun's out again! :)

Inspiration Board: Silhouettes

I'm a big fan of silhouettes, so I'm loving these shadow puppet chocolates from Food Flower Style. Yes, those are actually shadow puppet designs traced and cut out of parchment paper, and then used as chocolate molds. You can use the same concept for any sort of design, although the shadow puppet idea is really cute. (Unfortunately, this post is no longer on the Food Flower Style site, but I found a copy right here.)

If you're interested in making silhouette cookies, like the ones below that appeared in Martha Stewart Weddings, The Victor Trading Company will create a personalized silhouette cookie cutter for you (see below). Just send them a photo and you'll get a customized cutter ($30) in return. Click here for more details.


For another type of silhouette cookie, check out the these slightly more traditional cookies courtesy of The Good Apple and then click here for tips on making them.

Callos

title
What is it about old familial favourites that make them so daunting to me that I shuffle my feet in eternal hesitation to even hazard an attempt? I’m fine and dandy with things I’ve never made before, like soufflé and opera cake. I dive head first into dishes from other shores, like Thai green curry and Arni Youvetsi. But when it comes to familiar, well-loved dishes with long histories, I cower like a mouse facing a lion. I supposed you could say that when it comes to trying new things I am all daredevil and bluster, but when much is at stake (like wreaking havoc on an old family dish) I get cold feet.

Well no more! I’ve conquered my fear of making adobo (I now love making it – as only someone who has started making it late in life can). We’ve successfully managed to start down the tricky road of 
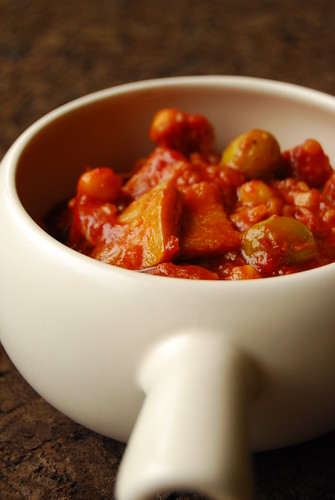
paella. And now it was time to revisit callos (Callos a la Madrilena...but just callos from here on in to keep things simple).

I made callos for the first time 3 years ago when I got married. No, not to make it for my spanking new husband, but for K’s talented then-boyfriend, now-husband J. He designed our fabulous save-the-dates and callos was his preferred mode of payment. So I promptly set about harvesting culinary information from my grand-aunt and my mum-in-law (two experts in our family) and cobbled together a recipe.

Now if there is anything I can say about our old family recipes it is this: there is no recipe. And back then, I was not as adept as I am now at recognizing the subtleties and nuances of these age-old, hand-me-down methods, or knowing how to extract the correct information from beneath memory and reminiscing, or asking the right questions to translate a technique from past to present. In short, although J’s invite design was indeed fabulous, my callos were not. They came out much too watery no matter what I did. I spent most of the night over a huge pot of what looked like a Spanish-style stew that simply refused to make the leap to a proper callos. J and K did say the flavour was good...but it hadn’t made the cut in my book. I never made callos again.

Until now.

Like Thomas Keller riding back into Manhattan on a golden chariot made of French Laundry to build a palace called Per Se, victory was finally mine.

As with the paella, I have no recipe yet. Perhaps there never will be. A basic framework, yes. An exact recipe, probably not. Dishes like these are meant to be tucked in here and taken out there and tweaked to your own brand of deliciousness.

Here’s what I did: I divided the work into two days. This is a dish that needs a lot of patience and love so I broke down the steps so I wouldn’t get too tired and ornery. On day one I prepared the meat and the stock – the backbone of the callos. Because of my first attempt’s lack luster performance, I decided to stick with a small batch for now. I used roughly 400 grams each ox tail, ox feet, and tripe. I wanted a good mix of gelatin-rich joints, a little meat, and of course the tripe (I love tripe). I bought the tripe already clean, as you can find in most supermarkets if you search and ask questions. This allowed me to nix the step of multiple boiling and tossing of liquid (which I did the last time...which caused me to lose all my gelatin from the other meats...which caused the watery callos). That being said, go ahead and brush your tripe with salt and rinse under running water if you feel it isn’t clean enough. Feel free to experiment with other callos-friendly meats as well (I know I certainly will in the future!) like pig’s feet and face. Cover the meats in water to about 1-2 inches above them, bring to a boil and skim off the scum. Try to get as much of the scum off as you can. Once all the scum has been removed add a piece of ham bone (if you can get jamon Serrano bone use it!), some halved red and white onions, lots of whole black peppercorns, and a couple of bay leaves. Simmer until all the meats are soft. This took me about 6 hours. Be patient! It takes time to coax the meats into tender submission, as it does to render all the gelatin from their bones and reduce the stock to a sticky, glistening mess. Don’t rush this part I implore you. Do this on a day when you have to stay home and do a lot of work/chores. Just check on your pot every once in a while --- add more liquid if the water level gets too low and fish out meats that have already gotten tender before the rest. You want a stock that is reduced, glossy, and a bit sticky. When you are almost there, taste and adjust the seasoning – do this at the very end as you may not need any additional salt. Once done, I took the meats out, deboned them, and cut them into chunks. Make sure you get all the bits! Strain the stock (I didn't have much left after all that reduction - but that's ok...if it's good and rich you won't need copious amounts) but don’t lose any of the gelatin. Once cool, I stored the stock and meats (separately) in the fridge. When chilled, my stock turns into a jiggling solid mass – one piece of solid gold flavour and deliverer of unctuousness. I have yet to explore freezing options but will do so soon!

On day two, you can now breathe a sigh of relief as you get ready to make your callos knowing that the long, arduous part is over. I heated some olive oil in a pot and sautéed lots of chopped onion and garlic, and a bay leaf. Once the onions were soft I added some canned roasted red pepper sliced into strips (you can roast and peel your own as well) along with a couple of dollops of carne de pimiento choricero (bottled pulp of a type of red Spanish pepper). I then added some chorizo bilbao (or any Spanish chorizo meant for cooking – use something fresh but strong) and some chopped bacon slab. Once they rendered their oils I deglazed the pot with some red wine and let the alcohol cook off. Add some pimenton de la vera and, if you like and additional spice kick, some cayenne or chili (I do and I did). After giving this a few stirs I added a 400 gram can of chopped tomatoes, juice and all. I cooked this until pulpy (evaporating much of the liquid). At this point you can remove some of the oil if it looks excessive to you. I then tossed in the reserved meats, stock, some garbanzos (about half a 400 gram can, drained), and some green olives (unpitted) and cooked it until it all came together in a bubbling, sticky pot of goodness (which doesn’t take too long – watch your pot!)!

C loved this version – I know because of the many high fives that came my way with dinner, plus he had it until the last drop was gone! He declared that it must be logged down into our own tome of family recipes (which now consists of a furry purple notebook unbeknownst to him). So in it went!

I feel (as I do with fabada) that it is essential to make a rich and full-bodied stock to serve as the flavorful foundation on which your callos will stand (and also to get it as sticky as C likes it to be). Actually, looking back, I think I ended up with something more akin to a demi-glace than a stock...either way, it was phenomenal and I believe a big part of the success of this version. That, and using good chorizo (get the best tasting Spanish cooking chorizo you can find -- something fresh ideally, not from a can, with a nice strong flavor) and pimenton de la vera (look for the denominacion de origen please!). This will no doubt be treated to much variation as time goes by, but I think this basic method works well for us :)

***Our callos was an amalgamation of recipes and methods from our two families, patched together to form something that both C and I loved. I also took inspiration and technique from another wonderful cook’s informative callos post.
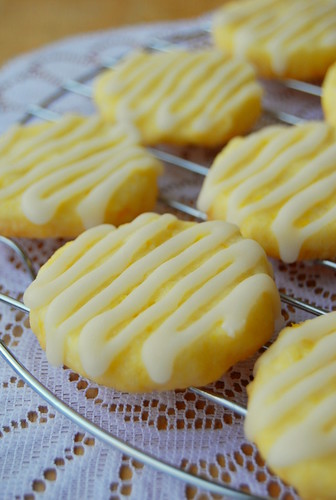
The Mixing Bowl: Pavlova by Hello Naomi

This week’s Mixing Bowl post is from Australian-based baker Naomi Henderson of Hello Naomi. She has prepared a cute pavlova recipe that can be easily be converted into delicious pavlova cupcakes, too! Personally, I love pavlova! It's a sloppy baker's dream! It's supposed to be cracked and uneven, so you don't need to worry about being perfect. Besides, who can resist a dessert named after a ballerina?

I first discovered Naomi's work on Flickr, where she started uploading photos of her creations after taking a cake-decorating class in early 2007. While working on her PhD in computer engineering, Naomi started creating her cute and clever designs, and, apparently, I'm not the only one who took notice! The photos of her creations became so popular, and there was such a demand for her desserts, that she was able to start her own business! If you visit her Flickr site, you'll know why. There's always something fun to check out on her photostream! My favorite Naomi sweet treat has always been the bird cupcakes, but the Pacman cupcakes are pretty hard to resist. They would be perfect for your favorite guy. . . or video game-loving girl. :-)


From Naomi: Pavlova is my favourite dessert in the whole world. My family would always have it at Christmas but I have been making it more and more lately. It is such a quick and easy dessert to make when friends are coming over for dinner. This recipe serves about 6 people but it is very easily scaled. I usually just budget 1 egg white and ¼ cup of sugar per guest. Then just beat it for 5 min, add a squeeze of lemon a dash of vanilla, throw it in a low oven and forget about it! Well maybe don't forget about it, check it after about 45 min . . . but the good thing is that it is really hard to stuff up!

Check out Naomi's Web site here and click here to view her Flickr photostream.

Full recipe and more photos after the jump. Thanks, Naomi!


If you need help converting the measurements, click here for a nifty conversion calculator.

Pavlova
Serves 6-8, makes approx 16 cupcakes or 1 large pavlova
Ingredients:
6 free range egg whites
1 ½ cups of castor sugar
Squeeze lemon juice
1 vanilla bean or 1 tsp of vanilla extract

500ml thickened cream
1 punnet strawberries
3 passion fruits
Any other fruit you wish (bananas, kiwi fruit, peaches, etc also go well)

Method:
Preheat the oven to 110°C
Line 2 cupcake trays with papers or lay a sheet of baking paper on a tray.
In an electric mixer whip the egg whites on high until frothy.
Keep beating on high and slowly add the sugar.
Keep beating on high until the meringue reaches stiff peak (when you lift the beater the peaks hold their shape and don’t fold). This will take about 5 min.
Add a squeeze of lemon juice and the vanilla and beat again quickly to mix it through.
Use an ice cream scoop (those ones with the squeeze handles) to scoop the mixture into the cupcake papers or use a spatula to spread the mixture onto the pan in the shape of a circle.
Bake on a low temp until light brown and crispy. Approx 45 min for cupcakes or approx 1.5 hrs for a large one.
Turn off the oven and let it cool slowly with the oven slightly ajar.
Whip the cream (do not add sugar!). This can be done in advance, while it is in the oven or just before serving.

Just before serving cover with cream, chop fruit and decorate.

Viola! Yum!


Ice Cream Crepes

One final, end of summer item from my Japanese dessert adventure: Ice cream crepes. It's ice cream, but it's a crepe, so it requires chewing. Kinda like an ice cream sandwich, I suppose. Not fun for people with teeth sensitivity, but I don't have that problem, so I'd give it a shot! If you're in San Francisco, you can get crepe ice cream at Genki Crepes and Sophie's Crepes. Otherwise, look for them at Japanese restaurants and markets. [Top photo by Brian.]

Apple Bread With Sugar & Cinnamon Topping

title
If you’ve been visiting here for a while you would have surely bumped into my best friend K in and around these posts. She popped up first here, during my first year of blogging and her move into a new apartment. Since then, she’s made many appearances. It’s inevitable really. Someone who is as much a part of my life as K will certainly find her way into the stories I tell.

She dropped in to try my first ever attempt at soufflé. She is the mother of my awesome godchild Z. We’ve gone off on adventures together. She knows what I like and brings me lovely gifts. She tastes the stuff I make even if they don’t turn out as good as they should. She tastes the stuff that does turn out good! We try to save the Earth together. She recently gave birth to a beautiful baby girl and we celebrated with a tea party.

K and I met in high school, and though on the surface we may seem very different (she is a gung-ho athlete who loves the smell of competition and I am a slow moving nap-lover who shies away from organized sports), it was the best friend version of finding your soul mate. Heck, forget versions, it was finding a soul mate! There are friends you bond with over common interests, friends due to some sort of proximity (same school, course, neighbourhood, family), and those serendipitous ones that happen by happy accident. Then there are those that you know are no accident...those who you know you were heading towards from birth and that become such an integral part of your life that you cannot imagine one without the other. That's K.

Some people have masses of friends, hundreds, even thousands if you check here and here. But a true best friend is worth ten million times that in my book. And for her birthday you'll want to try your darnedest to give her something really special – even if it’s just one of your favourite cookbooks and an Apple Bread baked from its pages.

Apple Bread With Sugar & Cinnamon Topping
(from Apples For Jam by Tessa Kiros, page 350)


  • 150 grams sugar
  • 150 grams butter, softened
  • 2 eggs
  • 120 grams all purpose flour
  • 1 teaspoon baking soda
  • 1 teaspoon baking powder
  • 1/2 teaspoon ground cinnamon
  • 400 grams apples (about 2), peeled, cored, and coarsely grated (I didn’t bother peeling them...I just took them to the grater unpeeled and this worked fine...and much quicker)
  • 60 grams walnuts, lightly toasted and roughly chopped
  • 1 teaspoon vanilla extract
Topping:

  • 60 grams walnuts, finely chopped
  • 60 grams brown sugar
  • 1 teaspoon ground cinnamon

- For the topping, mix together the walnuts, sugar, and cinnamon. Set aside.
- Beat together the sugar and butter until light and fluffy. Add the eggs and beat them in well.
- Sift the flour, baking soda, baking powder, and cinnamon into the mixture and add a pinch of salt. Mix until just incorporated. If using a mixer I just give this a couple of turns with the paddle and then scrape down with a spatula, mixing the rest of the way by hand.
- Add the apples, walnuts, and vanilla and mix through until just incorporated evenly. I did this with a spatula by hand as well. Scrape into a buttered and floured loaf tin (12x4 inch).
- Sprinkle topping generously over the batter. Bake in a pre-heated 180C oven for 45 minutes or until at cake tester poked in the center of the cake comes out clean. My loaf took about 50 minutes.
- Cool slightly before turning out carefully...the topping will scatter a bit! So do this over your serving plate so you don’t lose any.
- Serve slightly warm or at room temperature...plain or with a scoop of vanilla ice cream!

I have spoken about my love for Tessa Kiros before, and Apples For Jam is even more proof of why I am such a fan. Her enchanting “voice” draws me into her recipes like no amount of chef-cred, fame, or restaurant ownership could. So I wanted to share a bit of this with K on her birthday, along with Tessa’s delicious Apple Bread. This cake is beguilingly moist and laced with the spicy scents of apple and cinnamon – one of the best smells you can have coming out of your oven (if you live in a flat like me, this is a great way to get rid of fried fish smell)! The crunchy sugar-nut topping is the perfect foil to the cakes softness. A scoop of vanilla ice cream will not go amiss here. The only thing I have changed is forgoing the ground cardamom used in the original recipe. I have already made this two times, and both times everybody loved it...so despite its simple looks it is a definite crowd-pleaser.

K’s birthday was two days ago but I wanted to celebrate it here too (and share this lovely recipe with all of you) --- Happy birthday again my friend! :)