
I've been wanting to make this cake since the day I bought Dorie Greenspan's
Baking: From My Home to Yours. Quite honestly, it's the main reason that I bought the cookbook in the first place! So, when my sister's bday came around this year, I sent this cake, along with a few others, as possible choices for her cake. As you've probably already guessed by now, she picked this one! She did have one condition, though. Do not use the marshmallow frosting because, in the words of my sister, marshmallow is kind of yucky.

Luckily, Dorie states right in the recipe that you can use any sort of thick frosting for this cake, so, at my sister's suggestion, we went with a Bailey's frosting, instead. Well, actually my mom went with the Bailey's frosting, as she was the one who actually made the cake. I was, well, let's just say that I was not in a baking mood at the time. It all turned out well, though, because this cake was awesome! Sooo good! For some strange reason, my mom's cake was not nearly as high as Dorie's. Maybe the frosting wasn't as thick or sturdy. Regardless, it was mighty tasty! It's booze and chocolate! What's not to love? Btw, this doesn't taste like liquor, at all, but you can always add more Bailey's, if that's what you're into. :-)
You can find the complete recipe after the jump.
 Devil's Food White-Out Cake
 (with Bailey's Irish Cream frosting)
Adapted from
Dorie Greenspan's Baking: From My Home to YoursFor the cake1 1/3 cups all-purpose flour
1/2 cup unsweetened cocoa powder
3/4 teaspoon baking soda
1/2 teaspoon baking powder
1/4 teaspoon salt
1 1/4 sticks (10 tablespoons) unsalted butter, at room temperature
1/2 cup (packed) light brown sugar
1/2 cup sugar
3 large eggs, at room temperature
1 teaspoon pure vanilla extract
2 ounces bittersweet chocolate, melted and cooled
1/2 cup buttermilk or whole milk, at room temperature
1/2 cup boiling water
4 ounces semisweet or milk chocolate, finely chopped, or 2/3 cup store-bought mini chocolate chips
For the filling and frosting
1/2 cup egg whites (about 4 large)
1 cup sugar
3/4 teaspoon cream of tartar
1 cup water
1 tablespoon pure vanilla extract
GETTING READY: Center a rack in the oven and preheat the oven to 350 degrees F. Butter two 8-x-2-inch round cake pans, dust the insides with flour, tap out the excess and line the bottoms with parchment or wax paper. Put the pans on a baking sheet.
TO MAKE THE CAKE: Sift together the flour, cocoa, baking soda, baking powder and salt.
Working with a stand mixer, preferably fitted with a paddle attachment, or with a hand mixer in a large bowl, beat the butter on medium speed until soft and creamy. Add the sugars and continue to beat for another 3 minutes. Add the eggs one by one, beating for 1 minute after each addition. Beat in the vanilla; don't be concerned if the mixture looks curdled. Reduce the mixer speed to low and mix in the melted chocolate. When it is fully incorporated, add the dry ingredients alternately with the buttermilk, adding the dry ingredients in 3 additions and the milk in 2 (begin and end with the dry ingredients); scrape down the sides of the bowl as needed and mix only until the ingredients disappear into the batter. At this point, the batter will be thick, like frosting. Still working on low speed, mix in the boiling water, which will thin the batter considerably. Switch to a rubber spatula, scrape down the bowl and stir in the chopped chocolate. Divide the batter evenly between the two pans and smooth the tops with the rubber spatula.
Bake for 25 to 30 minutes, rotating the pans at the midway point. When fully baked, the cakes will be springy to the touch and a thin knife inserted into the centers will come out clean. Don't worry if the tops have a few small cracks. Transfer the cake pans to a rack and cool for about 5 minutes, then run a knife around the sides of the cakes, unmold them and peel off the paper liners. Invert and cool to room temperature right side up. (The cooled cake layers can be wrapped airtight and stored at room temperature overnight or frozen for up to 2 months.)
When you are ready to fill and frost the cake, inspect the layers. If the cakes have crowned, use a long serrated knife and a gentle sawing motion to even them. With the same knife, slice each layer horizontally in half. Set 3 layers aside and crumble the fourth layer; set the crumbs aside.
BAILEY'S IRISH CREAM FROSTING:
1 cup butter
2 1/4 cup powdered sugar
1/2 tsp salt
1/4 cup irish Cream
Cream butter, beat in powdered sugar, gradually beat in salt and Irish Cream until light and fluffy.
TO ASSEMBLE THE CAKE: Put a bottom layer cut side up on a cardboard cake round or on a cake plate protected by strips of wax or parchment paper. Using a long metal icing spatula, cover the layer generously with frosting. Top with a second layer, cut side up, and frost it. Finish with the third layer, cut side down, and frost the sides and top of the cake. Don't worry about smoothing the frosting -- it should be swirly. Now, cover the entire cake with the chocolate cake crumbs, gently pressing the crumbs into the filling with your fingers.
Refrigerate the cake for about 1 hour before serving. (If it's more convenient, you can chill the cake for 8 hours or more; cover it loosely and keep it away from foods with strong odors.)
SERVING: I think the cake is best at room temperature or just cool, but many people prefer it cold (the texture of the cake becomes fudgier after it has been refrigerated). No matter the temperature, the cake is so pretty it should be cut at the table, so bring it out on a platter and cut it into generous wedges using a serrated knife and a sawing motion.
STORING: The frosted cake can be stored in the refrigerator for up to 2 days; let it stand at room temperature for 30 minutes before serving, or longer if you have the time.

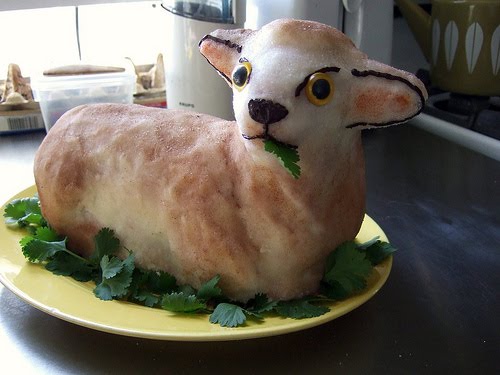 I think it's safe to say that not everyone is going to love this cake. I'll admit that when artist Andrea Everman emailed it to me, I looked at the first pic and thought, oh, that's sooo cute and then I saw the second photo and my feelings changed to hmmm…it's also kind of disturbing, and then quickly switched back to but, it is clever. My emotions continued to sway back and forth like this for several minutes until I just couldn't take it anymore and had to ask for another opinion! I think it's definitely well done and interesting, but, as an animal lover, I don't know if I could actually eat it! On the other hand, the less emotional part of my brain keeps saying, why wouldn't you eat it! It's just cake! So, what do you guys think of this particular lamb cake or lamb cakes in general??? Clever or disturbing?
 For those of you interested in trying this at home, the cake is strawberry and those are cilantro leaves filling in for the grass. Oh, and Andrea is a lovely lady and is going to making us a vegan dessert later in the year, so if you hate this cake, please don't take it out on her! :-) Thanks, Andrea!


 Right about now you may be saying to yourself, wow, that's pretty cool, but why even make a couch cake? Well, this yummy replica was created by artist
  Now, I love this cake and the idea of thinking creatively about food, but anything with the word "happening" attached to it is a little too pretentious for my taste. Personally, I was getting annoyed just reading about the event. I could barely get through the article! That said, if you don't mind the possibility of getting annoyed, and would like to learn more about the "cake happening,"


 The American Fashion Cookbook ($45) has my name written all over it! Fashion + Food + Colorful Illustrations by Designers??? Yes, please! The recipes included are both sweet and savory, but I, of course, immediatly foucused in on the desserts! Featured among the sweets are recipes for Betsey Johnson’s Cherry Sour Cream Pie, Cynthia Steffe’s Apple Crisp, and Mark Ecko's "Adults Only" Chocolate Chip Cookies ("adult" because they contain espresso).
  From the publisher: Isaac Mizrahi’s Mushroom Truffle Spaghetti, Carolina Herrera’s Pommes Toupinel, Mark Ecko’s “Adults Only” Chocolate Chip Cookies, Derek Lam’s Yellowtail Crudo, John Varvatos’s Calaloo Soup—food can be fashionable too! Published with the Council of Fashion Designers of America (CFDA) and with a foreword by Martha Stewart, American Fashion Cookbook is a chic objet containing recipes and original illustrations by more than 100 American designers. Brimming with color, flavor, and personality, here are the fashion community’s favorite dishes and preparation tips. From the flirtatiousness of Strawberry Shortcake to the minimalism of Chocolate Ganache to the zip of Andalusian Gazpacho, here are all the recipes a stylish soul needs to whip up a tasteful brunch, a romantic dinner, or simply prepare comfort food, in a collectible volume.