Zucchini with Toasted Almonds

title
Now, I’m not going to go off on some philosophical tangent here, but there is something really so perfect about a pair. Yin and Yang, night and day, Fred and Ginger, coffee and donuts, Harold and Kumar, strawberries and champagne. Two things that go together so well that the sum is altogether a different creature from the parts, something more, something better. It really is quite mysterious and beautiful how the one can reach across the void to the other and find a match so unquestionably right.

Ok, I have no idea where that came from. Most probably from the vestiges of my sub-consciousness...you see I’m still in my pyjamas and halfway through my coffee so I can't really be held responsible for these pre-coffee thoughts. In any case, a perfect pair is a pretty magical thing, in life and in food.

(and then you have chocolate...which can go and take over the universe all by its little self...but that would be for another post...)

I love two-ingredient recipes that work. When two ingredients complement each other so brilliantly that you feel like you’ve just struck gold – these are precious moments in gastronomy. Even if everyone yawns at your happiness with a bored “been there, done that”, you still can’t help but marvel at your luck. Of course, there is also the small factor of ease of preparation...and clean-up :) In these hectic times not something to be discounted!

This perfect pairing is brought to us by Deb of Smitten Kitchen, whose photos are as luscious as her writing. Really dangerous stuff on an empty stomach. Lots of recipes bookmarked from her you can be sure, but (surprise!) it’s the easiest one that gets test driven first.

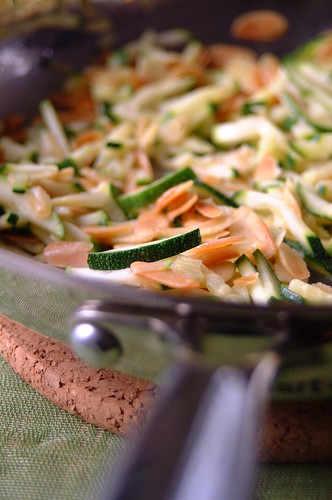
The recipe is enticingly simple – you toast some slivered almonds in a pan with some oil. When it’s all nice and tan, toss in a bunch of zucchini matchsticks and cook for just a minute. Season with salt and pepper and enjoy immediately. You can find Deb’s original recipe here.

Oh the beauty of it!

Simple, delicious, elegant, vibrant. A perfect pair.

Lots of work to do today. Plus errands. Plus dinner. Plus brainstorming for a small but exciting new project. And miles to go before I sleep. I think it’s time to get out of these pyjamas.

No-Knead Bread: round 1

title

Finally! After much hemming and hawing and expert procrastination, I have finally made the famous (infamous) No-Knead Bread! Yes, the very yeasty monster that so many have tried before, most raving about the results. Mark Bittman, a writer for the New York Times, featured the recipe of Jim Lahey, a breadmaker from the Sullivan St. Bakery in New York. What makes the recipe special is that it involves no kneading (yes, as the name suggest, I know) and a long (12-20 hours) rest period. But of course, you already knew that seeing as to how I am probably the last to attempt this.

As you can imagine of a recipe that effectively nixes what is seen to be the most onerous part of bread-making, it took off like a rocket and spread like wildfire. Everyone tried it. It was simple, it was easy, you could do it with one hand! And best of all, it worked. People who had never made bread before were turning out boules straight out of a Montmartre boulangerie. I had to have a piece of the action.

Two things though: First, I actually like kneading. It relaxes me tremendously and, along with shopping, is my only form of exercise. Second, I am, if you haven’t yet figured out, a horrible procrastinator. If you are one too, then you know how it can be – rationalization and avoidance are our weapons.

I don’t have a Le Creuset/enamel/cast iron pot! (the vessel where you are to bake the bread) That was my common refrain (excuse). My friend M (Bond isn’t the only one with an M you know) quickly laid that doubt to rest as she made her No-Knead Bread in a crockpot bowl covered with a ceramic plate in a turbo broiler. Yes, I know she rocks. It was soon a moot point though because I bought two cast iron faux creusets (my wallet is not yet ready to spring for the Patek Philippe of enamel/cast iron French/Dutch ovens) in IKEA during a trip to Hong Kong. So no more excuses.

And if I still was the least bit hesitant this post totally won me over. There are more no-knead blog posts out there then you can shake a stick at, but if you need to be convinced to make this bread right now, just take a look at this. I love Jaden of Steamy Kitchen – love her recipes and her story-telling – but most of all I love her two adorable sons! Technically, it wasn’t Jaden that convinced me to get my tush in the kitchen and bake this bread...it was Andrew. See him in action...you won’t be sorry :)

title
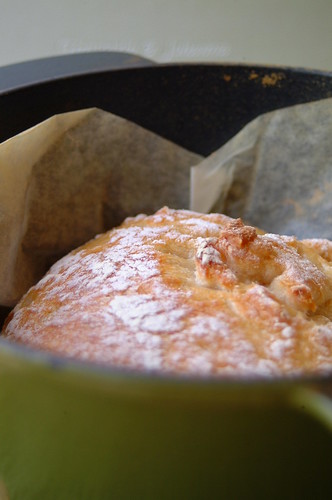
So! Faux creuset at the ready, I started. As Jaden says (and Andrew demonstrated) it is simpler than boiling pasta: 3 cups flour, 1/4 teaspoon yeast, 1 teaspoon salt, 1 1/2 cups lukewarm water, stir! Then cover the bowl and leave to rest for 12-20 hours. After the rest, dump it on a floured surface and with wet hands grab the dough and fold the ends towards the middle, then flip it over and tuck the dough ends under so you get a taut surface. Cover and let rest again for two hours. Half an hour before the rest ends, preheat your oven to 450F and stick the covered pot into the oven. After the dough has rested, remove the pot from the oven and dump the dough into the pot (I put a bit of parchment in to avoid sticking as Jaden advised). Cover and bake for 30 minutes. Uncover and bake for a further 15-20 minutes. You’re done! (please see Jaden’s post for a more detailed procedure and photos of the dashing Andrew making the bread)

Now. The reason it says “round 1” up there is because it did not turn out as perfect as I dreamed it would, but it did turn out good enough for me to keep at it until it does. If there are expert No-Knead Bread bakers out there (and I know there are!) or any kind of bakers at all, your advice would be seriously appreciated.

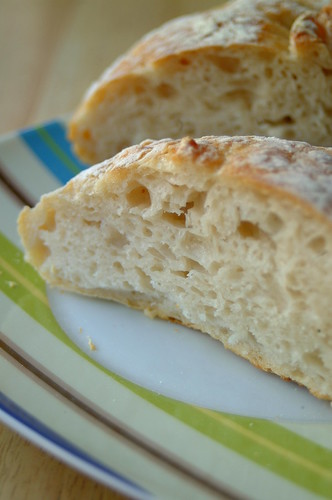
Here’s my result:
  • This is by far the best crust I have ever had on bread that I have baked.
  • I like the hole-y interior...again, bigger holes than I’ve ever baked before.
  • The depth of flavour was superior to any of my past breads.
  • It was soft, hearty, with a good chew but too gummy.

As you can see, the good outweighs the bad...but it still needs some work. I’ve consulted with M and she mentioned that it could be too much water (causing the gumminess), which is very likely as we live in an amazing amount of humidity. Extra (too much) moisture in the air is something we need to deal with constantly, wreaking havoc to our baked goods and our hair. So one thing to think about for the next round would be to lessen the water from 1 1/2 cup to 1 1/4 cup.

Any other suggestions? Temperature, baking time, baking vessel? Did I bake it too long? Too short? Did it rest too long (I let it rest for 19 hours)? Do I actually need more water (who knows)? The dough looked just as wet as it should compared to the photos I’ve seen around...

Help please! :) I am already half in love with this bread...if only I could turn out a less gummy crumb!

Another reason for my excitement and determination: As soon as I am done cutting my teeth on No-Knead Bread, I will move on to Artisan Bread in Five Minutes a Day! Yes, I have bought the book and I’m ready to eat homemade bread for the rest of my life! Ok, a dream maybe, but Jeff Hertzberg and Zoë François (the authors) are actually making it possible!

Just so you know, I still plan to knead every once in a while. I mean, a girl needs her exercise right? :)

My Top 10 Photo Picks


I am terrible at meme’s.

I get tagged and then the information goes into some meme-sucking black hole in my head, never to be heard of again. So although I do enjoy reading them (many times a neat way to learn new things about you all), I rarely take part or pass them along. For this I owe a heartfelt apology to anyone who has ever tagged me! I’m sorry...my internal hard drive doesn’t seem to work the way it used to!

On occasion though, something survives the meme-sucking black hole. It gets spit out at the other end, to float; a little tattered from the ride but still intact, back into my consciousness. So here I am now, dusting off and holding up the Top 10 Photo Picks from my blog – a tag from Dhanggit of Dhanggit’s Kitchen. I have long swooned over Dhanggit’s beautiful creations as I imagine her whipping them up in a gorgeous country kitchen somewhere in Aix en Provence. I would certainly have trouble picking only 10 photos from her blog!

So, enough chat, here’s my 10:

Ampalaya – I think the most amazing thing about this picture is that I actually don’t like ampalaya (bitter melon)...yet I found it so pretty (which is why I took this photo) – green, curly half-moons.

Arugula and Apple Salad – I took this in such a hurry because we were going to eat already...and I was pleasantly surprised that it came out looking so crisp. Salads (if you’ve got fresh ingredients) make great models!

Bakies Day – My first and so far only food photo with a model. I think I like this photo more for having my fabulous godchild Z in it than for the cookies (em, bakies).

Brussels Sprout and Camembert Gratin in Butternut Squash – I think I like how this looks so “autumn-y”...especially since I don’t have an autumn to speak of. I also like the colors in the photo – orange and green...the colors of my blog!

Matcha – This was one of my first attempts at active food styling. My pictures, to this day, are pretty simple. Just the food, a nice plate, and a spoon or fork (in fact, if you’ve been reading for a while I’m sure you are tired of seeing the same old tea towel and placemat as backdrop!). Here I remember actually thinking of each element...the cork, the earthenware plate, the spoon, exactly where the matcha would be, and the depth of field thingy. Hmmm...I think it’s time to bring out that cork again!

Yogurt with Red Wine Poached Nectarines – Sometimes the simplest things look best. Like vegetables (above) and fruits. I like how this picture seems to suck in the sun – something I wish I could do with more ease in the mornings!

CarrotsWhat was I saying about veggies taking good photos? Case in point, carrots that actually still have dirt on them! I am beginning to realize how much I love taking photos of vegetables...and how much they love having their picture taken!

Nutella Banana Muffins – Ok, I had to have some sort of sweets in this list! I like how this picture incorporates so many things I love: Nutella, bananas, cupcakes, and the color pink :)

French Toast with Blueberry Syrup – I was happy at how the syrup came out so shiny and jewel-like. Even when it comes to non-food, I am attracted to shiny like an insect diving towards a light bulb. This breakfast, and looking at the shiny syrup picture, kept me smiling all morning. No joke...I can really be that shallow.

Pili nuts – Again something very simple. Nature is really the best Janice. Her models always deliver. Oh yes, and this was my attempt at the “stuff spilling out of the glass” effect. Not too shabby I think!

Thanks Dhanggit for giving me the opportunity to revisit all my photos here! I actually had a bit of a reflection on my photos :)

And speaking of the lovely Dhanggit: She’s got a new project! Check out Recipe Muncher for food blog post updates!

Some shameless own-horn-tooting: I have some recipes published in Yummy Magazine July issue! Seven sandwiches prepared right here in my little flat (including a sweet sandwich...and a couple of vegetarian ones too)! The best part about the shoot for me? Having an actual photographer and food stylist work on my stuff! My sandwiches and I were thrilled :) (I took notes don’t worry)

Breakfast #21: Breakfast Quinoa Cereal

title
Sometimes I feel that the only time I can hear myself think is early in the morning, when the world is still asleep. Then, there is no one to interrupt the steady train of important musings that go through my head like: What is the meaning of life? What will we have for dinner? Should we be making more long term investments? Should I get a new laptop? When will I finally make no-knead bread? Why can’t we all just get along?

In the silence of the early hours, the answers to these questions seem almost within my reach...if not staring right at me. (Love, tinapang bangus*, yes, yes, next week, start with me). As the day wears on, the din of work, errands, cooking, washing my snazzy new top, coordinating schedules drown out all but the most persistent of thoughts (what will we have for dinner?). Don’t get me wrong, I do love the wonderful clamour of friends and loved ones, but we all need a little quiet time (me-time) for just us.

Unfortunately, it’s not that easy for this body to get out of bed in those early hours, so these important questions are often left unanswered. (Hence the lack no-knead bread on this blog or sophisticated financial instruments in my life – although I’m happy to report the new laptop did make it). Most days I just launch myself head-on into the racket of everyday.

This breakfast is good for both – early-waking, slow-blooming days, as well as rapid-rise, hit-the-ground-running days.

Breakfast Quinoa Cereal
(adapted from
culinography – original recipe here, along with quinoa preparation)
  • 1 cup prepared quinoa
  • 1/2 – 3/4 cup milk
  • 1 teaspoon unsalted butter
  • 1 tablespoon honey (or to taste)
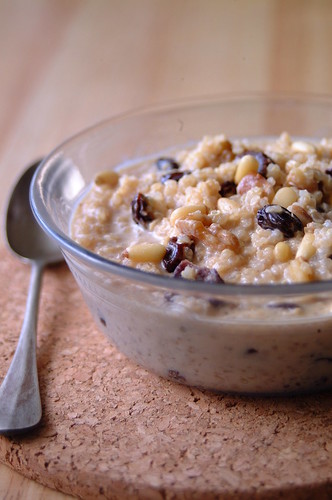
  • Dried fruit and nuts (the amount depends on how chunky you want it and the kinds are up to your taste – I used a small handful of raisins, dried figs, walnuts, and pine nuts)

- Place prepared quinoa in a small saucepan with milk, butter, honey, dried fruit, and nuts.
- Simmer, stirring often, until thickened slightly...about 5 minutes.
- Garnish with extra nuts and honey if you want. This will feed one hungry person or two regular ones :)

I learned about quinoa through (where else?) food blogs and, as I love grains of all kinds (although quinoa is technically a seed – but I love those too), kept my eyes peeled. I found some last year in ThreeSixty, and organic grocery in Hong Kong, and have since found it in a health food store here...and have been loving it from that day. For someone who has eaten (white) rice with almost every meal of her life, it is liberating to suddenly have more choices! Especially one as pleasingly nutty and springy and cute (little curlicue!) as quinoa. And did I mention healthy? And ancient (referred to as the Mother Grain by the Incas)? Learn more here and here.

I’ve had quinoa in other savoury preparations but when I saw this breakfast dish I knew I had to try it! And Michelle’s enticing photo was proof that resistance would be futile. I’m glad I didn’t resist. Earthy, comforting, fortifying...with a steadfast “back-to-basics” quality with every bite. Not to mention delicious! This is a simple recipe with which you can play -- add spice when cooking (Michelle uses cinnamon) or top with fresh fruit before eating!

Whether you wake at the crack of dawn or the last possible minute, this breakfast can be had by you. Just prepare the quinoa ahead (and you’ll have extra for quick meals too...a good thing this) and mix everything in a small saucepan the next morning, which really doesn’t take much time at all. Just enough time to ponder one or two of life’s all-important questions :)

Other quinoa breakfasts:
101 Cookbooks
Morsels & Musings
Closet Cooking
Food Blogga

*Tinapang bangus is smoked milkfish...much loved in our household!

Red Wine and Tomato Lamb Stew

title

Incongruous, illogical, foolish.

It’s when you wear 4-inch pointy-toe stilettos to a party where you know you will be standing up all night. It’s when you get a blowout and it’s raining. It’s when you eat chilli with onions and pizza with garlic and anchovies on the night of your first kiss. It’s when you drink coffee at midnight. It’s when you eat classic French Onion Soup and you’re a vegetarian. It’s when you get in the car of that ex-boyfriend and accept his breath mints.

It’s when you make lamb stew in steaming 32C (and climbing!) weather.

As always, our summer was deadly hot and mind-numbingly humid. Somewhere in the latter part of May though, it seemed to lose steam (no pun intended). Rains came (rainy season follows summer...that’s how our seasons go) and it looked like the summer would be shorter than normal – sad in a way, but a relief too. It was way too hot already and I was running out of skirts and dresses to wear (the breeziest way to go in the summer).

Then suddenly, in June (which fyi, should already be rainy/back to school season) like an avenging angel, the heat swooped back down to flatten us. Sweat and lethargy grappled with me...sometimes rendering me unable to do even the most basic tasks! The heat raged anew, ignoring the thunder that tried to bully it away.

So why was I melting over a heavy pot of bubbling lamb stew when I was in danger of getting a good braise myself? Why do I wear stilettos? Why did I get into that car?

I know!
I would have been kicking myself if only I had the energy.

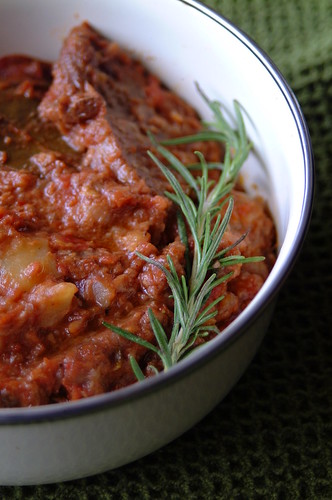
Red Wine and Tomato Lamb Stew
(inspired by* Red Wine and Tomato Lamb Shanks, page 124 Donna Hay Magazine issue #33)

  • 1 kilo lamb (stewing cuts, with bones)
  • flour for dusting
  • olive oil
  • 4-5 garlic cloves, minced, plus 1 head garlic, outer skins peeled but inner skin left intact
  • 3 onions, peeled and cut into wedges
  • 1 cup red wine
  • 1 800-gram tin chopped tomatoes
  • 1 400-gram tin chickpeas (260 grams drained weight)
  • 2-3 smallish potatoes (about 300 grams total), peeled
  • 4 bay leaves
  • 3 sprigs fresh rosemary
  • 1 teaspoon sugar
  • a generous pinch of your favourite chilli powder or flakes**
  • sea salt and freshly cracked black pepper

- Dust the lamb with flour and shake off any excess. In a heavy-based pot heat oil. Add lamb pieces and sear until browned, seasoning with salt and pepper. Remove from pot and set aside.
- Add the onions and minced garlic to the pot and cook until soft and golden.
- Gradually add wine, scraping the bottom of the pot as you do to deglaze and get all the yummy bits.
- Add the tomatoes, chickpeas, potatoes, bay leaves, rosemary sprigs, sugar, chilli, and the whole garlic head. Give everything a good stir.
- Add lamb and bring to a boil.
- Reduce heat to low, cover with a tight-fitting lid, and simmer for 2 hours or until meat is tender and sauce is thickened. Stir occasionally after the first hour to make sure the stew does not stick to the bottom of your pot and scorch it! When you do this, taste and adjust seasoning.

In my defense, we had some stewing lamb*** in the freezer and it was taunting us mercilessly! I had bookmarked a lamb shank recipe from the Donna Hay magazine winter 2007 (winter? Could I not see the warning signs?) issue that sounded fabulous – lamb stewed in tomatoes and red wine. I was itching to try it. And at the end of the day, we did enjoy the dish...even as I stared unbelievingly at C, who was wolfing everything down while beads of sweat popped up on his forehead. He loved it! So did I. But yes, it would have been much better eaten while a storm raged outside. Now I’m thinking of tossing the leftovers in the freezer...to be resurrected**** once the rains come again.

*I changed and added a lot (the garlic head, chickpeas, and potatoes for example are my additions, all the quantities are different, I added chili, she used marjoram instead of rosemary...) so aside from the wine, tomatoes, and lamb, my recipe differs quite a lot from Donna's (but I still give her credit for inspiring me!)...so if you try this, and you don't like it, please don't blame Donna :)

**I used dried chipotle pepper flakes and a couple of generous glugs of Chipotle Tabasco sauce – my latest favourite supermarket thing :)

***This was made with another batch of mum-in-law lamb. She may not know this, but I haven’t had to buy lamb since she gave me the first batch! Thank goodness for small favors eh? ;) I hope I don’t jinx this seemingly steady supply of lamb. I’m making something for her soon I swear!

****The leftovers will make a kick-a** pasta sauce...I just know it! And you know I don’t use the word a** lightly (again, no pun intended).

HHDD #20: Double Chocolate Choux

title
After all that white chocolate used in my L’Opera, I was craving for something dark and bittersweet. Dark and bittersweet are, after all, how I like my chocolate. I love the sophisticated yet sinful taste it has, the exquisitely long time it takes to melt, and the little tug it leaves at the back of your mouth when it’s all but gone.

And now it’s supposed to be a Super Food! It is loaded with antioxidants that can improve health. Flavonoids, the antioxidant found in dark chocolate (and tea!), can help lower blood pressure and keep your arteries from clogging. The more cocoa solids the better, so check your label and look for the stuff that’s 70% and up! I always knew dark chocolate was super...flavonoids or no :)

So as not to wait too long to get a dark chocolate fix, I decided I would incorporate it into my very next baking project lined up (Donna Day!). Ok, that was a sneaky excuse...it would have been quicker just to buy a bar of it! But humor me and my whims, and let me bake when I want to (even if there is hardly anyone around to eat what comes out of my oven!**).

I had already been eyeing the double chocolate éclairs in Donna Hay’s Simple Essentials Chocolate when Suzana from Home Gourmets (delicious food, gorgeous photos...oh my!), winner of the last round of Hay Hay It’s Donna Day, announced this round’s theme to be choux. Hooray! I love it when a plan comes together...especially if it results in chocolate confections for me to eat :)

Double Chocolate Éclairs
(from Donna Hay’s
Simple Essentials Chocolate, page 50)
  • 1 cup water
  • 100 grams butter, chopped
  • 3/4 cup all purpose flour
  • 5 eggs
  • 1 quantity chocolate crème pâtissière
  • Melted dark chocolate, for topping

- Place the butter and water in a saucepan and cook until butter is melted and mixture starts to simmer.
- Add flour to the saucepan and beat with a wooden spoon until smooth. Keep stirring over low heat until the mixture leaves the sides of the pan.
- Remove from heat and place the mixture in the bowl of an electric mixer. Add eggs one by one, beating well in between each egg (make sure the one is incorporated before adding the next!).
- Spoon mixture into a piping bag with a 1/2 plain nozzle. Pipe onto a parchment paper-lined baking sheet: in 3-inch lengths for the éclairs and 1-inch in diameter mounds for the puffs.
- Bake for 20-25 minutes in a 180C (350F) oven until golden and puffed up (mine stayed in for longer than 25 minutes).
- Cool on wire racks.
- Halve éclairs and puffs and fill bases with chocolate crème pâtissière. Dip the top halves in the melted chocolate and let set (I took the photo above before the chocolate set). Sandwich tops to bottoms.

Chocolate Crème Pâtissière
(from Donna Hay’s
Simple Essentials Chocolate, page 88)

  • 2 cups/500 ml milk
  • 200 grams chopped dark chocolate (I used Valrhona 70%)
  • 1 teaspoon vanilla extract
  • 4 egg yolks
  • 1/3 cup caster sugar
  • 1/3 cup cornflour/cornstartch

- Place milk, chocolate, and vanilla in a saucepan and bring to a boil (be watchful that it doesn’t burn!).
- Whisk together egg yolks and sugar until thick and pale. Add the cornflour and whisk to combine.
- Slowly pour in the hot milk, whisking continuously.
- Pour the mixture back into the saucepan and simmer rapidly while whisking continuously for 5 minutes or until thick. Remove from heat.
- Place a piece of parchment paper directly on top of the pastry cream and set aside to cool.

I have made choux only one other time in my life so I was not that confident. It ’s really not that difficult though...considering the puffy and proud results! Definitely a case of maximum bang for minimal buck. I did encounter a spot (or two) of trouble. The two things Suzana specifically warned us about! Sigh...why do I not listen when I’m supposed to?

The first thing she mentioned was that she had to add more flour because the mixture was looking too soft even before adding the eggs. I should have taken note! And I live in a place that is chock-full of humidity...so you can just imagine! Next time I am definitely adding a bit more flour. The second tip was to make sure not to under bake the choux. Although I gave it a few more minutes in the oven, my first batch came out undercooked and deflated slightly after a while. (insert good cry here) I baked my second batch longer (longer than the recommended 20-25 minutes) and they came out nice and puffed and stayed that way...yay! I may even bake it slightly longer next time. I decided to make a combination of éclairs and puffs because, although I like the filling to pastry ratio of éclairs more, puffs are more fun to watch rise in the oven!

The chocolate crème pâtissière was lovely! Rich, creamy, not too sweet...and I have some extra! Suggestions on what to do with it (aside from eat with a spoon because I’ve already done that) are welcome :)

For the glaze I just melted a bar of dark chocolate and it worked fine. The combination of dark chocolate on dark chocolate was perfect...at least for me. I’m the type of girl that likes chocolate ice cream on her brownie a la mode you see. I will definitely make this again...I need to perfect my choux! And get my share of super foods ;)

HHDD Update: Barbara of winosandfoodies.com, the brilliant creator of Hay Hay It's Donna Day has decided, after building HHDD into the fabulous blog event that it has become, that it is time to let her spread her wings and leave home :) HHDD is now continuing to blossom under the caring eye of Bron, her new gaurdian :)

On another note: I am loving Simple Essentials Chocolate! I may be horribly biased, being such a Donna Hay fan, I know. Normally, I am no proof against Donna’s beautiful styling and temptingly simple recipes. But all in Chocolate? I am lost (sigh of bliss)...totally and irrevocably. Now, don’t think I only want to stick to what looks simple! I also have this book (another sigh of bliss)...and I mean to use it (soon)!

**I am happy to report that all the éclairs found good homes with friends!