Coconut Kisses

I am not a fan of the current "fixing what ain't broke" trend among candy makers. You know, how they'll take a classic treat that we all love and try to adjust the flavors to make it new and exciting to consumers, like covering Reese's Peanut Butter Cups in white chocolate, instead of the traditional darker variety. Hel-lo, peanut butter and white chocolate?? Puh-lease. The original is a classic for a reason!! Anyway, even though past experience has taught me that messing with classic candy doesn't generally work well (although I do like nontraditional baked goods), I couldn't resist buying these Coconut Crème Kisses. I know a lot of people don't like coconut, something about the texture, blah, blah, blah, but I LOVE the white stuff, so I just had to try these!! I snatched them up as soon as they went on sale and I was not disappointed! They are sooo good! Of course, now I'm itching to try all the flavored kisses. Any recommendations?

For some reason, Hershey's has only a limited selection of Kisses on their Web site. To check out the flavors that they feel are worthy of their Web Site, click here.

Chocolate Hazelnut Friands

title
Five egg whites were burning a hole in my freezer. I had used the yolks for something (crispy cereal prawns!) and decided to try freezing the whites...as I have heard so many people do. I was quite pleased that, finally, I would not be sending some poor unused whites to the bin without a fighting chance. So I smugly tucked the whites to sleep for a bit in the deep freeze and that was that.

Much too soon, little niggling egg white thoughts began to badger me. “Must use those egg whites soon!” “What will you do with those egg whites?” “Don’t forget about those five frozen egg whites!

Criminy.

I know you must be thinking of a ton of things to do with egg whites – meringue or some version of it – like a pavlova (which seems to be enjoying some kind of crazy resurgence!) – maybe an angel food cake or a canonigo. But you see, I am not an egg white kind of girl. I, sigh, do not like meringue (even though I think the making of it is pretty charming). I do not really like any (solely) egg white based desserts. I am more an egg yolk kind of girl – rich, creamy, intense, and loaded with cholesterol.

So what to do with those whites that didn’t involve something even slightly meringuesque?

Financiers and friands. Almond meal, melted butter, and unbeaten (trumpet sounding here please) egg whites. The perfect vehicle for any egg white of mine I say! Not only are they delicious, financiers have an interesting provenance involving Parisian bankers, breakfast, and gold ingots. What more could you ask for in a lovely little cake? Friands meanwhile, are pretty much the same in make-up, although I am still a bit unsure as to their origins. Some say they are the Australian versions of financiers, and I am inclined to agree since my recipe came from one of my favourite Aussie ladies :)

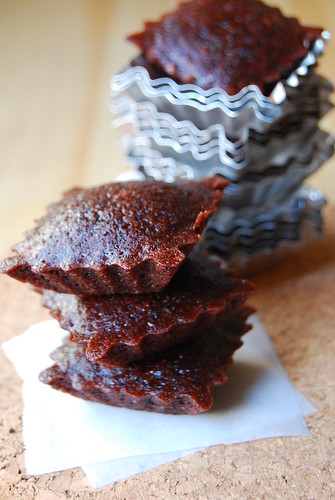
Chocolate Hazelnut Friands
(adapted from Chocolate Friands, page 40, Simple Essentials Chocolate by Donna Hay)

  • 1 cup (110 grams) hazelnut meal
  • 1 2/3 cup (250 grams) confectioner’s sugar, sifted
  • 1/2 cup (75 grams) all purpose flour, sifted
  • 1/4 cup (40 grams) cocoa powder, sifted
  • 1/2 teaspoon baking powder
  • 5 egg whites
  • 200 grams butter, melted

- Grease mini muffin tins, or mini tart pans (I must have used over 30 over these little pans).
- Place hazelnut meal, confectioner’s sugar, flour, cocoa, and baking powder in a bowl and whisk to combine.
- Add the egg whites and stir to combine.
- Add the butter and stir until just combined.
- Spoon the mixture into the tins and bake for 15-20 minutes in a 160C (320F) oven (until springy to touch). Adjust the baking time to the size of your tins and check early on how it’s cooking.

I fear there may be some French bakers out there shaking their fists in the air at my mentioning financiers and then using hazelnut meal instead of the traditional almond meal in this recipe. There may even be some hissing and scratching about how a chocolate version could in no way be likened to a gold ingot – although I’ll have you know that Pierre Herme, French pastry chef extraordinaire, has also made a chocolate version. The simple fact was, I had some hazelnut meal that needed using and no almond meal in sight. Plus, as any Nutella lover would know, hazelnuts and chocolate were destined to be together.

Friand or financier, I liked how these came out! Not too sweet, very chocolate-y, with the hazelnut’s nutty flavour all throughout. They were not too heavy and their small size made them perfect for serving with a cup of coffee or tea...or as a nice hostess gift :)

I’ll need to start freezing my egg whites more often!

p.s. I got these cute little tartlet pans from a famously sweet-toothed local blogger who needed to find new homes for some of the many bits of bake ware she had accumulated (as any expert baker out there with mountains of baking stuff needs to do once in a while). I also got this pan from her. Lori, your stuff have found a good home over here :)

Swedish Fish: A Friend You Can Eat

While at work last week, a friend of mine e-mailed me these awesome Swedish Fish ads and they totally made my day! I love them! Of course, at first, I was a little confused. Why is that bunny sitting on a toaster pastry and covered with some sort of syrupy substance??? Why is that poor kitty sandwiched between two pieces of bread?? Why is the tagline A Friend You Can Eat????


I was starting to get creeped out until my friend pointed out that the word nej, which appears below the images on the left, means no. Ahhhh . . . the bunny and cat are examples of friends you can't eat, while the candy fish are safe to devour. I get it!! Okay, the A Friend You Can Eat line is still a little weird, but, you know, in a good way.

Actually, Swedish Fish are more animal friendly than you might think. Animal lovers will be happy to know, Swedish Fish are one of the few gummy candies that are in fact vegan! Well, as far as I can tell, anyway! No gelatin in these babies!


Click here to visit the Sweedish Fish Web site where you can check out some pretty funny commercials as well.

Balsamic Snake Beans

title
Sitaw, also known as long beans, or even more excitingly as snake beans (shiver-shiver), are a standard fixture in my organic veggie basket. It is a vegetable commonly found at the markets here. Pretty much most of us grew up eating it in one form or the other – and I can hazard a guess that the form most common was adobong sitaw.

Adobo is arguably our National Dish, being cooked in a plethora of versions from one end of our archipelago to the other (and beyond!). Every cook has their own version and you can find my basic one here (although I must admit I have more versions besides!). We can turn any edible into adobo...from chicken to pork to beef to lamb (I love this!) to seafood to vegetables. And adobong sitaw, long beans cooked with soy sauce and vinegar, is one of the most typical veggie-adobos around.

Adobong sitatw is also one of C’s favourite vegetable dishes so that, along with it being a regular in our veggie-basket, is the reason that it is often present in our dining table. Although C can wolf this down all day any day, I need a little more variation. I decided to try this dish using balsamic vinegar after seeing a similar preparation in a magazine. It is simple to make and provides a nice, tasty alternate to a much-loved but too-oft-repeated dish!

*I’ve gone with snake beans in the title because I think it sounds sexy and dangerous...which is not something beans are often given the chance to be! ;)

title
Balsamic Snake Beans
  • 2 tablespoons olive oil
  • 3-4 cloves garlic, finely chopped
  • 300 gram bundle of sitaw/snake beans/long beans, chopped into one-inch pieces
  • 1 – 1 1/2 tablespoon balsamic vinegar
  • Sea salt and freshly cracked black pepper

- Heat oil and garlic in a wok/kawali or skillet (this way the garlic will infuse the oil without burning).
- Once the garlic’s aroma wafts up, and it starts to sizzle, add the sitaw/snake beans and toss so everything is coated in garlicky oil. Sautee until almost done.
- Add balsamic vinegar and sautee until the vinegar’s acidic smell mellows, tossing once or twice to make sure all the beans are coated in the caramelizing vinegar.
- Season generously with sea salt and freshly cracked black pepper.
- Serves 2.

I love the sweet-sharp tang that the balsamic vinegar lends this dish, rounded out by the spicy-savouriness of the garlic. Paired simply with olive oil, sea salt, and lots of cracked black pepper, it is proof that you can get fantastic flavour using good ingredients without much fuss. The garlic-black pepper-vinegar blend is reminiscent of our adobong sitaw just enough for you to recognize a smidgen of comforting familiarity among bright new flavours.

I hope to post more about other vegetable preparations I stumble on in the ongoing adventure of trying to use every single leaf and bulb in our veggie-basket. For me, it’s an exciting challenge I always look forward to! If anyone wants to share other sitaw/snake bean/long bean recipes, please do and I will make it with my future batches! Credit to you of course :)

Tomorrow I am getting half a kilo of kalamansi with my basket, which I plan to turn into icy-cold, kalamansi juice...another way to combat the Manila summer heat!

Sweet Testing: Lemon Drop Cake

Everyone who visits this site probably already knows how much I love the Baked cookbook! I've gone on and on and on about it in multiple posts and it's not a secret that I've become pretty much obsessed with it! I love it so much that I've decided that I'm not going to stop until I've made every single recipe! The most recent one on my list was their Lemon Drop Cake. Perfect for spring and completely yummy! Everytime I make a Baked cake, I inevitably get a "this is the best cake I've ever had!" sort of compliment and their Lemon Cake earned equally high praise from eaters!

I was feeling a bit guilty about posting recipes from this cookbook, considering that is, technically, someone else's work, and I have only linked to the recipes in the past, as opposed to posting the text. Given that I'm going to be making many more things from this particular cookbook, I checked with Baked co-owner Matt Lewis, who assured me that Baked loves when people write about their recipes and that I was free to "post away!" Yay! No Catholic guilt today!

Happy Easter/Passover/Random Week in April!

More From Baked: Whoopie Pies, Sugar Cookies, Sweet and Salty Cake
Complete recipe after the jump.


Lemon Drop Cake
from Baked: New Frontiers in Baking

For the cake layers:
2 1/2 c cake flour
3/4 c all purpose flour
1 tablespoon baking powder
1 teaspoon baking soda
3/4 teaspoon salt
1/2 c unsalted butter, room temp
1/2 c vegetable shortening, room temp
1 3/4 c sugar
1 tablespoon pure vanilla extract
grated zest of one lemon
1 large egg
1 1/2 c ice cold water
3 large egg whites, room temp
1/4 tsp cream of tartar

For the lemon curd filling:
3/4 c fresh lemon juice
Grated zest of 2 lemons
2 large eggs
7 large egg yolks
3/4 c sugar
4 tablespoons butter, room temp

For the Lemon Drop Frosting:
1 1/2 c sugar
1/3 c all purpose flour
1 1/2 c milk
1/3 c heavy cream
1 1/2 cups unsalted butter, soft but cool, cut into small pieces
1 teaspoon vanilla extract
1/2 c lemon curd

Garnish: 8 lemon drop candies

Make the Lemon Cake Layers:

Preheat oven to 325 degrees. Butter 3 8" round cake pans, line the bottoms with parchment, and butter the parchment. Dust with flour and and knock out.

In the large bowl, sift the flours, baking powder, baking soda, and salt together. Set aside.

In the bowl of an electric mixer fitted with the paddle attachment, beat the butter and shortening on medium speed until creamy, 3 to 4 minutes. Add the sugar, vanilla, and lemon zest and beat on medium speed until fluffy, about 3 minutes. Scrape down the sides of the bowl, add the egg, and beat until just combined. Reduce speed to low. Add the flour mixture, alternating with the ice water, in three separate additions, beginning and ending with the flour mixture. Scrape down the bowl, then mix on low speed for a few more seconds.

In a clean bowl, whisk the egg whites and cream of tartar until soft peaks form. Do not overbeat. Gently fold the egg whites into the batter.

Divide the batter among the prepared pans and smooth the tops. Bake for 40-45 minutes, rotating the pans halfway through baking time, until a toothpick inserted in the center of each cake comes out clean. Transfer the cakes to a wire rack and let cool for 20 minutes. Invert the cakes onto the rack, remove pans, and let cool completely. Remove the parchment.

Make the Lemon Curd Filling:

In a small bowl, pour the lemon juice over the lemon zest and let stand for 10 minutes to soften the zest.

In a nonreactive bowl whisk the eggs, egg yolks, and sugar until combined. Add the lemon zest and lemon juice to the egg mixture and whisk until just combined.

Place your bowl containing the egg mixture over a double boiler. Continuously stir the mixture with a heatproof spatula until the mixture has thickened to a pudding-like texture, about 6 minutes.

Remove the bowl from the heat and whisk the butter until emulsified. Strain the mixture through a fine-mesh sieve. Take a sheet of plastic wrap and press it into the mixture and around the bowl so that the curd does not form a skin.

Set the lemon curd aside while you are making the frosting. Do not refrigerate the curd unless you're saving it for future use.


Make the Lemon Drop Frosting:

In a medium heavy-bottomed saucepan, whisk the sugar and flour together. Add the milk and cream and cook over medium heat, whisking occasionally, until the mixture comes to a boil & has thickened, about 20 minutes.

Transfer the mixture to the bowl of an electric mixer fitted with a paddle attachment. Beat on high speed until cool. Reduce the speed to low and add the butter; mix until thoroughly incorporated. Increase the speed to medium-high and beat until the frosting is light and fluffy.

Add the vanilla extract and 1/2 cup of the lemon curd and continue mixing until combined. If the frosting is too soft, put it in the refrigerator to chill it slightly then mix it again until it is the proper consistency. If the frosting is too firm place the bowl over a pot of simmering water and beat with a wooden spoon until it is the proper consistency.

Assemble the Cake:

Refrigerate the frosting for a few minutes (but no more) until it can hold its shape. Place one cake layer on a serving platter. Trim the top to create a flat surface and evenly spread about one cup of the remaining lemon curd filling on top. Add the next layer, trim and fill with 1 cup of lemon curd, then add the third layer and trim. Crumb coat the cake and refrigerate for about 15 minutes. Frost the sides and the top of the cake with the frosting. Garnish with the candies and refrigerate for 15 minutes to firm up the finished cake.

This cake will keep beautifully in a cake saver at room temperature (cool and humidity free) for up to 3 days. If your room is not cool, place the cake in a cake saver and refrigerate for up to 3 days.Remove the cake from the refrigerator and let it sit at room temperature for at least 2 hours before serving.

Salt-kissed Buttermilk Cake

title
I know I’ve just come from a post that extolled the wonders of my favourite tropical fruit, now in its resplendent season. I also know that it’s best to buy in season, and locally. But sometimes a girl just can’t wait, nor can she travel to wherever raspberries grow.

So I’ve gone and been naughty and bought frozen raspberries.

Listen first and scold me later!

You see, this didn’t start with frozen raspberries, although I have seen them for a while and have been sorely tempted (we sometimes get fresh too but they are likewise imported and quite pricey). This actually started with this. Another recipe from the fabulous Heidi of 101 Cookbooks who makes healthy food look like the superstars they truly are. Salt-kissed Buttermilk Cake. The name alone sounds instantly charming. But that wasn’t the only thing that drew me to her post.

Reading through it she mentions the finishing salt she uses, a salt which her salt-geek friend refers to as “an exaggerated version of the classic fleur de sel Brittany sea salt widely used in fine cooking, with lush almost billowy crystals that provide a sensuous crunch.” Do you know where this wondrous salt is found? Here! Yes, here in the Philippines! It’s called Pangasinan Star sea salt and is also hailed as “Ilocano Asin Philippine fleur de sel sea salt”. Could this be the same (or similar) to the sea salt I lugged back from Ilocos? I had never heard of this salt before but you can be sure I will be on the hunt for it here! If anyone knows of purveyors in Manila please drop me a line!

At this point I was into the cake and into the salt and just lost in the blissful haven of Heidi’s blog as what usually happens when I am there. It was time to focus and I was determined to replicate that cake.

Fortuitously, I knew just where to get fresh, local, buttermilk – not just any buttermilk, but buttermilk made from carabao’s milk (a carabao is our native water buffalo whose milk has a higher fat content than cow’s milk)!

The next ingredient I had to find was whole wheat pastry flour, which I easily located at a nearby health food shop (where I get all my grains too) care of Bob’s Red Mill.

Local buttermilk, local salt, imported flour, and imported berries – I’ll call that even and will let this one slip by :)

You can find the original recipe here along with pretty pictures that will make you want to bake this cake right now. I followed it to the letter using the frozen raspberries I so sneakily bought. This is the first time I’ve baked with whole wheat pastry flour (not including bread using whole wheat flour) and I was curious to see how it would come out. I brought it to my mom’s for dessert and the vote was split 3 to 2. My mom, grandmother, and I enjoyed the cake – its soft buttermilk crumb, the earthy whole wheat taste, the not-overly-sweet cake, and the tart tang of the raspberries. C and my brother seemed a bit uncertain – which I think stems from the whole wheat-y-ness of it which caught them a tad off guard. I did like it though and next time, I will try making it while half whole wheat pastry flour and half AP to see if the boys can be changed in their opinion :) I’m also thinking of being better behaved and actually using fruits in season instead of the raspberries. Mangoes would be a good choice but I am reluctant to bake with mangoes as I much prefer them fresh. Maybe pineapple? This cake is also good for breakfast the next day – I toast a slice and put a bit of butter on it...siiigh, still naughty! :)

Happy Easter to those who celebrate it! If you are under the Philippine sun please don’t forget your protection...my shoulders are stinging from my negligence (naughty again!)!

Chocolate Goldfish?

Goldfish always remind me of my sister. When she was little, she was addicted to them, much like a crack addict it addicted to, well, crack. So, I immediately thought of her when I saw that Pepperidge Farm has recently introduced three new Goldfish flavors: chocolate, honey, and cinnamon! As far as I know this is the first time that goldfish have swum into the sweet pond (sorry, I couldn't resist!), but I guess now that they've conquered the savory, they've moved on to the sweet! I'm really interested to see how chocolate translates when moved to the hollow, crackerlike fish. Has anyone tried these?? Click here to see all the Goldfish flavors.

Breakfast #27: Kesong Puti & Mango Jam Melt

title
Summer is here! Once again the asphalt sizzles, the heat is just this side of unbearable, and our thoughts turn to keeping cool. In Manila, summer for me means unbearable city heat trapped between buildings and turning my little flat into an oven...while I dream of the blue skies, white sands, and crystal seas that surround our islands, but seem so far away from my immediate urban reality.

As I sit here with my dreams, hoping to squeeze some beach trips between the piles of work that know no such thing as a “summer holiday”, one very summery promise wafts through the warm air...the scent of ripening mangoes. Mangoes here are like women in Brazil (or at least everyone’s idea of women in Brazil) – every single one gorgeous! Yes, we are home to the Gisele Bündchen of mangoes (in my humble opinion). Different provinces and regions lay claim to growing the best mangoes in the country. Some say Guimaras, some say Cebu, some say Zambales. I say tough competition for the growers, but a lovely position for the eaters! :)

Presently, I have a bunch of mangoes from Zambales ripening on my dining room table. With their tantalizing fragrance perfuming the sultry air, I don’t feel so bad being stuck in a concrete jungle while summer is unfolding recklessly about me. I get these mangoes from a nice lady from whom I also procure carabao (our native water buffalo) milk products.

The mangoes are ripening at different speeds, which is perfect for us as we don’t have to worry about suddenly having to consume 10 mangoes at once. I have already tried some and I must say that these are some of the best mangoes I’ve ever tasted in my whole tropical Filipino life! Everything that makes the Philippine mango enchanting is infused in each bite – wickedly sweet, scandalously juicy, golden perfection. Straight from the fridge on a hot summer day, I am hard pressed to find something to top it.

These mangoes (from this particular farm in Zambales) will not last forever though. Their season may be over in a month, maybe less. I am thinking of buying a load and maybe freezing some...or maybe turning some into jam as I’ve done in the past. The mangoes high sugar content makes them perfect for jam (only if you can’t have them straight from the fridge on a hot summer day - which is really the best way to have them).

I didn’t make the mango jam used in this sandwich, nor was it made from Zambales mangoes. It was a gift from a friend and was delicious (“was” because I’m all out!). I paired it with carabao’s milk kesong puti, our local fresh white cheese, and squashed everything in a whole wheat pan de sal set on a contact grill. A delicious summer breakfast! If you don’t have a contact grill, just grill it on a skillet, pressing down on the sandwich until the cheese is nice and melty. If you don’t have kesong puti, you can use any fresh white cheese. That being said, mango jam also pairs beautifully with gruyere, melted the same way.

Happy summer to my co-islanders! I must get back to my beach escape plotting...and I do think another mango is calling my name from the dining room...