Breakfast #14: Yogurt with Red Wine Poached Nectarines

title
It looks like my breakfasts posts are coming one on top of the other lately. After a long, breakfast-free, interval, they seem to be back with a vengeance…reclaiming their rightful place as this blog’s namesake.

That past two breakfasts have been hearty…a fortifying rice meal, and a rich & sweet rice pudding. Although both able to give a proper amount of valor to face the trials and tribulations of gloomy work days during the rainy season, both are also liable to pile on the poundage if eaten unchecked, day after day. Here is something much lighter, but equally yummy, and as you will see, no less special.

Many people eat yogurt for breakfast…some can’t live without it; some just eat it just for the sake of promised weight loss. I am living gloriously in the former category. I love yogurt. It can put me in a good mood like nobody’s business. And since I’ve discovered a good, thick, natural yogurt sold in my grocery (read more about it here), I have been enjoying it in every way I can. Here’s one of them.

Red Wine Poached Nectarines
  • 1/2 cup red wine
  • 1/2 cup water
  • 1/2 cup sugar
  • 1 cinnamon stick
  • 1 strip orange rind
  • 2-3 nectarine, each cut into 8 wedges

- Place wine, water, and sugar in a saucepan and heat until sugar is dissolved.
- Add the cinnamon stick and orange rind and let infuse for a couple of minutes.
- Add the nectarines and poach gently for 5-10 minutes, until just tender.
- Top a bowl of yogurt with some of the slices and a drizzle of the poaching liquid. Sprinkle some pistachios on top for added flavor and texture.
- Store the rest of the poached nectarines with the poaching liquid in a jar in the fridge. Use as topping for yogurt, ice cream, a filling for crepes, perhaps in a tart…lots of possibilities!

Fruit and yogurt is a common breakfast any way you paint it. But I think poaching the fruit in red wine lends it something special. Aside from an enchantingly robust flavor (punctuated quite nicely by the spiciness of the cinnamon and the citrusy note of the orange rind), it gives me a festive sense of celebration…which really, is a whole other aspect of breakfast that many forget: A celebration of a new day, with food still on our table, and energy still in our veins.

So let me toast this new day with you, and let each breakfast remind us that, wherever we are, if we are at a table eating breakfast, we still have something to celebrate. Cheers and happy weekend! :)
SHF #34 & Breakfast #13: Carabao’s Milk Champorado with Cocojam and Pili Nuts

title
On the heels of my last post, after waxing lyrical about our national love affair with rice for breakfast, I had to come back to tell you this: We don’t just have it with egg and meat/fish. And we don’t just have it savory.

We also have it sweet and with chocolate.

This is called champorado and is our version of chocolate rice pudding. It’s traditionally eaten at breakfast time, sometimes with a side of dried, salted fish. It may seem strange to the uninitiated to have chocolate rice pudding with dried fish. I can’t actually comment because I haven’t tried the combination, but rest assured that if I do I will report back here. Until then, it’s enough for me that eating chocolate for breakfast figures into my culture and I’m more than grateful for that :)

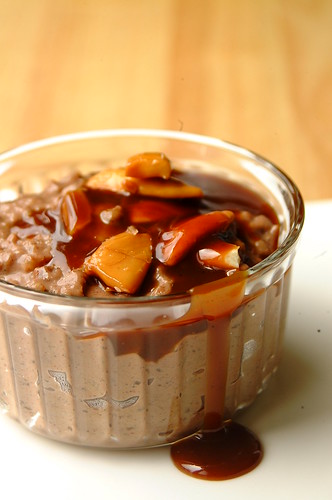
There are loads of champorado mixes available at the supermarkets but I decided to make it from scratch using the loot C had brought back for me from his business trip to Naga City. First I used the native tablea (chocolate tablets made of local crushed cacao) as my chocolate flavoring, a more traditional ingredient than the commonly used cocoa powder that you find in a lot of champorado today. Then, since chocolate and coconut are a popular pairing, I thought of topping the champorado with some of the coconut jam with pili nuts and sprinkling a few candied pili nuts over the whole mess. Finally, instead of making the champorado with water as it is typically done, I decided to use milk, and not just any milk, carabao’s milk. Carabao’s milk has a higher fat content than cow’s milk, making it richer and creamier, and upping the ante for milk-based puddings and desserts.

Carabao’s Milk Champorado with Cocojam and Pili Nuts
  • ½ cup malagkit rice (this is our local glutinous rice which we use for sticky rice sweets, I think rice you would use for risotto would work as well, although I’m not certain as I haven’t tried that yet)
  • 2-3 cups carabao’s milk (start with 2, then add if the mixture becomes too dry for your tastes)
  • 4 tablea (just under an ounce each)

- Place the 2 cups milk and the rice in a saucepan and cook until rice is almost done, stirring regularly.
- In another smaller saucepan, melt tablea in some of the extra milk.
- When rice feel almost done, add chocolate mixture and keep stirring until rice is soft, adding more milk when necessary (this will depend on how soupy or sticky you want it…I like it really thick)
- Place cooked champorado in small bowls and top each with some coco jam (to taste) and candied pili nuts.
- Serves 4.

I don’t add any sugar in this recipe because the coco jam is very sweet (so please practice restraint when adding it…unlike me). Also, when I say “place in small bowls”, I do mean small bowls, this is very rich and I could only finish half of the serving you see in the photo above. You can use cocoa powder instead of the tablea (I’ve consumed many a champorado using cocoa) but the tablea adds a certain rustic grittiness that I like, the chocolate being more bitter and grainy. The carabao’s milk makes this incredibly rich and creamy.

This is amazingly comforting during our rainy/wet season, not only because it is rich, sweet, and hearty, but also because it brings back so many childhood memories. My paternal grandmother use to make this all the time (albeit the regular way and not with carabao’s milk) and I used to look forward to it every time I visited. Now that I'm older, comforting childhood favorites like this are sometimes forgotten in the face of more sophisticated fare...but, I quickly realize as the rain beats steady on my grimy window, are no less needed.


back to school

UPDATE!!! -- I had been secretly hoping that I could submit this as my very first entry to the famed and highly acclaimed food blogging event, Sugar High Friday, but unfortunately I was late. However, I just recieved word from Johanna, this round's kind and generous host, that I was very much welcome to join...YAY! Johanna, The Passionate Cook, chose "Going Local!" as the theme and encouraged everyone to blog about local sweet stuff...hence my fervent wish to join this round...so I could toot the horn of my native champorado! :) Thank you Johanna! And thanks to Jennifer the Domestic Goddess for creating this event that celebrates sweetness! :)

Breakfast #12: Chorizo Fried Rice with Egg

title

This is one of the most blissful things (in my humble opinion) about growing up in the Philippines…decadent yet fortifying, indulgent yet necessary, over-the-top yet simple and basic (hold on to your garters my friends!) – rice for breakfast.

And not just any rice – fried rice! It goes by many names: sinangag, kalo-kalo, sangag. Whatever you call it, it is what has been driving us on for decades. Rice is the fuel for our collective, national "little-engine-that-could". It is what got us to till the fields at the crack of dawn, cast our nets in the wee hours of morn, and gamely answer vast amounts of call center complaints still wearing a smile on our faces. Rice for breakfast – we salute you!

Nowadays, this archetypal “Pinoy breakfast” would consist of rice, a protein (check these Lasang Pinoy entries to get an idea), and egg. A delicious feast! What I decided to do here is just toss everything together to get a hearty one-bowl meal. For the protein I used skinless chorizo.

Chorizo Fried Rice with Egg

  • 250 grams skinless chorizo
  • 2-3 cups day old rice (depending on your preferred protein-to-rice ratio)
  • 2-3 cloves garlic, peeled and chopped
  • 1 small onion, peeled and chopped
  • 1 sili labuyo (bird’s eye chili), cut in half (I always cut sili in half so the heat escapes but you can still see it while you eat and thereby avoid scandalous surprise)
  • 2 eggs, lightly beaten
  • Your choice of oil

- Heat oil in a wok or kawali. Add onions, garlic, and sili all at once, and sauté until onion is soft.
- Add chorizo to the pan and sauté until it has released its glorious orange oil and is just cooked.
- Add rice to the pan and toss until rice is orange and soft. Take the pan off the heat and set aside.
- In a non-stick skillet heat a little oil. Add egg and cook until set. Flip the egg like an omelet until the whole thing has set. No need for good form here as you will slice it up. Just make it as flat as you can.
- Slice egg into strips and toss with rice. You can reserve some egg strips to use as topping.
- Serves 2-3

The chorizo gives this dish a bit of a Spanish influence…with one important caveat: The Spanish-style chorizo I used is made right here! I bought it from a friend that makes his own and, yes (!), he sells it too (details below). It is really delicious and I am presently kicking myself for only buying the 250-gram pack. You can use any chorizo you have though or even longanisa. If you don’t have any skinless (or, as it is locally called “hubad”, which means naked…I love that!) you can use regular and just cut it up as you see fit.

If you happen to be in Manila: You can order the chorizo from Desnudos, just call 8230047. They also have choriburger patties (oh yes…I have a pack in the freezer!) and longanisa hubad (naked longanisa!). Desnudos also means naked. I should stop with the naked huh? Or at least wait until after lunch ;)

Food gifts from Naga & Some good news

title

C was on a business trip last week in Naga, a city in the Bicol region of the Philippines. Naga is a leg-numbing 8-hour drive from Manila (where we live), unless there is traffic (which is often, especially in last Friday’s rains), in which case the ride can stretch to 10 hours.

***The Bicol region has some gorgeous natural gems such as: Mayon Volcano (with a nearly perfect cone!), the incredible butanding (whalesharks) of Donsol, and a great many beautiful beaches and idyllic islands. If you are sports minded these are great spots for surfing (in Daet, Camarines Norte), diving, and wakeboarding (Camarines Sur is now a popular wakeboarding and wakeskating destination). So despite the long drive, I would definitely love to see it one day (you can fly too if you’ve got extra moolah on you).***

Anyhoo, back to reality, and a rain soaked Friday evening. I had just finished a full day meeting and C was on his way back from Naga, stuck in traffic, tired and hungry. He finally gets home at past 9 in the evening and we are just about ready to slay a cow with our bare hands. Hunger, fatigue, and metaphorical cow-slaying aside, I was delighted to see the stash of regional delicacies C had (thanks guy!) brought back for me.

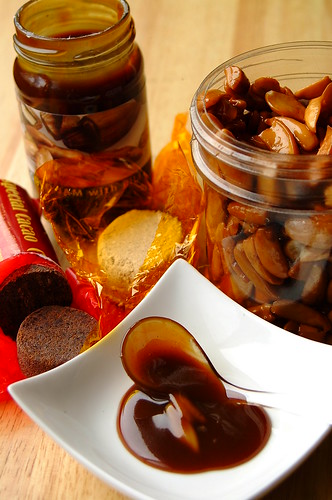
My loot:

  • Polvoron – Best described as a “powdered milk candy”, polvoron is made of (you guessed it) powdered milk, flour, sugar, butter, and perhaps some sort of flavoring. Some have crushed bits of pinipig (puffed rice) which give it a great crunch. The flour is toasted, the ingredients are mixed, and the resulting fragile powdery blend is stuffed into special oval-shaped molds. It’s like eating sweet, solid, milk…yum! (well, yum if you like milk)

  • Tablea – These are blocks of crushed local cacao beans. They are used to make hot chocolate and champorado (our local version of chocolate rice pudding). These blocks are grainy and intense, turning out a hot chocolate that is earthy and rustic. This type of hot chocolate reminds me of my youth, when I would dip heavily buttered toast into it, watching the beads of melted butter float on the chocolate’s surface before sipping it up. I will be making a cup for breakfast very soon!

  • Candied Pili Nuts with HoneyPili nuts are native to the Philippines, and although they are grown as ornamental trees in other tropical countries like Malaysia, only in the Philippines are they produced and processed commercially. All this production take place mainly in the Bicol region, making pili products one of Bicol’s most popular sweets. I love pili nuts, and candied pili nuts are an unholy addiction. I have eaten myself sick many times, so I’ve placed this batch far from reach in the hopes that I won’t get too out of hand (I'm having them right now on my yogurt -- tops!).

  • Coco jam with pili nuts – This was a first! I’ve had coco jam (coconut jam) since I was a kid but never with pili nuts. I love jams and preserves that have got nuts in them so I was extra excited about this. Predictably, I loved it…coconut jam and pili nuts? How could I not? I wish they had more pili in it though, but that’s ok because I have one whole pack of candied pili nuts to add to it :) I can’t wait to buy some pan de sal and make some coco-nut-sandwiches!

MORE NEWS:
I have an interview up on Culinate!
Culinate is a great new website on everything food-related. I discovered it through Liz Crain, one of their writers, who contacted me asking if I could be interviewed for Blog Feed, her column in Culinate that focuses on food blogs. To say I was flattered would be an understatement! Somebody out there wanted to put 80 Breakfasts on her column? Beside features on such fabulous blogs like La Tartine Gourmande, Cook & Eat, Baking and Books, and MattBites? Oh yes thank you kind stars! :) You can check out the article here and do check out the rest of Culinate, which has loads of interesting stuff to peruse!

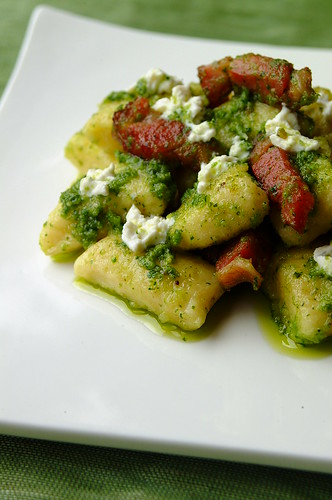
HHDD #14: Gnocchi with Rocket Pesto & Tyrolean Bacon

title

Which of the following statements are true?

Bacon goes excellently with pesto.

OR

Bacon goes excellently with everything, including pesto.

I am definitely an ardent student of the second school of thought. As the book I am presently enjoying indicates, I am a lover of anything pork. Bacon, with its streaks of gorgeous fat and hypnotic smoky flavor, is high on my list of porcine delights (with this at the top). Which is why, when I heard that this month’s round of Hay Hay it’s Donna Day was to be all about gnocchi, and I have never made gnocchi before***, I decided to call in the bacon…you know, just in case ;) If there were any accidents, at least I would have the bacon to act as delicious camouflage.

Anyhoo, moving right along…

Gnocchi. Although the recipe our lovely host Lynnylu posted was for a gnocchi made with ricotta (yum!), I decided to go with potato gnocchi for my first time. As luck would have it, I found a basic recipe for potato gnocchi in (surprise! surprise!) Donna Hay Magazine’s Winter 2007 issue…complete with how-to pictures and tips! Yay!

Being a first attempt, I had no idea what to expect, how finely the potatoes needed to be mashed, how the dough was suppose to feel…everything was done on a wing and a prayer. I do not own a potato ricer or food mill, so all “mashing” was done with a fork, and I started to worry that the mash wasn’t smooth enough. Then, as the dough came together, it seemed very sticky (added some flour to that) and soft. As I cut the gnocchi, I feared that they would fall apart once I dropped them in the water…they seemed a little too delicate. Well, there was nothing I could do now but hope for the best, so into a saucepan of rapidly boiling water they went. After a few nerve-wracking moments, the little lumps floated to that top. That’s it? Where they done? I fished one out and poked it…felt firm. Crossing my fingers I took them out and let them drain.

For the sauce, as mentioned above, I wanted bacon to play a part – hopefully masking any disasters if needed. I decided on a bacon-pesto sauce as I believe it’s a pairing made in heaven (try bacon+pesto+broad beans…excellent side dish!). I made rocket (arugula) pesto, because I love arugula and I wanted something different from the usual basil pesto (simply substitute rocket for the basil in your favorite pesto recipe). For the bacon, I used some of a just-acquired batch of Tyrolean bacon (so good!).

Gnocchi with Rocket Pesto & Tyrolean Bacon
(gnocchi recipe adapted from
Donna Hay Magazine, Winter 2007...I halved it)

For the gnocchi:

  • 350 grams potato
  • 1/4 cup freshly grated parmesan cheese
  • 1/3 cup flour
  • 1 egg yolk

  • For the sauce:

  • Olive oil
  • 2-3 tablespoons rocket pesto
  • 100 grams Tyrolean bacon, chopped into fairly chunky bits
  • Ricotta cheese, to serve

    - Place the potatoes on a baking tray and bake in a 180C oven until soft inside and crispy on the outside (about 1 hour or more).
    - When potatoes are soft, allow to cool slightly. Cut them in half while still warm (but easy to handle) and scoop the flesh into a bowl, and mash until smooth.
    - Add the parmesan and flour and stir to combine. Add egg yolk and stir until mixture comes together and leaves the sides of the bowl.
    - Turn out the dough onto a lightly floured surface and knead for one minute until a soft dough forms (my dough was too sticky so I added a little flour at this point).
    - Divide the dough into half and roll each half into a long rope about 2-2.5 cm in diameter. Cut into 2 cm pieces and place on a lightly floured tray.
    - Cook gnocchi in batches in a large saucepan of salted boiling water. Once you dropped the gnocchi in, do not stir or touch it…wait until it floats to the top and is firm to the touch, then it’s done. Drain and keep warm.
    - In a skillet, heat a small amount of olive oil, and then add the bacon. Once bacon has released some of its fat, add the gnocchi and fry quickly until the sides lose some of its paleness. Take pan off the heat, add pesto, and toss gently to coat.
    - Transfer to a plate, dot with ricotta cheese (please be more generous than I was in the photo above) and serve.
    - Serves two.

    I was pleasantly surprised with the outcome of my first foray into gnocchi-land. Despite a seemingly too-delicate dough, and my serious lack of special implements, once the little lumps where plopped into the boiling water, something miraculously righted itself and passable gnocchi emerged – soft and starchy but also firm and chewy. They did look depressingly pale at first, but I fixed that by frying them a little in the bacon fat (as I fix most of life’s problems). Also, I think I may make them smaller next time…these ones were a tad too hefty for me. The rocket pesto was a dream…if you like arugula, you have got to try it in your pesto! The Tyrolean bacon was a discovery…lightly smoky and salty, it was perfect with the pesto and the doughy-ness of the gnocchi.

    Thanks Lynnylu for choosing a theme I thoroughly enjoyed! And thanks Barbara for thinking up of such a great event! :)
  • ***Come to think of it, pretty much all my Donna Day entries were firsts! Hmmm…I guess now we all know how experienced I am in the kitchen huh? Never having made risotto, soufflé, mousse, or sorbet…wow, am I even the least bit embarrassed to admit this? Well, no matter, thanks to Donna Day I now have them all tucked snugly under my belt. And now gnocchi too ;)

    Weekend Interlude & Tea Bounty

    title
    I was a happy girl this weekend. Despite last week having more than its fair share of stress, and this week shaping up to be just as hectic (with a big important meeting coming up!), and C being away (to watch FC Barca play in Hong Kong), the weekend was a wonderful interlude from everything.

    Friday night was spent with my favorite girl, my icon, my mom. Yes, I am one of those girls who has lived her life in wonder, fear, and abject adoration of mother. This is a state that can never be outgrown…nor would I want to. We had a fabulous dinner at our favorite French restaurant, splitting a bottle of white wine and lots of gossip between us. Then we went back to my old home where we had a mini-slumber party with Moe, her poodle :)

    I spent Saturday and Sunday with a very good friend (known as Christine, but Nena to me). We spent most of the day at the Pink Kitchen – a terrific food festival organized by I Can Serve (a breast cancer advocacy group) to raise breast cancer awareness. Many popular local chefs gathered under one roof, whipping up old and new favorites, all for a good cause! It was fun and we were stuffed silly, staying on for hours chatting and sampling all the delicious treats on offer. We liked it so much we returned the next day for more!

    title
    Nena also introduced me to Genmaicha – green tea combined with roasted brown rice. I already love the taste of green tea…and the nutty flavor of the roasted rice adds a deep and earthy dimension to it, even if it was originally used only as a filler (way back when) to reduce the price of the tea. After she saw how much I liked it she kindly offered to get a box for me when she passed by the Japanese grocery.

    title
    And speaking of green tea, C arrived back home on Sunday bearing the matcha (green tea powder) I have been wanting! Yay! Now I can finally make all those lovely looking matcha sweets and desserts I have been seeing everywhere! Hmmm…I wonder where I should start…Any suggestions? :)

    title
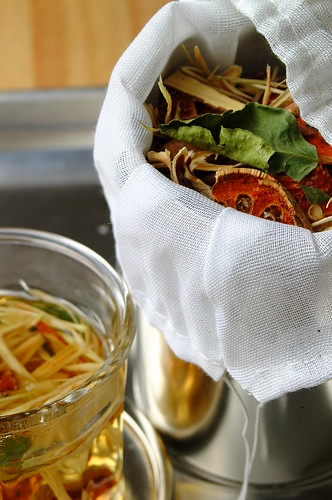
    C also brought back a canister of Café Siam Thai herb tea. It’s a favorite among all my aunts and uncles who have lived in Hong Kong. It’s the café’s own blend of such goodies as lemongrass, bael fruit, lemon leaf, galangal, orange peel, and cha-em. The scent is out of this world. And the infusion it makes is absolutely magical.

    Thank you C and Nens! Now I have a good stock of tea to fortify me this week :)

    Breakfast #11: Cuajada con Miel y Piñones

    title
    Good morning! What’s so good about it you ask? Well, the sun is shining through the smog of my city, I’m looking forward to dinner in my favorite French restaurant with my favorite lady (my mom!), and I’m having cuajada for breakfast.

    Cuajada is a creamy milk curd from Northern Spain, although you can have it all over Spain now. I have mentioned cuajada before here and here. It is traditionally made with sheep’s milk (leche de oveja), but is now often made with cow’s milk. The cuajo or rennet is added to the heated milk and this is what curdles it. Rennet is a natural complex of enzymes found in the cow’s tummy (actually any mammalian tummy), and what digests mother’s milk. This complex contains an enzyme which coagulates the milk, making it separate into curds and whey.

    Now, if mammalian tummy (present company’s excluded) is not readily available to you, rennet is also available in tablet or powder form. If you are at a restaurant that makes their own cuajada or serves fresh, please, take it! Take two and think of me! Also, grocery shelves throughout Spain are filled with commercially made cuajada, some better than others – look out for the ones in the clay pots marked “de leche de oveja”, these are the best. And if that still eludes you (like, for example, if you live half a world away), there is the last resort, which I have used here – cuajada mix. This is nowhere near as good as fresh cuajada, but as fresh cuajada in Manila is, for now, a lovely fantasy, it will have to do for me. When I saw these on the shelves in El Corte Ingles, I purchased a bunch to send home.

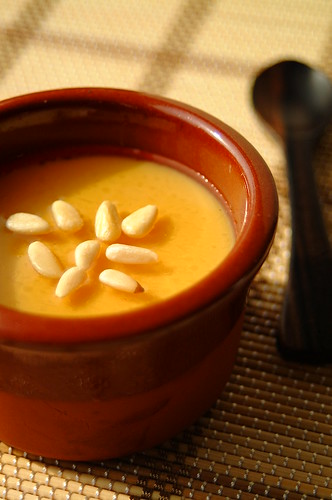
    I have made them here in the clay crocks I bought in La Bisbal, along the Costa Brava. This is my favorite way to have it…with honey and pine nuts. It's usually served as dessert, although sometimes also for breakfast. I can have it both times, and a third for snacking!

    Simply put, I love cuajada. To bits. No visit to Spain is complete without it. I think of it the way other people think about eating paella in Spain. Not leaving until I’ve had my fill. Is it that good? Obviously, opinions differ. This is, after all, a simple milk curd, taken with honey, sometimes nuts, sometimes fruit. But there is something about its creamy smoothness, its milky white innocence, which makes me feel inexplicably optimistic about life.

    For next time:
    - Add a vanilla bean or a cinnamon stick to the milk when heating.
    - Try experimenting with other spices and flavors…could a “chai cuajada” be in my future?
    - Use carabao’s milk! Extra creamy!

    Happy weekend and count your blessings! Even if sometimes they have to come from a ready-mix box :)

    Walnut and Fig Braised Lamb

    title

    I guess my elation at the lamb shanks my mum-in-law gave us must have been very obvious because we received a second package of lamb shanks not too long ago. Yay! Ok, I might have been a bit sheepish, wondering if she thought I was hinting around for a second serving (I swear up, down, and round and round that I wasn’t!)…but I was shamelessly thrilled nonetheless.

    The first batch of shanks she gave us I made into Lamb Youvetsi, a hearty Greek dish which remains one of my staunch favorites. For this batch, I wanted to move south to Morocco, famous for its tagines, those aromatic stews smelling of cinnamon and scattered with dried fruit and nuts.

    Despite having a book on Arab cooking (filled with luscious-sounding recipes I hope to share here someday) I ended up settling on a recipe from Alastair Hendy in The Accidental Foodie. With figs and walnuts among the ingredients, I was absolutely sold. Much as I did here, I decided to substitute the dried spices with my Egyptian baharat. Baharat is an Arabic spice blend, of which there are many different varieties depending on the country of origin. I know I have totally crossed borders here, but I figured that since Morocco and Egypt are both in Northern Africa I wasn’t straying that far off course.

    Walnut and Fig Braised Lamb
    (adapted from Alastair Hendy’s recipe in The Accidental Foodie by Neale Whitaker)

    • 700 grams lamb shank (the lamb shank my mum-in-law brought me is cut up widthways so they look like little osso buco…see here)
    • Olive oil
    • 2 onions, each sliced into 4 thick discs
    • 1 – 2 tablespoons Egyptian baharat (use 1 tablespoon first, then check seasoning and adjust when you check the water level halfway through cooking…I used almost 2 tablespoons total)
    • 2 cinnamon sticks
    • 3 strips orange rind
    • 500 ml water (or as needed)
    • 5 dried figs
    • 12 walnut halves
    • Salt and pepper

    - Heat oil in a wide casserole and brown lamb all over, adding salt and pepper.
    - Remove from the heat and take lamb out of the pot. Line the bottom of the pot with the onion slices, then place lamb back in, over the onions.
    - Sprinkle baharat over everything. Tuck the orange rind and cinnamon sticks around the lamb.
    - Pour water in, just enough so the meat sits in a shallow puddle. Season again and return to the hob. Allow to boil, and then transfer immediately to an 180C oven and leave it to slowly braise for about 2 1/2 – 3 hours (until meat is very tender).
    - Halfway through cooking, check the water level to make sure it hasn’t dried up. At this point check seasoning and adjust as needed. Add figs and nuts during the last hour.

    I made some couscous, tossed with chopped parsley, to go with it. I also made a salad of chickpeas and roasted peppers, a simplified version of this one (I didn’t add the goat’s cheese since I didn’t have any on hand). Right now everything is resting in the kitchen (Alastair did advise to make it in advance as the flavors “get happier as the get to know each other”) waiting for dinner. I must admit though, I did take a tiny taste! I couldn’t help it…the fragrance wafting up from the casserole was just too good to resist.

    I know this sounds painfully obvious, but it tastes just like it smells! One minute you are entranced by this delicious aroma, the next it is exploding in your mouth…each scent with its corresponding taste, and you find yourself trying to match each scent with a particular spice. But it’s difficult as the baharat is a mysterious blend and there are nuances that are teasing and taunting and keeping themselves hidden. All this is touched by the sticky sweetness of the figs. The lamb is falling of the bone tender, and whole thing is rich and unctuous.

    This is just the thing to have now that it’s gloomy and wet outside…and just the thing to comfort me after getting soaked in the rain yesterday…I must remember to keep my umbrella handy these days!

    ***If you’d like to try the original, Mr. Hendy uses 1 teaspoon each ground ginger, cinnamon, coriander and cumin (instead of the baharat) for 1 kilo of lamb or 4 lamb shanks. You can also use lamb stock instead of water if you have it.

    Gambas al Ajillo

    title
    I do like hosting dinners and lunches. Thinking of a theme, planning the menu, deciding which of my three (grand total!) plate settings I will use, mapping out the logistics of getting everything done in between work and other duties. I use up tons of note paper drawing up lists (I love doing this…I never have less then 3 pads of paper at a time), using different colored pens (all metallic…yes, I need my "bling" sometimes too) to categorize different items and tasks.

    Sometimes though, the heart and mind may be willing but the body weak. C and I are not always up to the task of planning and executing an 8-10 people sit-down dinner (10 is the absolute max I can squeeze in my place for sit-down…not exactly Ina Garten, I know), including the post-meal clean up (sans dishwasher). We do still love having people over. So what’s the solution? The ubiquitous drinks party!

    More relaxed and informal, having people over for drinks leaves you with less to prepare, as well as less to clean up afterwards. At the most you will be using small appetizer plates and forks, which are a snap to wash compared to dinner plates + soup bowl + maybe even salad plates + dessert plate + full-on cutlery. When it comes to food, you only have to think of a few well chosen finger foods and appetizers…easier to make and no less fun to plan and prepare.

    This is something I love to cook when I have friends over for drinks because it can be eaten with a cocktail fork or even a toothpick, and you can make it in 5 minutes or less. I like to make this after my guests have just arrived (you want it served hot…and it’s done so fast that your guests won’t even notice you’re gone) and they all have their first drink in hand. There are usually some other cocktail snacks on the table already to keep them busy.

    Gambas al Ajillo
    (adapted from
    Saveur magazine, November 2006 issue)
    • 150 grams shrimp (weight after being peeled and deveined)
    • 8 cloves garlic
    • ¼ cup parsley leaves, loosely packed
    • ¼ cup olive oil
    • ¼ teaspoon pimentón de la vera (dulce)
    • Sea salt to taste
    • Dried chili flakes, half a sili labuyo (bird’s eye chili), or any chili you like

    - Slice the garlic cloves. Pile the parsley leaves over the sliced garlic, then sprinkle the pile with salt. Chop everything together. (You can do this earlier on the same day and keep the mix covered in the fridge)
    - Heat the oil in a skillet. When the oil is hot toss the garlic/parsley mix and the chilis in. Let it sizzle for about 10-20 seconds, until aroma wafts up and hits your nose.
    - Add the shrimp and immediately sprinkle pimentón over everything. Stir and check for seasoning. Add salt if needed.
    - Cook until shrimp is just done. This will happen really fast (about 2 minutes, sometimes less) so watch it!
    - Take it off the heat and serve immediately.
    - Serves 2-3 as a single appetizer or more if you have other appetizers besides it.

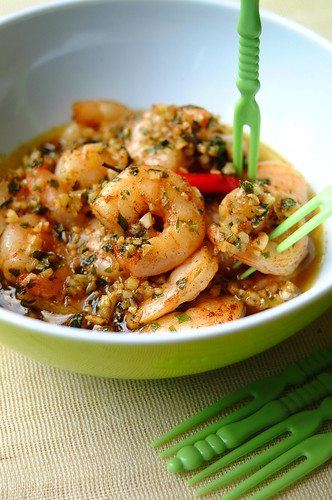
    You can serve this on the skillet while it is still sizzling (great drama!) or transfer to a serving plate. This is traditionally cooked and served in earthenware cazuelas but if you don’t have any, feel free to eschew tradition and serve them in retro neon-green bowls with kitschy plastic cocktail forks as I’ve done here. They are delicious on their own, but also great with bread for sopping up the juices (you will want to do this, trust me).

    I looked over a lot of gambas recipes until I found one I liked. This one’s procedure is largely taken from Saveur’s November 2006 issue. The addition of pimentón is mine, as I really like the flavor it adds. I also feel that chopping the garlic and parsley together with the salt intensifies the flavor (this was the step taken from Saveur). I added a lot more garlic because: I love garlic, this is about shrimp cooked in garlic after all, and it keeps away vampires :)

    Not just for cocktail parties, this makes a fabulous pasta sauce, simply as is, or with the addition of tomatoes. You can also dump the whole thing on a mound of steaming white rice and discover the delicious secret that most Filipinos have known about gambas for years! Cheers!