Pumpkin Chocolate Chip Loaf

This post will be short and sweet because I've already written so many posts about the Baked cookbook! I'm a HUGE pumpkin fan, so it's not that surprising that I would like this one, although I did make pumpkin bread last year, using a nonBaked recipe, and I was really disappointed. This, on the other hand, was delicious! Yum from the first bite!

More From Baked: Flourless Chocolate Cake, Whoopie Pies, Sugar Cookies, Sweet and Salty Cake, Lemon Drop Cake, Coconut Snowball Cupcakes, Chocolate Bourbon Pecan Pie

Recipe after the jump.


Pumpkin Chocolate Chip Loaf
(from Baked: New Frontiers in Baking)

3 1/4 cups flour
2 tsp cinnamon
1/2 tsp nutmeg
1/2 tsp allspice
1/2 tsp ground ginger
2 tsp baking soda
2 tsp salt
15 oz canned pumpkin
1 cup vegetable oil
3 cups sugar
4 large eggs
1 tsp vanilla
12 oz dark chocolate chips

Preheat oven to 350 degrees F and grease two 9x5-inch loaf pans. Whisk flour, cinnamon, nutmeg, allspice, ginger, baking soda and salt together in a bowl. In another bowl, stir together pumpkin and oil. then add sugar and combine. Stir in eggs one at a time and add vanilla. Add 3/4 cup room temperature water and then stir in chocolate chips. Fold the dry mixture into the wet mixture and combine but do not over mix. divide between two loaf pans and bake 1 hour 15 minutes to 1 hour 30 minutes. Cool in the pan for 15 minutes and then remove and cool completely on a wire rack.

Inspiration Board: Steampunk

(Image above: Cake by Mike's Amazing Cakes, photo by celustig)

What the heck is steampunk??? That was a question I was asking myself recently after stumbling across this word, a word that I had never seen before, twice in one day! The first time I came across it was after a friend of mine posted a steampunk-related link on Facebook and then, later that same day, it showed up again, on a pair of steampunk cuff links on Etsy. What the heck is this steampunk business??? I quickly sent an e-mail to my friend, the Facebook poster, for an explanation. As it turned out, I've been a steampunk fan for years . . . I just didn't know it!

For those of you who, like me, require a crash course in steampunk, here ya go. Steampunk is, as far as I can tell, a sort of a Victorian, fantasy, sci-fi hybrid. Just picture any film that has one foot in the future, and the other in the past. Think Time Bandits or City of Lost Children. I think the whole genre is pretty cool and, as I usually do whenever I learn something new, I started getting super excited about it! Of course, I immediately started thinking about writing a post about steampunk desserts! I was a bit disappointed with the lack of range amongst the steampunk sweets out there. As of right now, the inspiration is mostly about gears, but I still think it's an fun idea, nonetheless!

Steampunk cookies and bourbon bread pudding with bourbon glaze from Jenny Bannock

Cake by Mike's Amazing Cakes, photo by Libby Bulloff


Cake topper by The Builder's Studio ($139)

The best gift ever...

title
I have a confession to make -- it hasn't just been the renovation and the move that I've been busy with (although those are still in full swing). I've been carrying around (literally for nine months!) some pretty big news that has (finally) just made her arrival.

Little C was born 12 days ago and I am still not over the wonder. Perhaps I never will be -- I wouldn't know, never having been a parent before. Now that I am I'm ecstatic and nervous and excited and scared all at once. "Please let me be good at this one thing," I think to myself as we stare at each other over her 3am meal. And as she nods off to sleep with a ghost of a smile, which isn't really a smile at all but just some gas according to her doctor, I know this is going to be the most amazing ride of my life.

I have no clue when my posting with regain a semblance of regularity. Right now the only meals I am serving are hers (although I have sneaked in a few items of sustenance for C and I). I'll be back as often and my and little C's ever changing schedule allows -- after all, I now have more people to cook for and more reason to document our family recipes :)

C and I couldn't have asked for a better Christmas gift! Merry Christmas and a Happy New Year to you all! :)

The Mixing Bowl: Holiday Fudge by yellowlion

Nothing says happy holidays like fudge! Homemade fudge was a family tradition when I was a kid, so I was so pleased when Sarah at yellowlion sent over this delicious (and easy!) recipe for marshmallow/walnut/chocolate chip fudge! It's the perfect holiday treat and, as Sarah told me, a must for any chocolate lover!

Based in Chicago, Sarah creates beautiful screen prints that are inspired by her love of nature and, of all things, the patterns of Rorschach tests! Personally, I've always been fascinated with the look of the Rorschach inkblots. There's something about their surreal, dreamlike quality that I can't resist, so I love how Sarah takes that concept and kicks it up a notch with gorgeous colors and interesting designs.

I hope you all enjoy your holidays! Click here for more information on Sarah's work and to shop online! Thanks, Sarah! More fudge and prints after the jump.


Sweet Testing: Peanut Butter Cookies with Milk Chocolate Chunks

I don't know what it is, but sometimes I enjoy the things I bake more the next day. Maybe I spend so much time in the kitchen that by the time the cake/cookies/whatever comes out of the oven, I'm pretty much sick of them. Maybe I put too much pressure on myself and the food that I'm bound to be disappointed once I finally get around to taking a bite. Maybe, sometimes, foods just need to rest a bit in order for the flavors to really settle in. You know, like how soup is better if you make it the night before. Anyway, these cookies were definitely a better the next day kind of thing for me.

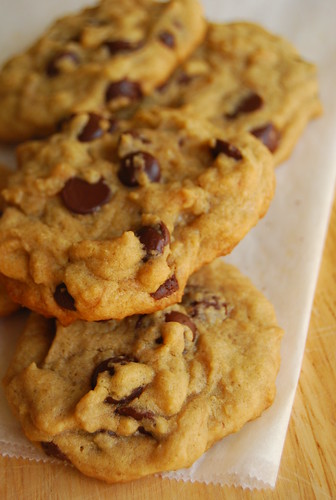
I made these classic goodies for a party and almost didn't bring them because I thought they were so boring, but the next day and the day after that . . . and the day after that, I couldn't stop shoving them in my mouth! I'd plan on eating one and end up chomping down five, one after another! This recipe made A LOT more cookies then I expected, so I brought the leftovers to work and they were quickly gobbled up. People actually came back for more, so they must have been fairly good, right? I know. This whole post is not exactly ending up as some huge ringing endorsement, but they're easy to make and they're tasty.

After writing this post, I came across Carolyn's review of these cookies on Food Gal and quickly realized that my big mistake was using chocolate chips instead of chopping the chocolate myself. I usually follow instructions, but I was short on time and I didn't think that it would make a huge difference. Apparently, the chopped chocolate transforms an ordinary cookie into something more like a peanut butter cup! So, there you go! I'm sorry Baked for not listening to you! It won't happen again! :-)

Recipe after the jump.

Peanut Butter Cookies with Milk Chocolate Chunks
from Baked: New Frontiers in Baking

Makes 24 cookies

1 3/4 cups all-purpose flour
2 teaspoons baking soda
1 teaspoon salt
1 cup (2 sticks) unsalted butter, softened, cut into 1-inch pieces
1 cup granulated sugar, plus more for sprinkling
1 cup firmly packed dark brown sugar
2 large eggs
1 teaspoon pure vanilla extract
1 cup creamy peanut butter
6 ounces good milk chocolate, coarsely chopped

Sift flour, baking soda, and salt into a medium bowl and set aside.

In the bowl of an electric mixer fitted with the paddle attachment, beat butter and sugars together until fluffy. Scrape down the bowl and add eggs, one at a time, beating until each is incorporated. The mixture will look light and fluffy. Add vanilla and peanut butter and beat until just incorporated.

Add half of the flour mixture and mix for 15 seconds. Add remaining flour mixture and mix until incorporated.

Using a spatula or wooden spoon, fold in chocolate. Cover bowl tightly and refrigerate for at least 3 hours.

Preheat oven to 375 degrees. Line two baking sheets with parchment paper.

Drop dough by rounded tablespoons onto prepared baking sheets, at least 2 inches apart. With palm of your hand, very gently press each cookie down so it forms a very tall disk shape. Do not press too hard and do not press it flat.

Sprinkle tops of cookies with granulated sugar and bake for 10 to 12 minutes, rotating pan halfway through baking time, until tops of cookies just begin to brown.

Remove pan from oven and cool on a wire rack for 5 minutes. Use a spatula to transfer individual cookies to the rack to cook completely (although they are also delicious warm).

The cookies can be stored, in an airtight container, for up to 3 days.

Robyn Lee's Chocolate Chip Cookies

title
Hello there! Anyone still around? It's been a month since I last posted...a month. Where did the time go? What, in heaven's name, was I doing?

Will get to that in a bit. Meanwhile, I can say one thing that I definitely was not doing...not thinking about this blog. Believe you me, it was on my mind constantly, like a wonderful friend who lives on a paradisal island that I was just aching to visit and play with...but because of lack of resources and time, just couldn't get to, no matter how much I longed for that escape.

So what I have been doing? Going full speed ahead on the renovation of our new home. Shopping for tiles and faucets and door knobs and all sorts of bobs and bits. Deciding on paint swatches. Pinching pennies. Working like a fiend on more shifts than I even want to think of. Attempting halfway decent Christmas shopping. Trying to appease our new neighbors during the noisy demolition period with these cookies...

Robyn Lee's Killer Big Fat Chewy Chocolate Chip Breakfast Cookies – smaller version
(adapted from Serious Eats)

  • 2 cups all-purpose flour
  • 1/2 teaspoon baking soda
  • 1/2 teaspoon salt
  • 3/4 cup unsalted butter, melted
  • 1 cup packed brown sugar
  • 1/2 cup white sugar
  • 1 tablespoon vanilla extract
  • 1 egg
  • 1 egg yolk
  • 1 1/2 cup semisweet chocolate chips

- Preheat the oven to 335 degrees. Grease cookie sheets or line with parchment paper.
- Sift together the flour, baking soda and salt; set aside.
- In a medium bowl, cream together the melted butter, brown sugar and white sugar until well blended. - Beat in the vanilla, egg, and egg yolk until light and creamy. Mix in the sifted ingredients until just blended. Stir in the chocolate chips by hand using a wooden spoon. Drop cookie dough a rounded tablespoonful at a time onto the prepared cookie sheets. Cookies should be about 1 inch apart.
- Bake for 12-13 minutes in the preheated oven, or until the edges are lightly toasted. Cool on baking sheets for a few minutes before transferring to wire racks to cool completely.

The original recipe called for 1 cup semi-sweet chocolate chunks from a high quality chocolate bar (like Vahlrona or Green & Black's). I didn't have any so I decided to use a half cup more of my regular chocolate chips to compensate. I am definitely trying this with swanky chocolate chunks next time! I also made the cookies smaller (you use a 1/4 cup measure to mold the cookie dough in the original) to make more cookies -- and feed more neighbors!

These are absolutely classic tasting chocolate chip cookies -- chewy with slightly crispy edges and gorgeous shots of chocolate all throughout. You can be sure I kept some for myself!

I hope this recipe appeases you until I pop back here again. I can't promise when that will be. You see, aside from the renovation and work (and the holiday rush!), there is also much going on in these parts -- of which I hope to share with you soon! For today though, these cookies will have to do. They're very good and I'm sure they will keep anyone happy :) I certainly hope they keep my neighbors in good spirits as the carpenters hack away!

Chewy Chocolate Gingerbread Cookies


My sister made these Martha Stewart cookies recently and I immediately snapped some pics because I knew that I wanted to share the recipe! So yummy!

You can find the recipe and a video right here on Martha's site. I've also posted the recipe after the jump.


Ingredients
Makes 2 dozen

7 ounces best-quality semisweet chocolate
1 1/2 cups plus 1 tablespoon all-purpose flour
1 1/4 teaspoons ground ginger
1/4 teaspoon ground cloves
1/4 teaspoon ground nutmeg
1 tablespoon cocoa powder
1/2 cup (1 stick) unsalted butter
1 tablespoon freshly grated ginger
1/2 cup dark-brown sugar, packed
1/2 cup unsulfured molasses
1 teaspoon baking soda
1/4 cup granulated sugar
1 teaspoon ground cinnamon


Directions

Chop chocolate into 1/4-inch chunks; set aside. In a medium bowl, sift together flour, ground ginger, cinnamon, cloves, nutmeg, and cocoa.

In the bowl of an electric mixer, fitted with the paddle attachment, beat butter and grated ginger until whitened, about 4 minutes. Add brown sugar; beat until combined.
Add molasses; beat until combined.

In a small bowl, dissolve baking soda in 1 1/2 teaspoons boiling water. Beat half of flour mixture into butter mixture. Beat in baking-soda mixture, then remaining half of flour mixture. Mix in chocolate; turn out onto a piece of plastic wrap. Pat dough out to about 1 inch thick; seal with plastic wrap; refrigerate until firm, at least 2hours.

Preheat oven to 325 degrees. Line two baking sheets with parchment paper or nonstick baking mats. Roll dough into 2-inch balls; place 2 1/2 inches apart on baking sheets. Refrigerate 20 minutes. Roll dough balls in granulated sugar and return to baking sheets. Transfer to oven and bake until surfaces crack slightly, about 18 minutes. Let cool 5 minutes; transfer to a wire rack to cool completely.

Cupcakes on Pitt

Wow! These are impressive cupcakes! They're actually award-winning cupcakes and I can understand why! Their lemon meringue cupcake (a vanilla cupcake with fresh lemon curd inside and garnished with a soft torched Italian meringue) took home a gold medal at Sydney Royal Fine Food Show and I can see why. It's almost too intimidating to eat . . . almost! The vanilla, strawberry, peppermint, chocolate, and carrot varieties walked away with silver medals, so anything you get at Cupcakes on Pitt will probably be pretty tasty. They even have giant cupcakes (20cm in diameter, height 22 to 25cm) for when you're really really hungry.

Cupcakes on Pitt don't take online orders at the moment, so if you don't live nearby you'll just have to settle for looking at the pictures. If you live in Australia, click here for locations.