Mixing Bowl: Schackrutor (Chess Squares) by Petra Borner

Petra Borner, today's Mixing Bowl contributor, is a fantastic Swedish artist and illustrator who lives and works in London. Known for her beautiful paper cut designs Petra is an extremely versatile artist, working in a variety of different mediums from illustration to fashion design and everything in between.

Her lovely designs have graced a wide range of objects, including textiles, drinking glasses, magazine covers, and even dog food bags.

In addition to being a great illustrator, Petra is also a skilled embroider, working with clients such as Jonathan Adler and Ikea (see her Ikea duvet cover after the jump).

For my part, I first fell in love with Petra's work after seeing her incredible book covers. I'm all about great book covers, so I was completely taken with her colorful covers the moment I saw them and was really impressed with the detailing of the designs. I work at a publishing company and over the years I've really come to appreciate the skill involved with designing a good cover. I've seen a lot of bad covers, so I know that it's not as easy as it looks!


I've been trying not to gush so much when I write these Mixing Bowl posts because I seem to do that every time, but I really have only scratched the surface as far a Petra's work is concerned. I don't have the space to post all the images that I want to share. There are just sooo many and her work is so varied!

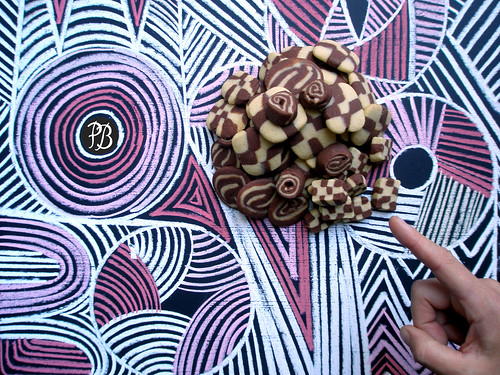
Right now, Petra is sharing some wonderful chalk drawings, yet another medium that she works in, and her great recipe for Schackrutor. I'm really loving the two-tone colors in these cookies and the cool designs on each one! Thanks, Petra!

I've changed the width of the columns to accommodate larger pictures. Let me know if anyone has any problems with the new layout.

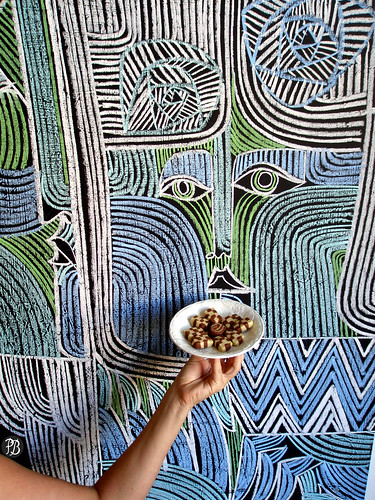
To see more of Petra's work, visit her Web site. Recipe and more images after the jump.


Schackrutor (Chess Squares)

Oven 175 - 200ยบ
Ingredients:

4 1/2 dl flour

1/2 dl sugar
200 g margarine or butter
2 teaspoons vanilla sugar
2 tablespoons Cacao powder

Mix the flour, sugar, butter in a bowl into a firm dough.
Cut the dough in two halves and mix the vanilla sugar in one and cacao powder in the other until smooth.
If too warm and sticky cool them in the fridge for a while to make it easier to handle.
Then have some fun with mixing the two parts together.
Before baking cut into about 3-4 mm thick cookies and bake for 7-10 mins.
Cool down and eat!

If you need help converting the measurements, click here for a nifty conversion calculator.


Mochi Ice Cream

Well, I'm still riding the Asian flavors train, after discovering a bunch of new desserts during research for my Wasabi ice cream post. Next stop: mochi ice cream.

This Japanese treat is about the size of a golfball and is basically ice cream covered in a dough-like shell, which is made out of rice flour. Flavors range from the familiar: chocolate, vanilla, and strawberry to the slightly more unusual: green tea and red bean paste. I have a thing for geometric shapes, so I'm loving the simplicity of the shapes and the idea of having your very own little ball of ice cream to call your own.

In the states, you can find mochi ice cream at Trader Joe's, Pinkberry, Red Mango, Bubbies in Hawaii, and Mikawaya in Los Angeles, which also sells mochi ice cream on it's Web site. If you'd like to try your hand at making your own mochi, click here for a recipe, courtesy of the Web site Japanese Ice Cream. Oh, and don't confuse mochi ice cream with regular mochi, which are filled with substances that are not ice cream. Regular mochi is probably tasty as well . . . but not ice cream! :-)

Photo credits: (top to bottom) Patti, B.ill

Simple Jam, Not So Simple Thoughts

title
Several people have asked me about the breakfast dish I prepared during my tv interview on Us Girls (yes, not-so-little old me on tv!). I realize now, in retrospect, that I didn’t really go into full gory detail about the interview, just to say when it was coming out and where. I didn’t think much of that then, but looking back, I suspect I must have been a little shy. It’s one thing to share your photos and thoughts to the whole world on a blog, or even have a photo of your face in a magazine, it’s quite another to have yourself moving and speaking in full Technicolor-vision on a tv screen!

When I got the email requesting for the interview I almost said no – tv? Me? Not likely. But I had been thinking about the premise behind this book lately. Do I say no too often? I don’t think so. In fact, I’d like to think I’m up for anything, and I usually am! But what if that anything just happens to be a something way outside my comfort zone? Will I still grab it with two hands and fly by the seat of my pants as I claim I like to do?

Deep thoughts.

So I found myself with those deep thoughts, looking at an email a lot of people would not have even blinked twice at (whether to say yes or no). And I decided to stop thinking and start doing.

And then I got really nervous and went out and bought a new dress.

See how good stuff happened almost immediately?

Then the shoot came and I had a ball! The staff of Us Girls were professional and thoughtful. The host was just this side of enchanting, and immediately put me at ease. We were shooting for an episode of the show called virtual life which featured people who, in one way or the other, were connected to the tech/cyber world. I also got to touch base with another blogger friend who I hadn’t seen in a long while (who was interviewed before me). During the segment, we talked about my blog, what it’s all about, how I started blogging and what I like about it (a lot!), and I prepared one breakfast dish. They asked for something easy to put together so I chose this yogurt parfait. It makes for a delicious, healthy breakfast that lends itself to many variations (you can use the fruits and preserves you have on hand) and a cinch to whip up...plus it looks nice.

So to those of you who were asking, you can find the method for the yogurt parfait here. Some were also asking what brand granola I use – although I don’t always have time to make my own, I urge you to try making homemade granola. It’s easy and leagues more delicious than anything you can buy in a store (plus you know for sure what goes in it). The recipe I use is here. You can make it ahead of time, store in an airtight container, and use whenever the mood strikes...which will be often, believe you me.

For the original parfait I used this blueberry syrup. For the show, however, I made some quick strawberry jam. Simple, quick jams are something I love to throw together. Let me just say here, before you think I am up to my elbows in fruits and jars and sterilization implements, I usually make small batches of jam...enough for roughly one bottle. I don’t go through the whole boiling of the bottles and sealing and what not either. I’m not storing up for the winter. I make the jam, pour it into a clean jar, and store in the fridge. It’s usually all gone after a week or so. It requires very little time and supervision, and will have you feeling like a proper domestic goddess without breaking a sweat, I promise you. Also, it goes without saying, homemade jam is a whole different world from store-bought in taste, and you have total control of what goes in and how sweet (or not) you want it.

No recipe for this, just a sort of loose method: I clean and weigh my fruits (peel, de-seed, and chop them too if needed depending on the fruit -- before weighing). I then toss the fruit in a non-reactive pot with sugar that weighs a little less. For example, for the Nectarine Plum Jam pictured here I had about 250 grams fruit (chopped and de-seeded weight) and I used about 170-180 grams sugar. Add a squeeze of lemon. Place on the hob and let cook, stirring occasionally, until thickened and setting point is reached. For this amount it will not take too long. When done, pour into a clean jar and cool. Store in the refrigerator.

I test the setting point with the old saucer-in-freezer method: Place a saucer in the freezer while you are making you jam. When your jam looks like it’s thickened, take the saucer out and put a drop of jam on its surface. Now tilt the saucer...if the jam runs down the plate it’s not ready. It should catch and droop slowly...then push the jam lightly with your finger, it should wrinkle a bit.

It’s lovely travelling out of your comfort zone to enjoy the new things that await you there :) Even if you already grab every opportunity by the horns, try something that you typically wouldn’t do. You may be happily surprised! :)

The Mixing Bowl: Easy Vanilla Cheesecake by Sally Elford

Today's Mixing Bowl recipe comes for Vanilla Cheesecake comes from illustrator and print maker Sally Elford. Based in the UK, Sally is influenced by mid-century artists like Jan Balet, Miroslav Sasek, and, my longtime favorite, Charley Harper! In the past, she has worked with clients such as Oxford University Press, BBC Worldwide, and Readers Digest, to name a few, and recently started creating and selling limited edition prints on her Etsy site where you can find a nice selection of her great designs. Personally, I really love the Peaceful Park print, but check out her shop to find your favorite!

The last few Mixing Bowl posts have been fruit-filled desserts, so I was excited when Sally sent over this vanilla cheesecake recipe! Not that I have anything against fruit, in fact I love it, but this is great recipe to lead us into fall Quick, easy, and a great way to impress your guests. What's could be better?

Click here to check out the illustrations on Sally’s Etsy site and here to check out more images on her Web site. Thanks, Sally!


Recipe and more images after the jump.


Easy Vanilla Cheesecake
(adapted from Cooking for Engineers)


1. Beat together in a bowl:

455g cream cheese or mascarpone cheese
2 beaten eggs
1 teaspoon of pure vanilla extract
50g granulated sugar (make it 100g if using cream cheese)


2. Place 8-10 ginger biscuits in either cupcake cases or ramekin dishes.

3. Dollop mixture evenly over biscuits in cases/dishes

4. Add a sprinkle of nutmeg over each cheesecake

5. On a baking tray pop in oven at 350 F or 175 C
for 15 minutes.

6. Take off tray and cool on wire rack

7. Refrigerate before serving.

Can be topped with soft fruit once cooled – raspberries particularly nice!

If you need help converting the measurements, click here for a nifty conversion calculator.

Tomato Salad 3

title
Are you tired of tomatoes yet? I’m not :) I’ve been enjoying them a lot lately, much more actually than you see here. I’ve had this tomato salad with steak and this tomato salad with chicken. We have had even more in between.

You see, I don’t like tomatoes in my salads. But I love tomato salads! I’m funny that way. Since my last two posts however, it seems that a lot of you are funny that way too. Nice to know I’m in such great company! :)

So, I’ll share one last tomato salad before I move on. I hope you don’t mind terribly. Like the first two salads, this is blazingly simple to make but delicious nonetheless...highlighting the tomatoes' natural flavour.

Tomato Salad 3
  • 250-300 grams tomatoes (different sizes and colors are good -- of roughly the same volume)
  • 1 small red onion
  • A couple of sprigs each parsley and dill, leaves only, roughly chopped
  • 5 basil leaves, roughly chopped
  • Extra virgin olive oil
  • Balsamic vinegar
  • Sea salt
  • Freshly cracked black pepper

- Slice the tomatoes in chunks – they don’t have to be the same shape, just approximately the same size.
- Slice the onion into thin half moons – as thin as you can manage.
- Toss onions, tomatoes, and chopped herbs together and dress with a couple of good glugs of olive oil and some dashes balsamic vinegar. Sprinkle with sea salt (as good a finishing salt as you have – and don’t be shy about it) and freshly cracked black pepper. I always do this to taste but if you want a guide just use 3 parts oil to 1 part vinegar, toss, taste, and adjust. Toss carefully...you don’t want battered tomatoes!

I know, I know...this is basically Tomato Salad 2 with herbs, and although almost painfully obvious (tomatoes + herbs = good), it’s still one of my favourites and I do feel I’d like to mark down my love for it here. The addition of greenery (herbs not lettuce!) really does make this an altogether different salad, adding its own layer of flavours that do a sprightly little dance, an altogether pleasant one I might add, around the tomatoes. I could eat this straight from the bowl with a spoon in one hand and a piece of crusty bread in the other.

I don’t always use the same set of herbs I’ve used here. In fact, each time I make this salad the number if herbs I use, and the combination thereof, changes. Cilantro, mint, culantro, thai basil, spring onions, chives, marjoram, chervil, lemon thyme. The possibilities are giddily endless! I usually toss in what I have on hand or fetch what I think would go well with whatever else we are eating.

Recently I bought a hefty tinapang bangus (smoked milkfish – one of my favourite types/preparations of fish ever. Period.) at the market, and we served it with the salad above, but switched all the herbs for cilantro – fish perfection! In fact, as far as we may be geographically, the cilantro version of this salad is our go-to siding for Filipino fish dishes and Mexican food (using a splash of red wine vinegar instead of the balsamic above). Gets on famously with both!

I’ve come to the end of my tomato salad series (although certainly not the end of tomato consumption!)! I hope you enjoyed it as much as I did :) You can check out more ways with tomatoes over here.

For even more about tomatoes, go take a peek at the Summer Fest Party...they are celebrating tomatoes this week: Steamy Kitchen, Simmer Till Done, Matt Bites, Away to Garden, White on Rice, The Sister Project, and Gluten Free Girl.

Sweet Testing: Flourless Chocolate Cake

You can't go wrong with a flourless chocolate cake. It's pretty much a foolproof dessert and this version from Baked did not disappoint. It was rich and moist, just like a flourless chocolate cake should be. I suppose there are people who may find this and other flourless chocolate cakes too chocolaty, but that's just crazy talk. In my opinion, there is no such thing as too chocolaty! Besides, in addition to being totally delicious, and easy to make, the flourless chocolate cake manages to be totally gluten-free, without even trying! Yay! I did make one small change to the Baked recipe, though. I wanted to snazz things up a bit, so I added two tablespoons of cinnamon. That's right, two tablespoons! You can, of course, leave that part out. Also, Baked gives you an option of adding a chocolate glaze, but I was short on time, so I just made the cake and then dusted it with powdered sugar and cocoa.

More From Baked: Whoopie Pies, Sugar Cookies, Sweet and Salty Cake, Lemon Drop Cake, Coconut Snowball Cupcakes, Chocolate Bourbon Pecan Pie

You can find the complete recipe after the jump.


From Baked: New Frontiers in Baking

10 ounces dark chocolate, coarsely chopped
10 tablespoons unsalted butter, softened
1 cup sugar
7 large eggs, separated
1 teaspoon vanilla extract
1 teaspoon salt

Preheat the oven to 350 F. Generously butter the sides and bottom of a 9-inch springform pan. Line the bottom with parchment paper and butter the parchment.

Using a double boiler or a microwave, melt the chocolate and set aside to cool.

In the bowl of an electric mixer fitted with the paddle attachment, beat the butter and sugar together on high speed until pale, light, and thoroughly combined, about 5 minutes.

With the mixer on low speed, add the egg yolks, beating well after each addition. After all the eggs yolks have been incorporated, scrape down the bowl and beat for 10more seconds. Add the cooled chocolate and mix until combined. Scrape down the bowl, add the vanilla and beat until just incorporated.

In a large bowl, whisk the egg whites and salt until soft peaks form. Scoop 1 cup of the egg white into the chocolate mixture. Use a rubber spatula to gently fold the egg whites into the chocolate mixture. After 30 second of folding, add the remaining egg whites and gently fold in until almost completely combined.

Pour into the prepared pan and use a spatula to smooth the top. Bake for 30 to 35 minutes, until the top of the cake seems set or firm to the touch. Be careful not to overbake.

Transfer to a rack and let cool. Use a small knife to loosen the cake from the sides of the pan. Remove the springform sides. Invert the cake on the rack, peel off parchment, and flip the cake back upright.

Mustache Cookies

A few weeks ago I was introduced to a fantastic little Italian cookie called mostaccioli via Megan's site Feasting on Art. Mostaccioli is, apparently, Italian for mustache and these cookies are often made to resemble, you guessed it, mustaches! Sooo fun! I'm definitely putting Megan's mostaccioli recipe on my extremely long baking to-do list. If you'd like to own your very own mustache cookies, here are are some additional baking and buying helpers:

Mustache Cookie Cutter ($2) from Bake It Pretty. They also have mustache lolly molds!


Mustache Moustachio Sugar Cookies ($25) from Sugar Cookie Couture


Mustache Sugar Cookies from Coastal Cakery in Delaware


Mustache Cookie Cutter ($13) from Copper Gifts

Tomato Salad 2

title
I’ve been talking about tomatoestomatoes and the media, my funny/strange ways with tomatoes, and a series of tomato salads that keep these fruit in the spotlight (and away from my greens!). And why not? It’s been quite warm of late (typhoons then this heat...the weather is leaving me befuddled) and the tomatoes are almost jumping of their own accord into my market bag, so I think it’s apt that I post about my tomato salads.

As I said in my last post, I like my tomatoes in salads of their own, away from my greens, and of fairly simple preparation. If I’ve found really excellent tomatoes, or if I’m hungry and can’t be bothered to prepare anything that requires utensils or washing up, then I just have tomatoes with salt. Effortless and unbelievably delicious...it also brings back fond memories of the days before I could cook ;) My Tomato Salad 1 is just a small step up from this :)

If I have a whole bunch of tomatoes that needs to be used up right away, or if the mood strikes me, I slow-roast them in my oven. This method is also good with less than stellar tomatoes as it concentrates the sugars in particular and the flavor in general. It is also cheaper to do this than to buy fancy (and imported) bottled sun-dried tomatoes. You can also control how dry you’d like your tomatoes...I prefer mine semi-dried, with a little “meat” still on them.

And then I have my second tomato salad to trot out...

Tomato Salad 2
  • 250 grams cherry tomatoes (or other tomatoes of your preference – different sizes and colors are good -- of roughly the same volume)
  • 1 small red onion
  • Extra virgin olive oil
  • Balsamic vinegar
  • Sea salt
  • Freshly cracked black pepper

- Slice tomatoes: no rules here – slice them as haphazardly or as uniform as you’d like. For these cherry tomatoes I left the smallest ones whole and sliced the majority in half...for the biggest ones I cut them in quarters.
- Slice the onion into thin half moons – as thin as you can manage.
- Toss onions and tomatoes together and dress with a couple of good glugs of olive oil and some dashes balsamic vinegar. Sprinkle with sea salt (as good a finishing salt as you have – and don’t be shy about it) and freshly cracked black pepper. I always do this to taste but if you want a guide just use 3 parts oil to 1 part vinegar, toss, taste, and adjust. Toss carefully...you don’t want battered tomatoes!

This is another way I like my tomatoes – with onions. Good and proper, breath-busting, red onions. Held together with sweet balsamic vinegar, olive oil, and salt and pepper (lots!) this salad is not shy with its flavour. It’s wonderful with anything grilled or fried...though we’ve had it with everything from roast chicken to adobo and it goes splendidly with those too.

For this salad I use any nice or interesting tomatoes that come my way. I’ll get different kinds, shapes, sizes, colors (I sometimes like to add some green tomatoes here) and cut them up into random chunks (just trying to remain in the vicinity of the same size). I used cherry tomatoes in this particular one because I came across some cute specimens in the market :) So don’t limit yourself! Feel free to grab what looks good to you. Some also prefer to “de-fang” their onions by soaking them in water and salt (then rinsing and draining) to remove some of the bite, but it’s exactly that raw-onion-bite against the sweet tomatoes that I love in this salad, just make sure you slice them as thin as you can.

More tomato salad coming soon! Happy weekend everyone :)

Tomato Salad 1

title
I have this funny thing about tomatoes and salads. I love tomatoes and tomato salads, but I don’t like tomatoes in salads. Does that make sense? It makes perfect sense to me. I find that tomatoes leave my salad greens a soggy mess. Perhaps I’ve been a victim of one too many soggy restaurant salads, or maybe I just take after my mother who is the consummate “on the side orderer”***, but in our home tomatoes are served separate (I’ll usually make one tomato salad and one green salad...which C will eventually mix together on his plate).

Good tomatoes are fantastic on their own anyway, and it is one of my great pleasures to enjoy them this way (and if they are not so brilliant? slow-roast them and watch them transform!). It starts with buying the best tomatoes you can – cheery organic ones, big buxom hydroponics, interesting varieties and colors...let your tastebuds be your guide. Then bring them home and place them in a pretty dish in a cool place (you can even use this as a centrepiece of sorts and not have to buy pricey flowers). Do not place them in the refrigerator! This will destroy their texture and flavour.

In celebration of the tomato and my funny habits towards them, I am sharing my three favourite tomato salads (along with variations and such) over the course of three posts...a tomato series :) I must warn you...they are extremely simple! No elaborate techniques here...

This first salad is the simplest and also the one I have been enjoying the longest. Taught to me by a cousin from Spain, it is too easy to even warrant the writing down of a recipe...but too good not to.

Tomato Salad 1
  • A very good tomato
  • The best extra virgin olive oil you have
  • The best finishing salt you have (I like the flaky kind so there is more of a salty crunch)

- Slice the tomato into medium slices (you can go thinner but I like a meaty bite for this salad). Spread on a plate. Drizzle with olive oil. Sprinkle with salt – be generous, the salt makes the tomatoes shine.
- Serves 1.

Because this salad is so simple it is essential to use the best ingredients you have or are available to you. The combination of the tomatoes' flavour and natural sweetness, with the fruity olive oil, punctuated by the salty crunch is really nothing short of magic. There is no fancy cooking or flavourings to hide less than stellar ingredients. Times are tough though so don’t go breaking the bank to get the most expensive olive oil or salt you can find! Work with the best you have or can afford – that is what I do and the gourmet cops haven’t come knocking yet :)

Variations:
- Add some basil and fresh mozzarella and you have an Italian Caprese salad!
- You can also add an acid, like balsamic or red wine vinegar if you prefer. For this salad I like it just the way it is :)
- Experiment with different tomatoes, oils, and salts (try smoked salt!).
- Add procuitto and omit the salt.

Stay tuned for my next two tomato salads!

This is my entry for Weekend Herb Blogging. This event was originally created by Kalyn and it is now in the care of Haalo. This week it's being hosted by one of my favorite bloggers, Anh :)

To those of you who watched my little tv interview on Studio 23 on Sunday: Thank you! I hope you enjoyed it and I hope you didn’t count my “ums”! I’m not the most tv-savvy person...I’m usually behind a laptop and not in front of a camera ;) To those of you who have asked about a video: I’ll see if I can get one! :) To those who have asked if the Rogue magazine write-up will be available online, I will keep you posted on that too (it should be online once their September issue is on the stands)!

***People who order their dishes with every speck of sauce/dressing/garnish/whatnot “on the side”.

The Mixing Bowl: Strawberry and Nectarine Pie by Ingela P. Arrhenius

Today's recipe for Strawberry and Nectarine Pie comes from illustrator extraordinaire, Ingela P. Arrhenius. Based in Stockholm, Sweden, Ingela's colorful and playful designs have appeared on everything from posters to chocolate milk boxes and everything in between.

In the past, she has created illustrations for products such as greeting cards and stationary, as well as patterns for children's apparel and roller blinds. Her work graces the pages of magazines and children's books, which are often written by her talented husband, and even show up on postage stamps and yogurt containers!


Inspired by art of the 50's and 60's, Ingela's work is so cheerfully retro that it makes me feel all warm and fuzzy inside. Her illustrations always make me smile, so I was really thrilled that she agreed to contribute a recipe to Dessert Girl! When she sent over the illustration for the recipe, I instantly fell in love with it! I want to print it out and put it on my wall! I'm so excited to get the chance to share her work with you! You can find more images after the jump or on her Web site, right here. Thanks, Ingela! [To see the recipe in a readable, large-print format, just click on the image.]


Recipe Helpers: Ingela mentioned to me that although this recipe mentions using 5 nectarines, she only used 3 and that was enough, so 5 is not a strict requirement.

If you need help converting the measurements, click here for a nifty conversion calculator.

Note on The Mixing Bowl: I failed to mention this previously, but I thought that I should fill you in on what The Mixing Bowl series is really all about. Basically, I love seeing people making and sharing their favorite recipes. I also really like the idea of featuring and collaborating with people whose work I admire. The Mixing Bowl combines both of those ideas. Not only do I get to share yummy dessert recipes with you, but I also get the opportunity to feature the artists, writers, designers, and people that I love and admire! What could be better? I hope you enjoy it as much as I do!)


There are more Ingela images after the jump.


Tomatoes and the Media

title
Such an ominous title! The tomatoes one usually equates with the media are of the rotten variety... figuratively thrown at their ill-fated targets. But, as you can see here, these tomatoes are in good spirits – fresh, sparkly, and ready for anything.

I can never resist cherry tomatoes, especially when they come in different sizes (from cherry to blueberry), shapes (check out the elongated ones in the foreground), and colors (from brilliant reds, to pale orange, to green). I found these ones at the Sunday market in my neighbourhood. So no, these were not a sweet gift from the media :)

I do have two media mentions to share though, both being occasions about which I was fairly excited/nervous (eep!). I'm happy to report that, so far, no rotten tomatoes in sight!

The first is a feature on food bloggers in this month’s issue of Rogue magazine (their 2009 Appetite issue). I have mentioned Rogue before (over here) and since then they have just gotten better and better. A more interesting and cutting edge local magazine I would be hard pressed to find. And I’m not just saying that because it was through their shoot that I got to meet awesome veteran photographer Neal Oshima, oh no. Not even because they bought me the sweet smelling watermelon I posed with (yes, me and a watermelon, proceed with caution!), no no. I say it because it’s true...it’s always a pleasure to read through Rogue :) Why was I nervous? Because I was desperate that I not turn into a blathering dork in front of afore-mentioned awesome photographer (who also happened to be really nice and funny!). To this day I wonder...in any case, it was a very good watermelon!

I’m there with 9 other food bloggers from these parts: Marketman of Market Manila, Lori of Dessert Comes First, Anton of Our Awesome Planet, Spanky of Manila Boy, Ivan of Ivan About Town, Christine of Hundred Pound Foodie, and Franco, Paul, and Mariko of Table for Three Please. The write-up was done by a good food-loving friend (who I met through blogging!) who also happens to be a great writer (and she did a terrific job!). Yay :)

Now, the second...the second actually involved a lot more nervousness. Why? Because I haven’t really been on TV much. At all. Gulp. But you only live once so I decided to be bold and say yes! It’ll just be a short interview about this blog with one of the most charming hosts that ever walked our shores (yes, she is just as lovely as she looks!)...so if you’re curious, and in the Philippines, tune in to Studio 23 this Sunday, August 9, at 7:00pm :) Hopefully there will be no rotten tomatoes!

As for the tomatoes in the photo? These went into one of my favourite tomato salads...I have this funny thing about tomatoes and salads. But that’s for another day...

Girl Scout Cookie Blizzards

This is my third ice cream post in as many weeks, so you know that it must be summer, despite what the weather report says. (I actually prefer cooler weather, so, if you ask me, this has been the greatest summer ever!) Anyway, I had to tell you about the limited-edition blizzards that Dairy Queen is offering this summer! You have probably guessed it by now. Girl Scout cookie blizzards!! Yum! Trans fat goodness! Last month DQ featured Tagalong blizzards and this month freezer friendly Thin Mints are on the menu! Even with my aversion to trans fats, I did try the Tagalong blizzard last month and was not disappointed! Totally worth it! I can't wait to try the Thin Mint version! Oh, and even though these were supposed to be available for a limited time, it looks like DQ is still offering the Tagalong flavor, so if you didn't make it to DQ last month, it's not too late!


On a side note, last month a goofy picture of me appeared on I Heart Handmade . . .because I heart handmade. Anyway, if you're into handmade items, check it out. It's a great site for crafty folks and the people that love them. Thanks, Marichelle!

Fresh Chanterelles here now!

title
Just a quick note to say guess what landed on our shores today! Well, not quite today, but today was when I discovered that they were here. Fresh chanterelles!!! Yes, it's been that long since the previous time I came across them at a local specialty food store. And it's been that long since I have been checking back to see if they have returned.

And today, when I was looking for some fresh thyme, these beloved forest creatures caught me totally by surprise. Fresh chanterelles are, as you can surmise by now, not regularly available here. My chanterelle cravings are usually sated vicariously through this blog. But today...today they are mine!

Now, to anyone who actually is lucky enough to have these mushrooms grow near them, know that I use the term "fresh" quite loosely. These specimens are imported so may be less sprightly for their long trip over to the tropics. But having them here, neither frozen nor dried, is thrill enough for us!

If you are in Manila, you can find these lovelies at Santis Delicatessen Rockwell branch...while supplies last. They are quite pricey (at P1000++ per kilo) but you can purchase 100-200 grams and enjoy them anyway :) Or splurge and freeze what you won't use immediately.

We had these for dinner simply sauteed with some butter, garlic, parsley, and cream alongside a roast chicken that C cooked. Happy Sunday indeed!